00197457-01_IM_EDM_2.2_en.pdf - 第18页
EDM V2.2 / I nstal lation M anual 10/2013 Edit ion 18 5.3 Step- by - step U pgrade of I ndividual L ines Since it is not a l wa ys possi ble to per form a simultane ous upgra de ac ross all t he lines, ED M provides a st…
EDM V2.2 / Installation Manual 10/2013 Edition
17
5 Upgrading to the EDM 2.2 Version
This chapter describes which steps you have to attend when upgrading from previous software
versions.
5.1 Conditions / Downward Compatibility
Installing different versions of EDM on Master and Client should be avoided. If different versions of
SIPLACE Pro are used on the EDM Master and the EDM lines, some restrictions apply because
the format of the data transferred depends on the SIPLACE Pro version used. During an upgrade,
the Master Server, all Line Servers and all Clearing Pools must therefore be converted to EDM 2.2
(and thus to SIPLACE Pro 11.1).
EDM 2.2 can use all templates that were created for EDM 1.1 or later, as well as custom workflows
from EDM 1.1 or later.
CAUTION
Please read section Notifications / Rules… in the EDM User Guide (item no.:
[00197458-xx]) before converting any filter from EDM 2.0 or earlier to EDM 2.2.
Existing filter settings on the EDM Master are retained and updated, but it is recommended that
you manually inspect the converted file (it may be that your own custom changes have been
superseded by improvements to the default configuration).
5.2 Simultaneous Upgrade over All Lines
Where possible, production on all the lines to be upgraded should be suspended for the duration of
the upgrade. As soon as all the components have been converted, production can be restarted.
Perform the upgrade operation as follows:
1. Interrupt production on all the lines to be upgraded.
2. Transfer all notifications from the Line Servers to the Master Server.
3. Accept/reject all notifications in the Clearing Pool.
4. Close all EDM applications.
5. Install SIPLACE Pro and then the EDM Master Server (with Configuration Server) on the
Master Server.
6. Install SIPLACE Pro and then EDM Line Server on all lines. After installing an EDM Line
Server, the production on that EDM Line can be resumed immediately.
CAUTION
To avoid all notifications still in the Clearing Pool from being lost, the EDM database
must not be deleted.
7. Resume production.
Simultaneous upgrade across all the lines is to be preferred to a step-by-step upgrade of individual
lines (insofar as this is possible).
EDM V2.2 / Installation Manual 10/2013 Edition
18
5.3 Step-by-step Upgrade of Individual Lines
Since it is not always possible to perform a simultaneous upgrade across all the lines, EDM
provides a step-by-step upgrade procedure that permits restricted operation of an EDM 2.2 Line
Server in conjunction with a Master Server from an earlier version for the duration of the upgrade.
CAUTION
This compatibility mode should not be used for long-term mixed operation of an EDM 2.2
Line Server with a Master Server from an earlier version of EDM.
During the step-by-step upgrade, it is still possible for an EDM Line Server to pull/push data from
the Master Server. However, it is not possible to transfer modified objects into the Master Server.
All the notifications that arise during that period are saved in the Clearing Pool and can be
transferred to the EDM Master Server when the step-by-step upgrade has been terminated by
upgrading the Master Server.
It is recommended to carry out gradual upgrading of individual lines as follows:
1. Prepare another computer to hold a temporary, standalone EDM Configuration Server (EDM
2.2) and run the EDM Configuration Server setup type EDM Configuration Server. If another
computer or virtual machine is not available, the Configuration Server may be installed along
with the first upgraded EDM Line in step 5. The current configuration should be copied to the
new Configuration Server before installing EDM – otherwise it will not be upgraded correctly.
2. Interrupt production on one of the lines to be upgraded.
3. Transfer all notifications from the Line Server of this line to the Master Server.
4. Upgrade SIPLACE Pro to the new version on the Line Server of this line.
5. Install the EDM Line on the Line Server of this line and make it using the standalone
configuration server. If you have chosen not to use a standalone server for upgrading the first
Line server, proceed as follows instead:
► Select the "EDM Line" and "Configuration Server" options within the "Custom Setup" setup,
in order to provide a Configuration Server.
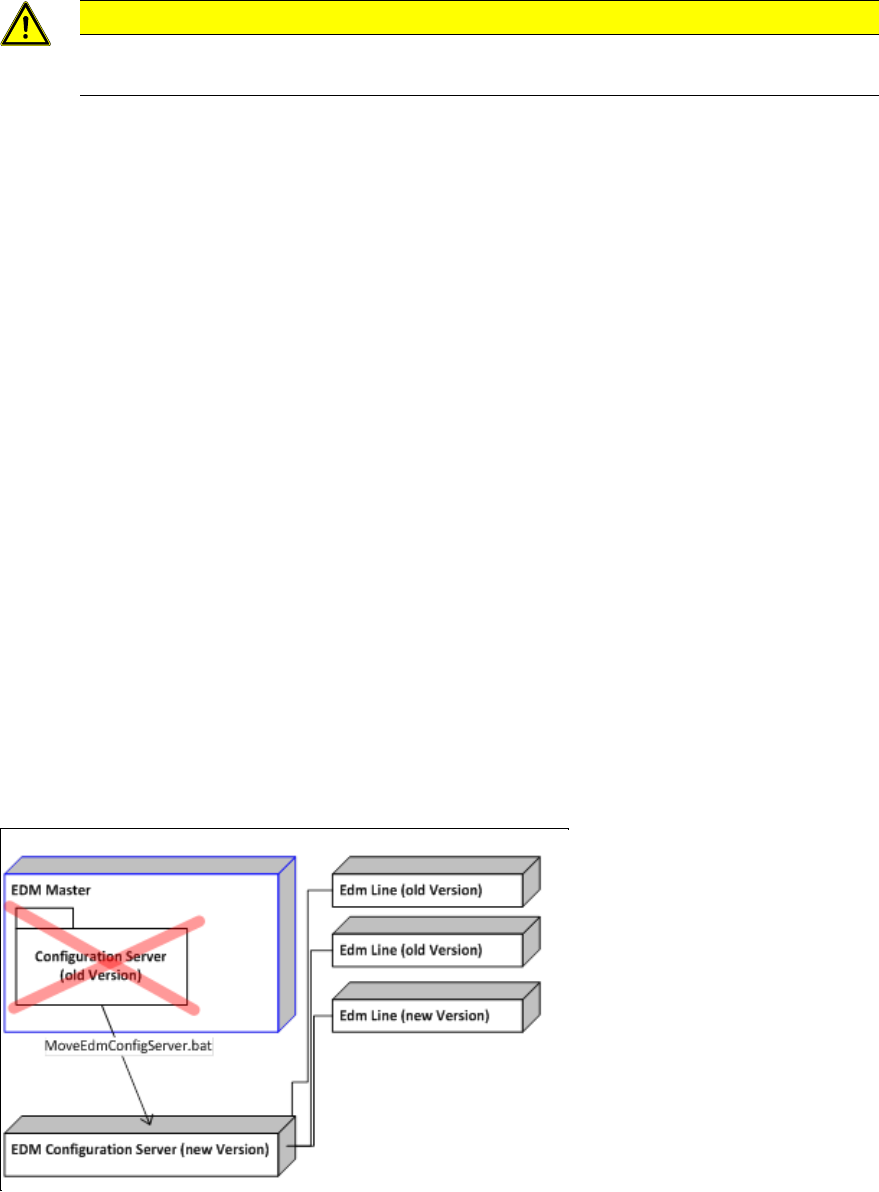
6. If the old version already uses a Configuration Server (e.g. EDM 2.0), run the script
MoveEdmConfigServer.bat, located in the Tools subdirectory of the EDM installation path, on
the temporary Configuration Server to move all the EDM Clients attached to the old
configuration server as well as all configuration settings to the temporary EDM 2.2
Configuration Server.
7. Resume production on this line.
Figure 6-1: Configuration Server distribution after step 6, if upgrading from EDM 2.0
8. Repeat steps 1-5 for the other lines to be upgraded.
EDM V2.2 / Installation Manual 10/2013 Edition
19
As soon as each EDM Line Server has been upgraded, you should proceed to update the EDM
Master:
CAUTION
To avoid all notifications still in the Clearing Pool from being lost, the EDM database
must not be deleted.
9. Shut down the EDM service and stop all EDM applications on the Master Server.
10. Upgrade SIPLACE Pro on the Master Server.
11. Upgrade SIPLACE EDM on the EDM Master Server using the EDM Master or EDM Master
with Clearing Pool setup type.
NOTICE
You might also want to keep the current configuration server. In this case, select
"Custom Setup" and choose the EDM Master and – if needed – the EDM ClearingPool
option, but leave the Configuration Server checkbox unchecked. Step 13 should be
omitted then.
12. Restart the Master Server.
13. Conclude the transition to the new Configuration Server instance with one of these options:
► Manually change the Configuration Server setting on all EDM Lines that used the
temporary Configuration Server to point to the Master Configuration Server (see EDM User
Guide, item no.:[00197458-xx].
► Run the script MoveEdmConfigServer.bat, located in the Tools subdirectory of the EDM
installation path, on the new Configuration Server to move all the EDM Clients attached to
the temporary configuration server as well as all configuration settings to the local
Configuration Server.
CAUTION
This script deletes all settings on the local configuration server, overwriting them with
copies of the source configuration server.