SP08.pdf - 第19页
SPARE PARTS LISTING Item Part No. Filters Filter Set (all 3 items) 135350 Carbon Brushes 230V Auto Shut-off Carbon Brushes 135351 110V Auto Shut-off Carbon Brushes 135352 Suction Hose 2 Metre x 38mm Hose (complete with e…

3rd Stage Filter Located at top under motor unit, Figure 1 refers.
Tools Required: 1x Pozidrive screwdriver
1. To gain access to the 3rd Stage Filter, see General Servicing and
Maintenance Information, Access.
2. Unplug the motor unit from control box and raise control box to the vertical.
3. Pull off the internal link hose on top of motor unit.
4. Lift off by-pass cooling assembly.
5. Lift off motor unit (via central pick-up point).
6. Lift off the fabric filter 3rd stage filter.
7. Reverse procedure to replace.
High Efficiency
Particulate Filter
This filter should not normally need changing over the lifetime of the machine.
Located on the under side of the motor unit, Figure 1 refers.
Tools Required: 1x Pozidrive screwdriver
1x 10mm socket or wrench or 10mm nut spinner
1. To gain access to the HEPA Filter, see General Servicing and Maintenance
Information, Access.
2. Unplug the motor unit from control box and raise control box to the vertical.
3. Pull off the internal link hose on top of motor unit.
4. Lift off by-pass cooling assembly.
5. Lift off motor unit (via central pick-up point).
6. On clean work surface invert power unit to expose H.E.P.A. Filter.
7. Whilst holding onto H.E.P.A filter cartridge (with gloved hand) undo the
central securing nut (M6) and place to one side.
8. Lift off H.E.P.A. filter cartridge.
9. Dispose of cartridge in non-pervious sack and dispose off as per local Health
& Safety requirements/Environmental laws and regulations.
10. Replace with new H.E.P.A. filter cartridge and ensure that the rubber seal is
intact and seal with the aluminium adapter spinning.
11. Reverse procedure to replace.
Disposal of Filters
As a precaution used / spent filters should be placed in non-pervious red
sacks, clearly marked and disposed of in the manner recommended in your
locality for such substances.
16 DEK Printing Machines Ltd Issue 3. Nov 00
DEK VACUUM AND FILTRATION UNIT SP08
INSPECTION AND REPLACEMENTS
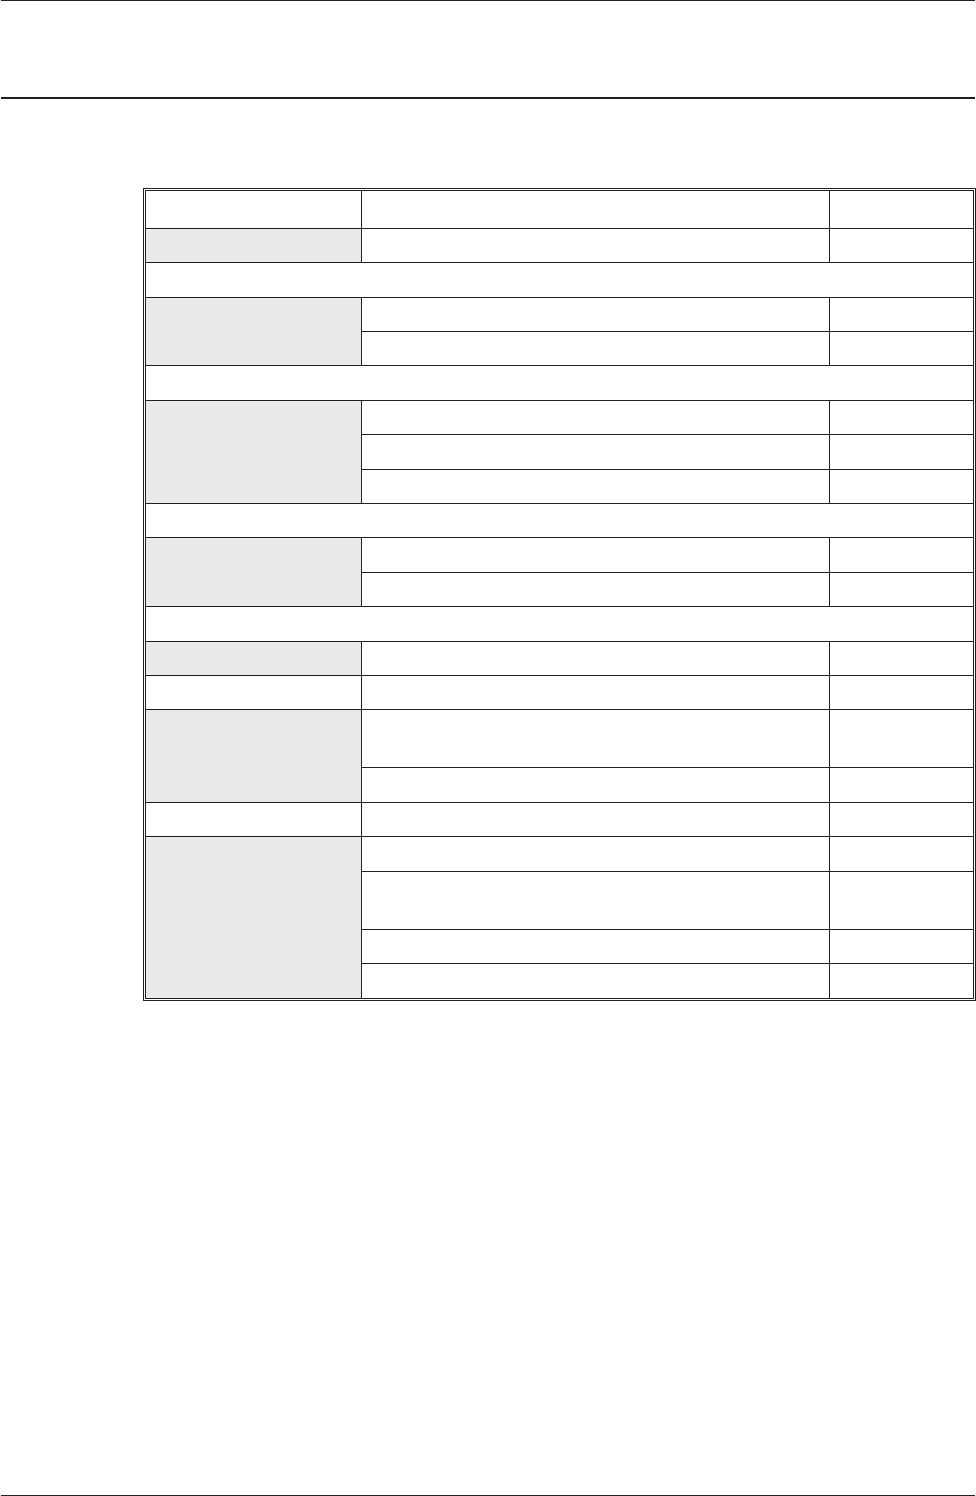
SPARE PARTS LISTING
Item Part No.
Filters Filter Set (all 3 items) 135350
Carbon Brushes 230V Auto Shut-off Carbon Brushes 135351
110V Auto Shut-off Carbon Brushes 135352
Suction Hose 2 Metre x 38mm Hose (complete with ends) 135353
5 Metre x 38mm Hose (complete with ends) 135354
15 Metre x 38mm Hose (complete with ends) 135355
Vacuum Pump Units Acoustic Motor (2 required) 230V 50Hz 135356
110V 60Hz 135357
Control Box Control Box (complete assembly) 135358
Front Control Panel Front Control Panel (complete with flying lead and
connector)
135359
Hour/Service Meter 135360
Rear Connector Panel Rear Connector Panel (complete) 135361
5 Meter Mains Lead (complete with plug and
socket)
135362
13 Amp Cartridge Fuse 135363
500 mA Fuse 135364
Issue 3. Nov 00 DEK Printing Machines Ltd 17
DEK VACUUM AND FILTRATION UNIT SP08
SPARE PARTS LISTING
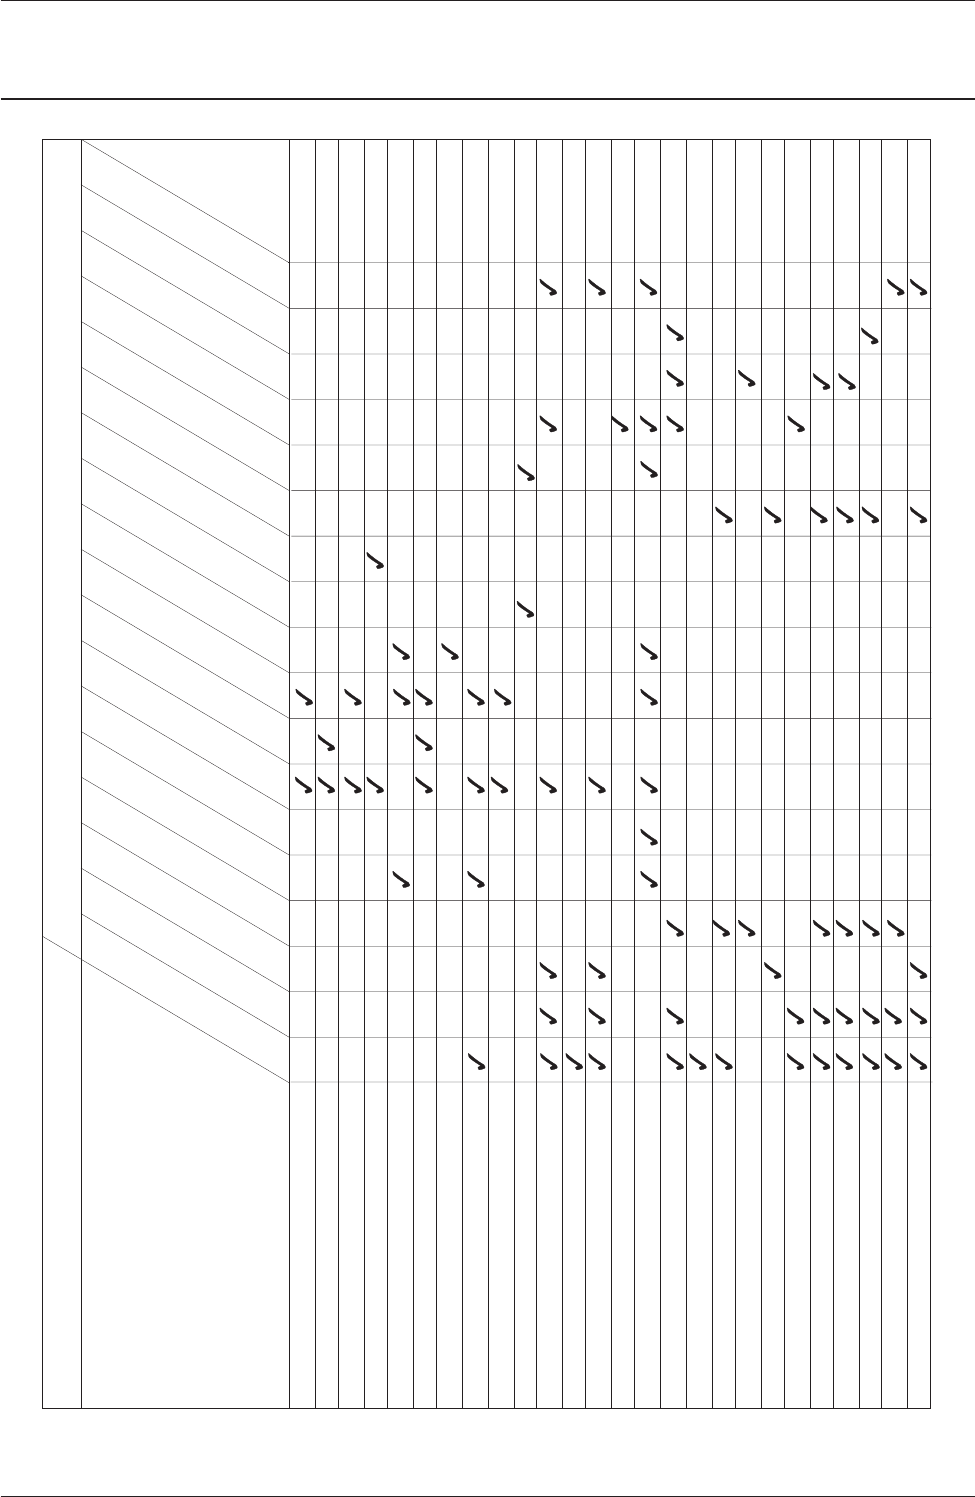
FAULT FINDING DIAGNOSTICS CHART
18 DEK Printing Machines Ltd Issue 3. Nov 00
DEK VACUUM AND FILTRATION UNIT SP08
FAULT FINDING DIAGNOSTICS CHART
Machine Inoperative
Machine Intermittent
Speed Control Not Working
High Pitched Motor Noise
Low Pitched Motor Noise
Remote Control Not Working
Suction Weak
Odour escaping from Machine
Whistling Sound
Excess Noise
Not Standing Firm
Pre Filter Clogged
Front Control Panel Inoperative
Vibration
Remote Control Fused
Not Switched Off
Suction Erratic
Mains Fuse Blown
High Efficiency Filter
Granular Filter
Fabric Filter 3rd Stage
Pre Filter
Exhaust Air Hose
Suction Hose
Internal Accoustic Hose
Auto-stop Carbon Brushes
Pump Unit to Granular Seal
Base Foot
Power Controller
On/Off Switch
Variable Resistor (Airflow Speed Control)
Interference Suppressor
By-pass Pump Motor
Relay
Fuse (Mains)
Fuse Remote Control
Diode
Control Knob
Mains Cable
Remote Control Socket
Remote Control Flex
Remote Control Switch from DEK 265
Motor Unit Control Box Connection
Front Panel to Control Box Connection
Fault
Check