00197279-03_SM_Glue-Feeder_EN.pdf - 第12页
Replacing Spare Parts Sliding film 3.3.1 Removing the Sliding Foil 12 Service Manual SIPLACE Glue Feeder 3.3 3 . 3 S lid in g f ilm Sliding film Required spare parts Sliding foil, X-feeder JUM- S-06LY, item no. 03019 604…
Replacing Spare Parts
Prerequisites
Service Manual SIPLACE Glue Feeder 11
3
3 Replacing Spare Parts
Replacing Spare Parts
3.1
3.1 Prerequisites
Prerequisites
To correctly repair a glue feeder, you need an ESD compatible workplace with a stable, even and clean
work surface.
3.2
3.2 Tools and Equipment Required
Tools and Equipment Required
The following tools and equipment are needed when replacing spare parts on the glue feeder.
Tools
▪ Flat bladed (slotted) screwdriver
▪ Phillips screwdriver
▪ TORX screwdriver size T8
▪ Allen key size 1.5, 2, 2.5
▪ 1x each open-ended wrench size 7, 8, 11, 14, 24
▪ 2x each open-ended wrench size 13, 17
▪ Antistatic tweezers, item no. 00377394-01 (service kit)
Special tools
▪ Heating key (on the glue feeder)
▪ Plunger service tool, item no. 03101819-xx
▪ O-ring service tool, item no. 03101816-xx
▪ Sliding foil remover
Tools
▪ Grease (Barrieta L55/3, grease for O-rings) 50ml, item no. 03095880-xx
▪ 1 Grease for O-ring NBR inside (special grease for actuator O-ring) 50 ml, item no. 0310206801-xx
▪ LOCTITE 243
▪ O-rings for plunger, item no. 03094179-xx
▪ Actuator O-rings (plunger seal NBR inside 2x1.7 PS83NBR70), item no. 03101821-xx
▪ Cleansing tissues
▪ Disposable protective gloves
Replacing Spare Parts
Sliding film 3.3.1 Removing the Sliding Foil
12 Service Manual SIPLACE Glue Feeder
3.3
3.3 Sliding film
Sliding film
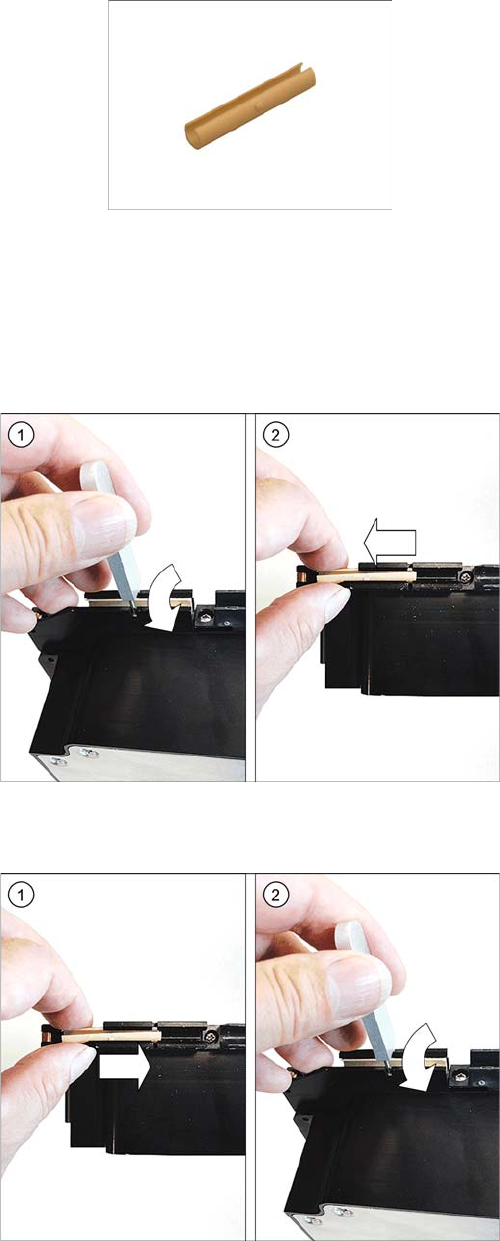
Required spare parts
Sliding foil, X-feeder JUM-S-06LY, item no. 03019604-xx
Required tools
▪ Sliding foil remover
3.3.1
3.3.1 Removing the Sliding Foil
Removing the Sliding Foil
3.3.2
3.3.2 Fitting the Sliding Foil
Fitting the Sliding Foil
► Place the glue feeder carefully down on its side, onto
a stable, level and clean surface.
► Place the sliding foil remover into the sliding guide, as
shown in the diagram.
► Lever the sliding foil out of the engaged position.
► Pull the sliding foil out of the sliding guide, towards
the front.
► Press the sliding foil slightly together.
► Push the sliding foil into the sliding guide, from the
front, as far as the end stop.
► Turn the sliding foil, until the slit can be fully seen and
the sliding foil engages audibly.
Replacing Spare Parts
3.4.1 Removing the Sliding Guide Rear Sliding Guide
Service Manual SIPLACE Glue Feeder 13
3.4
3.4 Rear Sliding Guide
Rear Sliding Guide
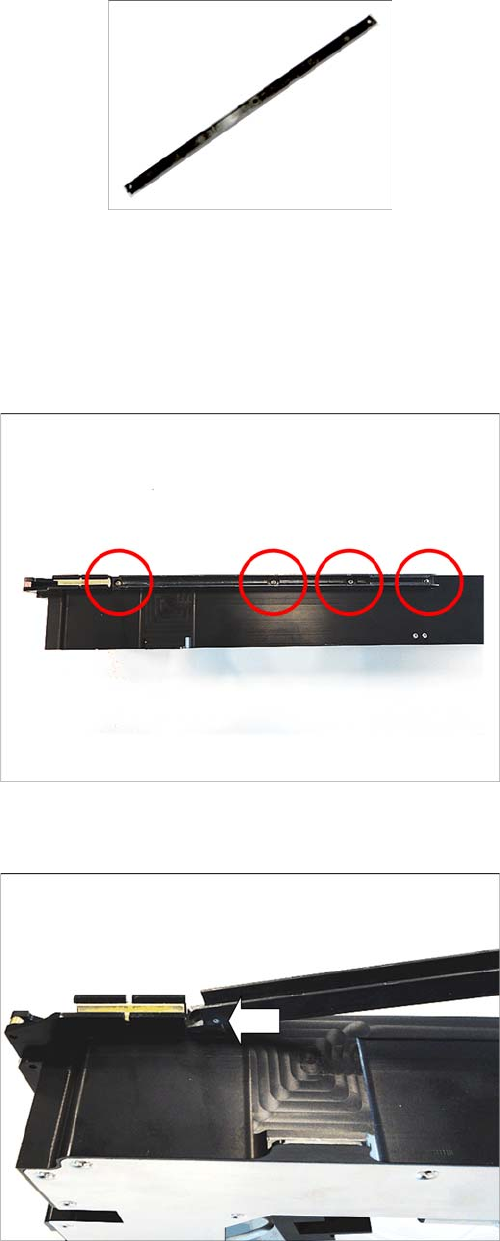
Required spare parts
Sliding guide/rear L200, item no. 03003994-xx
Required tools
▪ Phillips screwdriver
3.4.1
3.4.1 Removing the Sliding Guide
Removing the Sliding Guide
3.4.2
3.4.2 Fitting the Sliding Guide
Fitting the Sliding Guide
► Turn the glue feeder so that the underside is at the
top.
► Remove the 4 marked screws on the sliding guide.
Use a Phillips screwdriver for this.
► Lift the sliding guide upwards and off.
► Turn the glue feeder so that the underside is at the
top.
► Fit the sliding guide onto the underside of the glue
feeder.
Make sure that the arrangement of holes in the sliding
guide corresponds to that in the glue feeder.
► Push the sliding guide, as shown, forward towards
the front sliding guide, as far as the stop.