00192156-04.pdf - 第48页
Maintenance Maintenance Instr uctions F 8 2-monthly maintenance work 03/2003 US E dition 48 8

Maintenance Instructions F Maintenance
03/2003 US Edition 8 2-monthly maintenance work
47
8
You will need the following tools, equipment and consumables for the 2-monthly maintenance. 8
– Vacuum cleaner
– Condensate drip tray
– Short-bristled brush
– Phillips screwdriver
– Set of hexagon socket spanners
– Nozzle removal tool (article no. 00311448-01)
– Whetstone / oilstone
–Scissors
– Lint-free cloths
– SIPLACE cleaning tissue (article no.: 00315253-02)
– ISOFLEX TOPAS NCA52 grease (article no. 00328369-01)
– WD40 (article no.00325833-01)
– If necessary, diaphragms for 418 (article no. 00307052-03)
and 419 nozzles (article no. 00310569-03)
– If necessary, filter insert, 5 microm. for series 112
F4 / F5 / F5HM (article no. 00355386-01)
F3 / F4 Old (article no. 00330406-01)
– New silencer for the Collect & Place head, if necessary (from article no. 00320964-01).
– If necessary, new vacuum generator for the Pick&Place head (article no. from 00305378-01).
8
8
Inspect or replace the filter cartridge 8
a Open the door to the compressed air supply.
s Place a drip tray beneath the compressed air maintenance unit.
: Close the main compressed air valve.
d Once both manometers read 0, switch the placement machine off at the main switch.
Maintenance Maintenance Instructions F
8 2-monthly maintenance work 03/2003 US Edition
48
8
Maintenance Instructions F Maintenance
03/2003 US Edition 8 2-monthly maintenance work
49
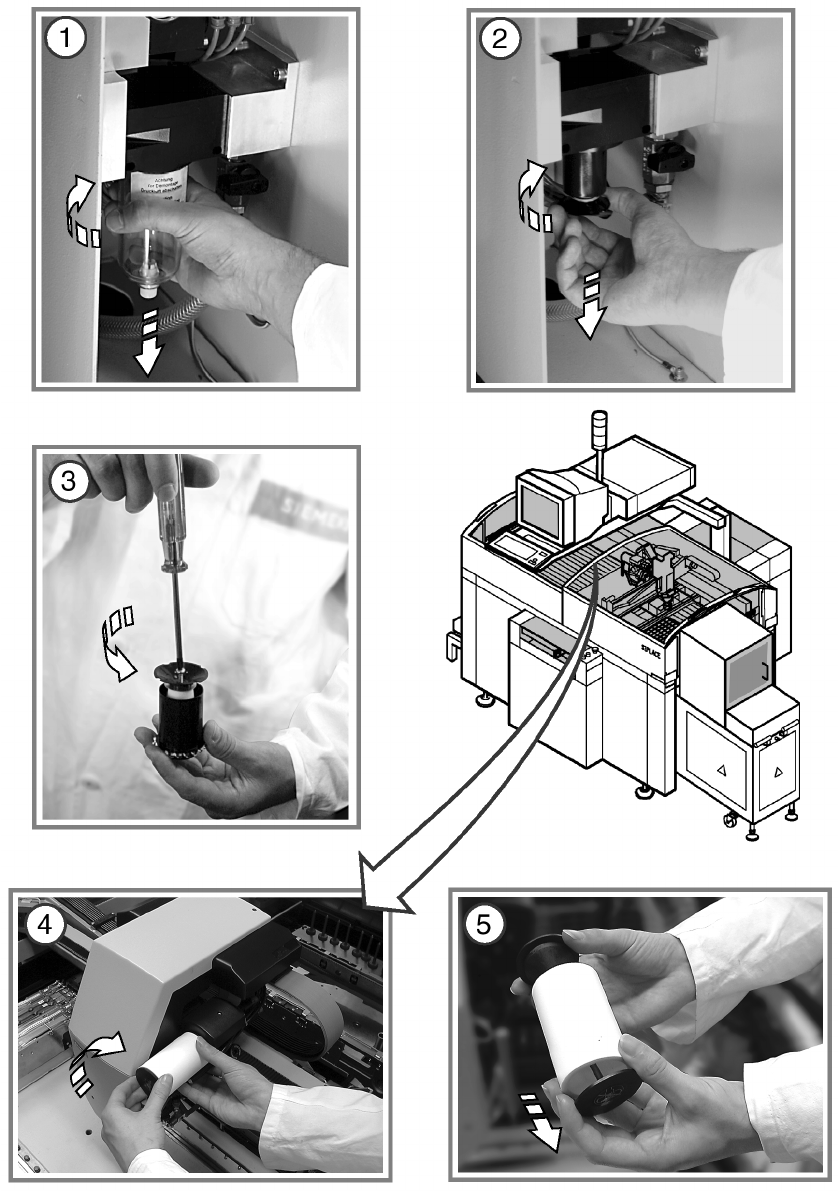
: Remove the black blanking cap by pressing down on the yellow cap release (at the back) and
turning the blanking cap counter-clockwise (bayonet fitting).
a Remove the condensate tank by pushing it up, turning it counter-clockwise and then pulling it
down (bayonet fitting).
s Unscrew the filter casing from the compressed air maintenance unit.
d Loosen the Phillips screw to remove the filter from the filter casing.
: Replace the filter if it is dirty.
: Reverse the order described above to fit the filter and filter casing.
8
: Then open the main compressed air valve again.
8
8
Inspect or replace the silencer on the Collect & Place head 8
f Check the silencer for the Collect & Place head for dirt.
If it is discolored, detach the retainer by turning it counter-clockwise.
g Replace the dirty silencer with a new one and reverse the order described above to fit.
8
8
8
8
8
8
8
8
8
8
8
8
8