AD-31 Handguns Manual.pdf - 第7页
7 108 835A Daily Operation Startup W ARNING : Hot! Risk of burns. W ear heat-protective clothing, safety goggles and/or heat-protective gloves depending on the symbol shown. 1 . At the applicator , bring the adhesive to …
6
108 835A
Description
3
4
5
6
7
1
2
4203001
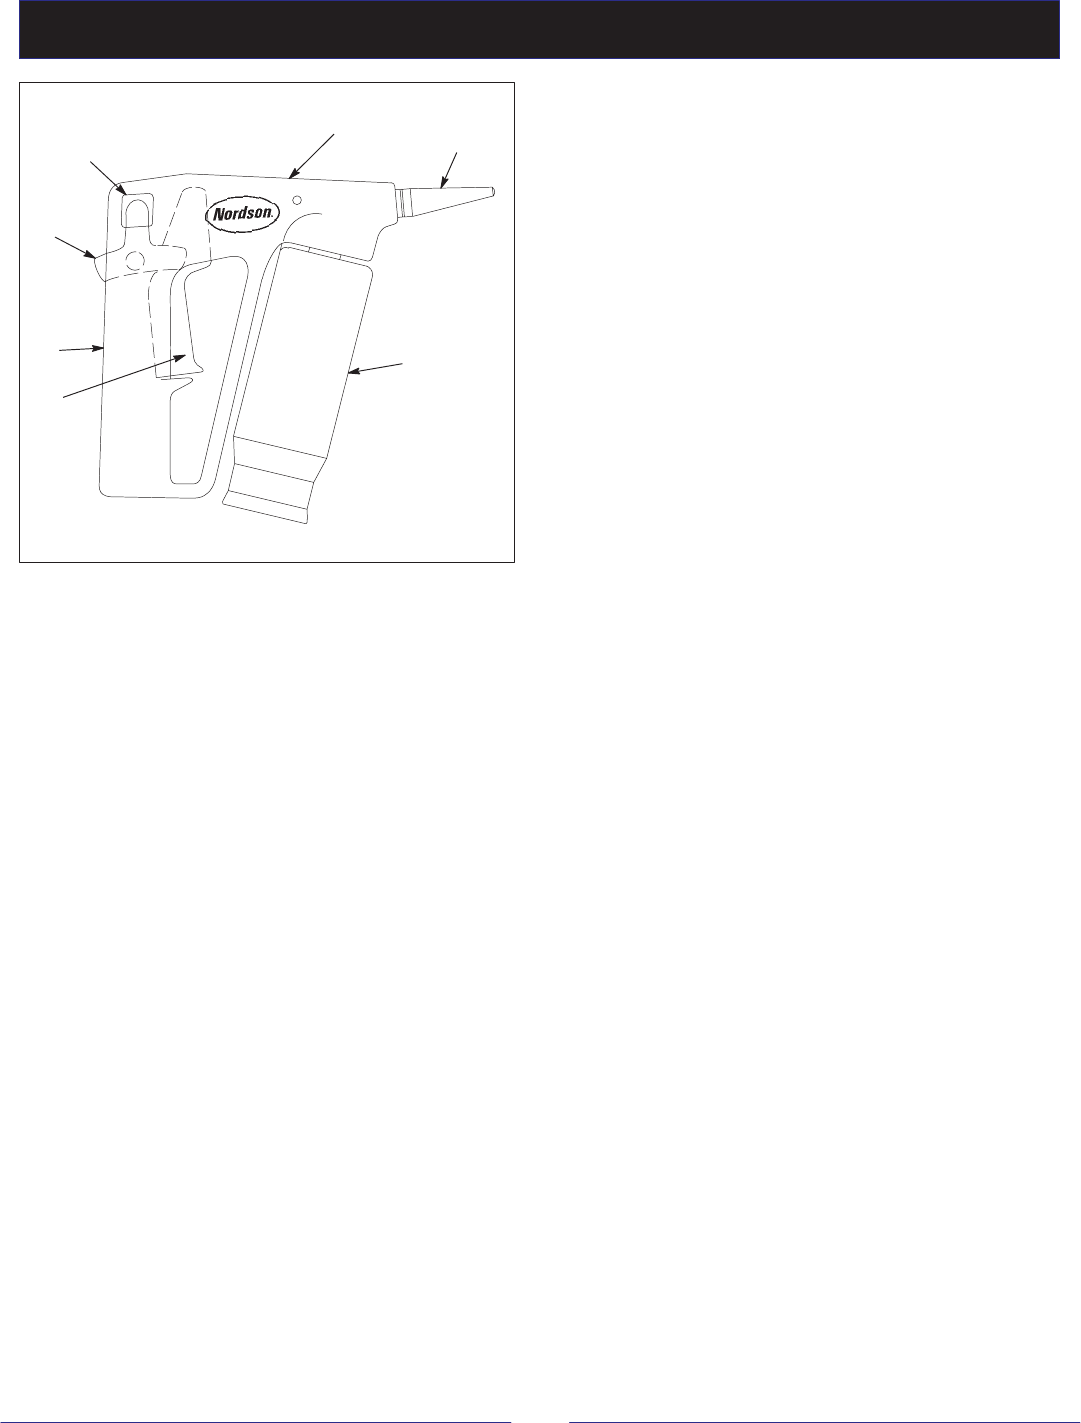
Figure 1 Typical AD-31 Handgun
1. Gun Body
2. Nozzle
3. Pivot Sleeve
4. Trigger
5. Handle
6. Trigger Lock
7. Gun Slot (for hanging
gun)
Nordson Series AD-31 Handguns may be used only for
manually dispensing hot melt adhesives, sealants, and
other thermoplastic materials.
The Series AD-31 Handguns include several models for
a variety of dispensing patterns, including solid or
foamed extrusion beads, atomized spray patterns, and
swirl spray patterns. For handling high viscosity or filled
materials, the AD-31 LBS extrusion handgun
incorporates a large ball-and-seat and larger flow paths.
Depending on the applicator design, handguns employ
either a preset thermostatic temperature sensor or an
RTD (resistance temperature detector) sensor. RTD
sensing provides temperature control precision by
reducing temperature fluctuations that could negatively
affect flow and cause char formation. A wide operating
temperature range of 65_ to 230 _C (150_ to 450 _F)
provides additional application versatility.
A typical AD-31 extrusion handgun is shown in Figure 1.
The gun consists of the following components:
S Gun Body
S Handle
S Pivot Sleeve
S Trigger Lock
S Trigger
S Nozzle
S Gun Slot (for hanging gun)
7
108 835A
Daily Operation
Startup
WARNING: Hot! Risk of burns. Wear
heat-protective clothing, safety goggles and/or
heat-protective gloves depending on the symbol
shown.
1. At the applicator, bring the adhesive to application
temperature.
WARNING: Do not swivel or trigger the gun
while it is cold.
2. Turn on the applicator pump. Adjust the system
hydraulic pressure to the value required for the
application. The recommended adhesive
hydraulic pressure range is 2.41 - 4.83 MPa (350 -
700 psi).
WARNING: For most extrusion applications,
adhesive should not project further than 18 in.
from the nozzle when the gun is fired in the
horizontal position. Otherwise, system hydraulic
pressure may be too high, resulting in poor
pattern control and harm to personnel or
equipment.
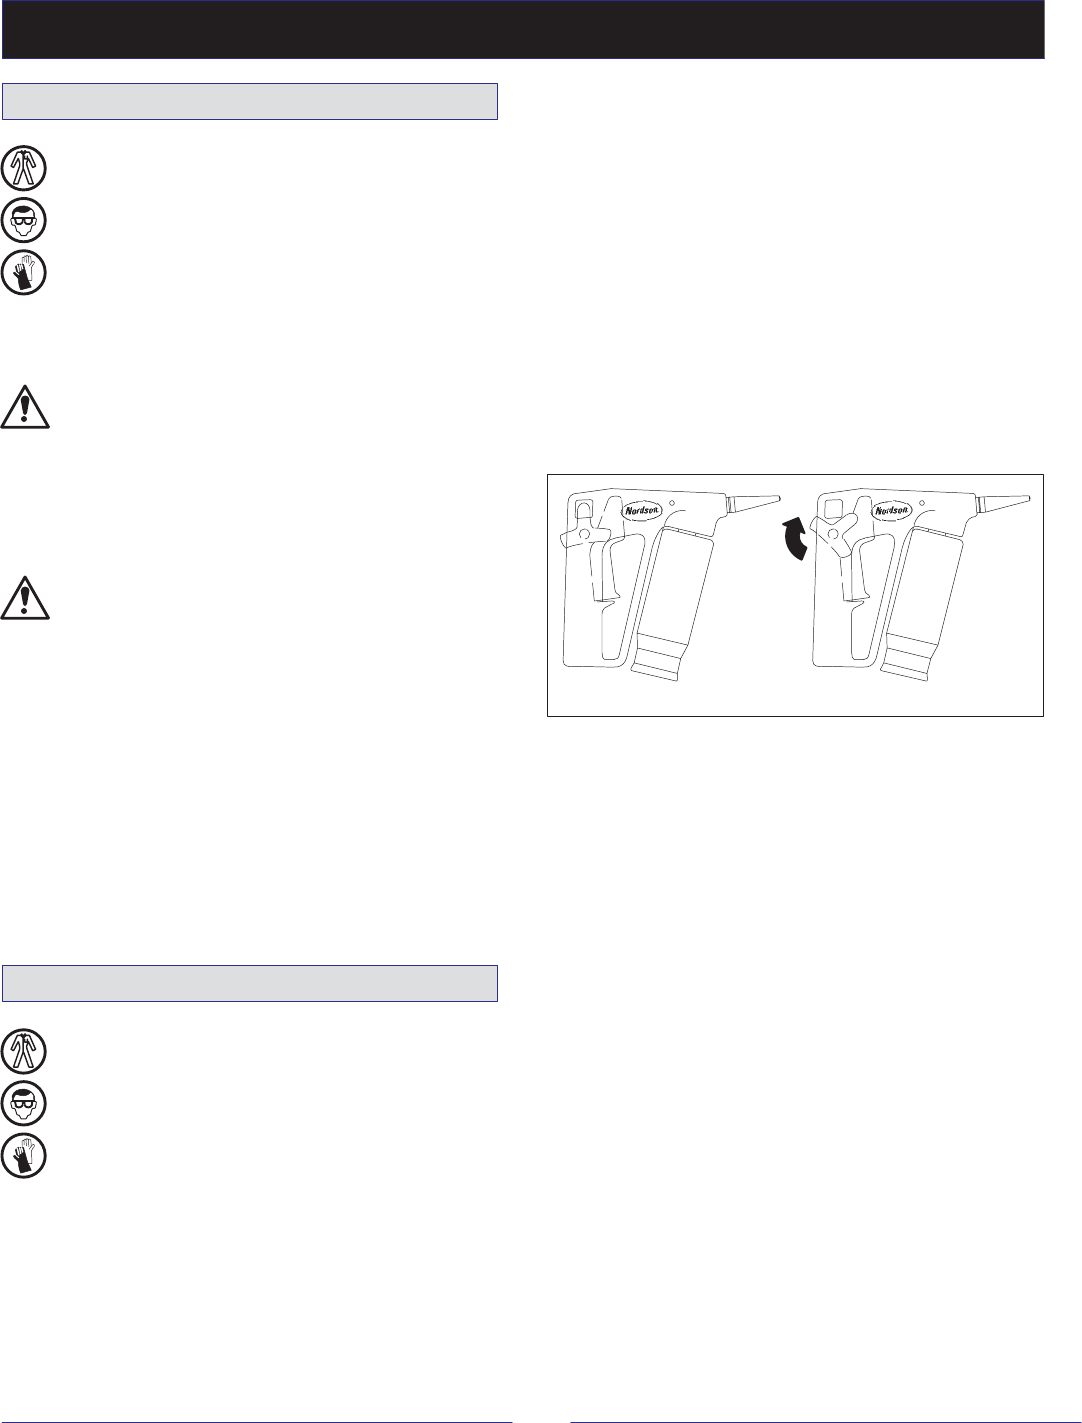
3. Place the trigger lock in the unlocked position (see
Figure 2).
4. Aim the handgun so the nozzle is pointing at the
substrate.
5. Begin dispensing adhesive by squeezing the
handgun trigger toward the handle.
6. Stop dispensing adhesive by releasing the trigger.
Shutdown
WARNING: Hot! Risk of burns. Wear
heat-protective clothing, safety goggles and/or
heat-protective gloves depending on the symbol
shown.
1. Place the trigger lock in the locked position
(see Figure 2).
2. Turn off power to the applicator pump as
described in your applicator technical manual.
S Systems with a piston pump:
Reduce pump air pressure to zero and
disconnect the supply air line to the pump.
Place the air pump ON/OFF switch in the
OFF position.
S Systems with a gear pump:
Turn the motor speed dial to 0%.
Place the motor ON/OFF (or START/STOP)
switch in the OFF (or STOP) position.
3. Place the trigger lock in the unlocked position
(see Figure 2).
4203002
12
Figure 2 Lock Positions
1. Unlocked position 2. Locked position
4. Place a suitable waste container, capable of
withstanding adhesive temperatures of 230 _C
(450 _F), on the floor near the dispensing point.
5. Aim the gun so the nozzle points into the
container.
6. Drain adhesive from the handgun by squeezing
the trigger toward the handle. Continue
dispensing adhesive until system hydraulic
pressure is relieved and the gun is drained of
adhesive. Properly dispose of the drained
adhesive.
7. Place the trigger lock in the locked position
(see Figure 2).
8. Hang the handgun by the gun slot at the top of the
handle.
9. Relieve any residual hydraulic pressure as
described in the following topic.
10. Shut down the applicator as described in your
applicator operator instructions or technical
manual.
8
108 835A
Daily Operation
Relieving Hydraulic Pressure
Remove system pressure before disassembling and
replacing any gun components.
1. Heat the system to operating temperature.
WARNING: System or material pressurized.
Relieve pressure. Failure to observe may result
in serious burns.
2. Follow the procedures described in your applicator
technical manual to relieve system pressure. In
general, relieving system pressure requires that
you perform all of the following actions that are
appropriate for your unit:
S Systems with a piston pump:
Reduce pump air pressure to zero and
disconnect the supply (incoming) air line.
Place the air pump ON/OFF switch in the
OFF position.
S Systems with a gear pump:
Turn the motor speed dial to 0%.
Place the motor ON/OFF (or START/STOP)
switch in the OFF (or STOP) position.
3. Shield the area and the operator.
4. Trigger all handguns to relieve any trapped
hydraulic pressure.
5. Place the trigger lock in the locked position
(see Figure 2).
6. Reduce air pressure to the handgun by reducing
gun air pressure to zero at the regulator (spray
and swirl guns only).
WARNING: Hot! Risk of burns. Wear
heat-protective clothing, safety goggles and/or
heat-protective gloves depending on the symbol
shown.
7. Wear heat-protective safety gloves.
8. Place a pan under the drain valve and drain the
unit manifold by following the procedure described
in the applicator technical manual.
CAUTION: Equipment damage can occur if the
applicator drain valve is turned with anything
other than a screwdriver. Use only a screwdriver
to turn the drain valve.
9. Use a screwdriver to open the drain valve.
10. Allow the manifold to drain as completely as
possible.
11. Use a screwdriver to close the drain valve.
12. Properly dispose of the drained adhesive.
Daily Maintenance
Cleaning Exterior Surfaces
Clean all exterior gun and nozzle surfaces daily. Use a
cleaning fluid such as Nordson Type R fluid.
Accumulated hot melt material forms char, which can
cause unreliable operation of the applicator.
WARNING: Risk of death or serious injury from
explosion or fire if Nordson Type R fluid is heated
above 245 _C (475 _ F). Do not use Type R fluid
on surfaces that are above 245 _C (475 _ F).