TS1254.pdf - 第6页
6 4. INSTALLATION AND OPERATION 4.1 Setu p Procedure (R efer to Figure 2) 1. Insure pressure regulator is off (set at zero ). Pull locked air regulator knob out to unlock and turn cou nterclockwise several rotations to s…

4
2. FEATURES
• Compatible with a wide range of dispensing fluids
• Pressure Relief (Safety) Valve to ensure safe dispensing
operation
• Exhaust valve to depressurize the chamber after operation
• One continuous tube for fluid dispensing from container
to the valve
• Use two tubing sizes (1/4” (6mm) and 4 mm)
• Disposable tubing is easy to replace the after dispense
operation
• No material contact with the fluid chamber or tube fitting
• Durable construction
• Cleaning is not required after the dispense operation
3. SPECIFICATIONS
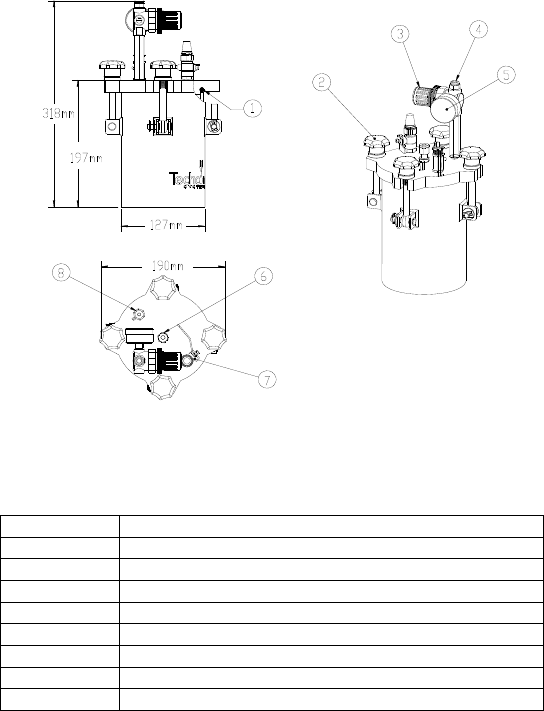
Size: 5”(127mm) x 12.5”(318mm)
Internal Chamber: 4.75”(121mm) I.D. x 6.5”(165mm)
Weight: 10.4 lbs (4.7kg)
Temperature Range: 40 °F (4.4 °C ) – 120 °F (48.9 °C)
Operating Pressure: 70 psi (4.8 bar) max.
Standard Tube Size: 1/4” OD (6mm); include with the unit
Optional Tube Size: 0.157” OD (4mm); need to buy tubing kit
part number =TS1252-4MM…Accessory
kit 4mm fitting and tubing
9
5. ACCESSORIES AND SPARE PARTS
5.1 O-Rings
The Installed O-Ring: The standard O-Ring supplied
on your Pressure Pot is made of Silicone and is intended for
applications with UV adhesive, Lubricants, Conductive and
Non-Conductive Adhesives, and various other compounds.
This O-Ring may be cleaned with Isopropyl Alcohol.
WARNING: Read material safety data sheet for any
solvent prior to use.
Optional O-ring: If your dispense material is not compatible
with Silicone O-ring, you can purchase Viton O-ring
separately
5.2 Fitting and Tubing Kits
There are two tubing sizes can be used with the TS1254
pressure pot, below are part numbers:
The 1254-250PE kit includes:
• Clear PE tube, 1/4” (6mm) OD; Qty = 10’ (3.4m)
• Black PE tube, 1/4” (6mm) OD; Qty = 10’ (3.4m)
• SS Fitting 1/4” OD Tube X 1/4 NPT ; Qty = 1piece
• Nylon Ferrule; Qty = 10 sets
The TS1252-4MM kit includes:
• Clear PE tube, 0.150” (4mm) OD; Qty = 5’ (1.5m)
• Black PE tube, 0.150” (4mm) OD; Qty = 5’ (1.5m)
• SS Fitting 4mm OD Tube X 1/4 NPT ; Qty = 1piece
• Nylon Ferrule; Qty = 10 sets
PART NUMBER DESCRIPTION
1254-VITON O-RING KIT, VITON, TS1254
PART NUMBER DESCRIPTION
1254-250PE ACCESSORY KIT 1/4", FITTING & TUBING (PE)
TS1252-4MM ACCESSORY KIT 4MM, FITTING & TUBING (PE)
8
4.3 Remove old Tubing
1. Pull air pressure regulator knob, turn counterclockwise and
lower air pressure to zero
2. Open Exhaust Valve by turning the lever up (figure 4) to
insure chamber is completely depressurized.
3. Disconnect air supply line if necessary
4. Disconnect fluid tubing from dispense valve
Note: Hold the fluid tubing in vertical position to allow
fluid inside tubing to flow back inside bottle/container.
5. Loosen the four locking knobs slowly and evenly. If
excessive effort is required, insure air pressure gauge reading
is zero
6. Unscrew tube male connector nut completely. Move nut and
ferrule along tubing about 4 inches away from the connector
body on the cover
7. Cut off tubing in between connector body on lid and
nut/ferule. Put the cut tubing with nut/ferrule aside. Take
care to accommodate drainage and spillage at the end of
tubing
8. Wipe off any excess fluid material from the cut-ends of the
tubing’s
9. Remove nut and ferrule parts from the used tube
10. Remove cover from Pressure Pot, while carefully pulling used
tubing half from the container, and set aside. Be careful to
avoid splashing and spilling from the tube end in the material
container/bottle
11. Using a disposable hand glove or tongs, carefully pull the
used-up tube from the connector body on the Lid. Pull tubing
from the inner side of cover plate. Dispose used tubing
appropriately
12. Screw the nut on the connector body. Ferrule parts may be
replaced
13. Disconnect fitting on the dispense end of tubing, and discard
used tube
5
Figure 1- Dimensions
Item Description
1 O-ring
2 Locking Knob
3 Air Regulator
4 Air Inlet port
5 Pressure Gauge
6 Fluid Inlet Port
7 Exhaust Valve
8 Safety Valve
6
4. INSTALLATION AND OPERATION
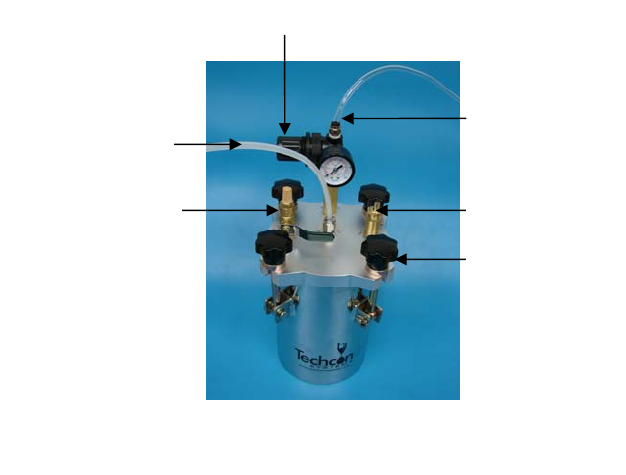
4.1 Setup Procedure (Refer to Figure 2)
1. Insure pressure regulator is off (set at zero). Pull locked air
regulator knob out to unlock and turn counterclockwise
several rotations to set to zero psi
2. Turn four locking knobs counterclockwise to remove cover
(Lid). Unscrew each locking knob until it is able to flip over
its hinge to clear the cover plate
3. Remove the Cover (Lid) of the 1254 Pressure Pot and
carefully set it aside
4. Remove cap from material (dispense fluid) container. Cap
may be saved for future resealing of the container
5. Place material container inside pressure pot chamber
6. Insure that the O’Ring stays in the groove of the cover
.
Air Inlet
Figure 2- Setup
Locking Knob
Fluid Outlet Tube
Exhaust Valve
Safety Valve
Air Regulator Knob
7
7. Install the Cover (Lid) on the Pressure Pot, making sure to
place the tube end into the material container
8. Align the four slots on the cover with the four locking knobs
9. Lift the locking knobs into slots on the cover and tighten
knobs uniformly until snug. (Hand Tight Only)
WARNING: Never pour adhesives or other material directly
into pressure pot. To do so may cause severe damage to
pressure pot. Use material container or similar containment
vessel.
4.2 Start-Up Procedure
1. Pull pressure regulator knob and turn clockwise to increase
air pressure to the desired operating pressure. Insure that the
pressure gauge reading does not exceed 70 psi maximum.
Then push regulator knob in to lock and maintain set gage
pressure
NOTE: Always start at lowest pressure and gradually
increase as needed.
2. Listen for any possible air pressure leakage on the Pressure
Pot
3. Look for any signs of material/fluid leakage on tubing
Pressure Pot Setup is now complete and ready for
dispensing operation with the selected valve system.
WARNING: Whenever replacing or removing valve (s)
insure that regulator is at zero. Do not open lid until air
pressure is at zero