Printer 710_810 v8 Preventive Maintenance.pdf - 第6页
PREVENTI VE MAINTE NANCE SUMMA RY OF THE PROG RAMME 33.6 Technical Reference Manual Chapter Issue 6 Oct 06 SUMMAR Y OF THE PROGRAMME The PM Plan Daily This maintenance schedule is a recommended progr amme which should be…
PREVENTIVE MAINTENANCE
CLEANING AND LUBRICATION
Chapter Issue 6 Oct 06 Technical Reference Manual 33.5
CLEANING AND LUBRICATION
Linear Bearings
and Guide Rails
All linear bearing blocks, fitted to the machine, are greased for life and require
no greasing although a grease nipple may be fitted.
The linear bearing guide rails require no maintenance unless they become
contaminated. In the event of contamination, carry out the following procedure:
1. Clean the linear bearing guide rail using a plastic spatula.
2. Remove any build up of grease around the linear bearing block.
3. Apply a very thin coating of THK AFB grease (DEK part No 141146) along
the whole length of the guide rail using a cloth.
4. Ensure that the three exposed faces are greased to prevent surface rust.
5. Remove any surplus grease using the cloth ensuring that there is no build
up of grease near the linear bearing block.
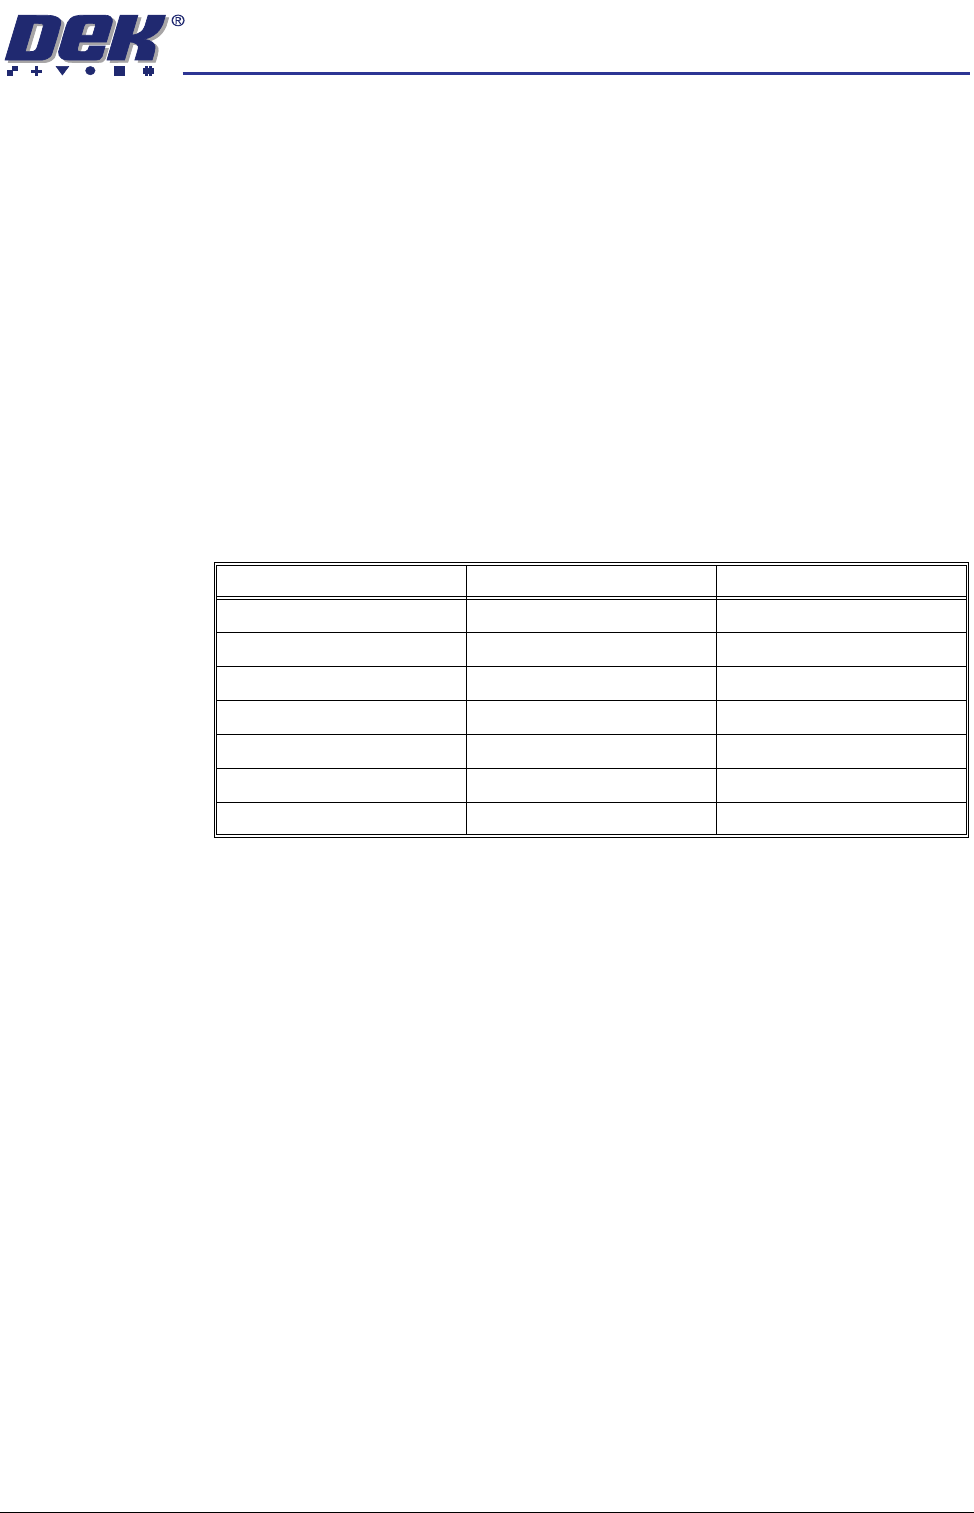
For locations of linear bearings, refer to the table below:
Rising Table and
Transport Rail
Ballscrews
The rising table and transport rail ballscrew bearing blocks are greased for life
and require no greasing.
The rising table and transport rail ballscrews require no maintenance unless
they become contaminated. In the event of contamination, carry out the
following procedure:
1. Clean the ballscrew using a plastic spatula.
2. Remove any build up of grease around the ballscrew bearing block.
3. Apply a very thin coating of THK AFB grease (DEK part No 141146) along
the whole length of the ballscrew using a cloth.
4. Using the cloth, remove any surplus grease near the ballscrew bearing
blocks.
Location Linear Bearing Guide Rails Linear Bearing Blocks
Camera 3 (2 Y and 1 X) 5
Paste Dispenser 1 1
Print Carriage 2 3
ProFlow 2 2
Rising Table 2 4
Transport Rails 6 6
Underscreen Cleaner Uses the 2 Camera Y Rails 2
PREVENTIVE MAINTENANCE
SUMMARY OF THE PROGRAMME
33.6 Technical Reference Manual Chapter Issue 6 Oct 06
SUMMARY OF THE PROGRAMME
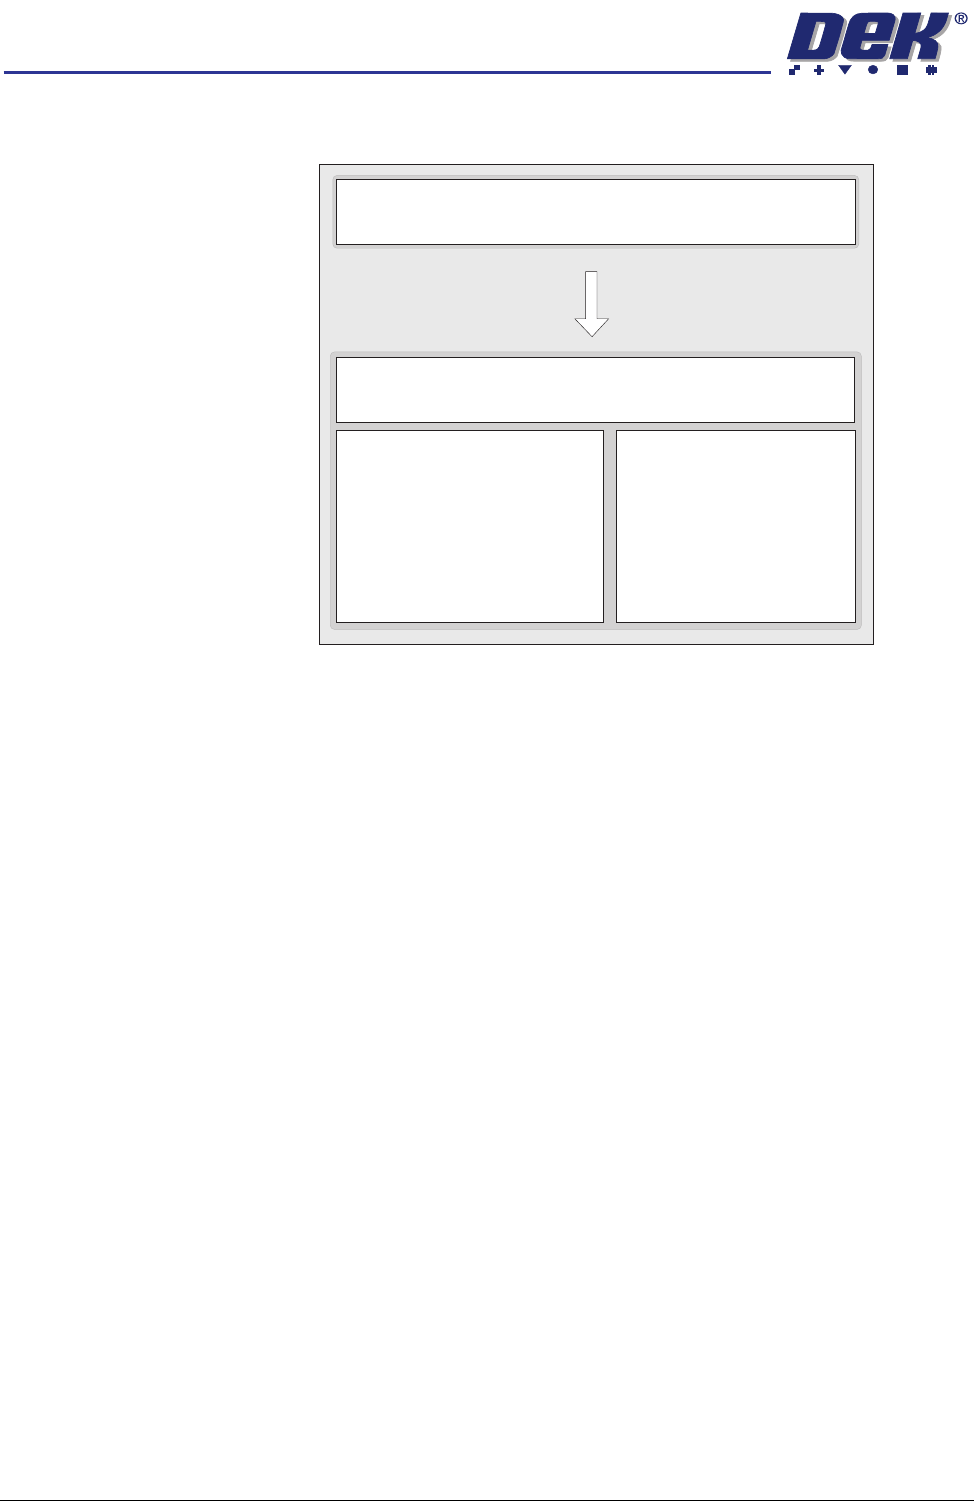
The PM Plan
Daily This maintenance schedule is a recommended programme which should be
carried out on a daily basis. Tasks are generally limited to surface cleaning and
minor inspections and should take no more than fifteen minutes to complete.
Monthly This maintenance schedule is a recommended programme which should be
carried out on a month by month basis. It comprises two modules that are
designed to take approximately 2 hours each to complete.
In the first module, SPC Alignment, Machine Cycle Count, Software Checks and
a standard Monthly Maintenance Check make up the elements.
NOTE
SPC Alignment is included in the QC Calc Software package which is an
optional measurement tool.
The second element comprises the Monthly Hardware Check, each month one
or more hardware modules are scheduled for maintenance. Over a twelve
month period all machine modules are checked and serviced at least once.
Each monthly schedule, January through to December is the same no matter
where the machine resides. DEK service engineers already have maintenance
history on which modules have been serviced and those that are in need of
service. If an error occurs the precise service history is known and this could
prove useful in tracking a fault condition.
Daily Schedule
Approximately 15 Minutes
Approximately 4 Hours
SPC Alignment Check
(where available)
2 Hours
Software Check
Monthly Maintenance Check
Machine Cycle Count
2 Hours
Monthly Hardware Check
Monthly Schedule
PREVENTIVE MAINTENANCE
DAILY MAINTENANCE
Chapter Issue 6 Oct 06 Technical Reference Manual 33.7
DAILY MAINTENANCE
WARNING
HARMFUL SUBSTANCES. CLEANING WIPES AND CLEANING SOLUTIONS MAY
CONTAIN SUBSTANCES HAZARDOUS TO HEALTH. OBSERVE ALL
MANUFACTURERS’ HEALTH AND SAFETY GUIDELINES. ALWAYS WEAR
APPROVED PROTECTIVE CLOTHING WHEN CLEANING THE MACHINE.
Preparation The machine must be isolated from electrical power and air pressure. Remove
the stencil if fitted.
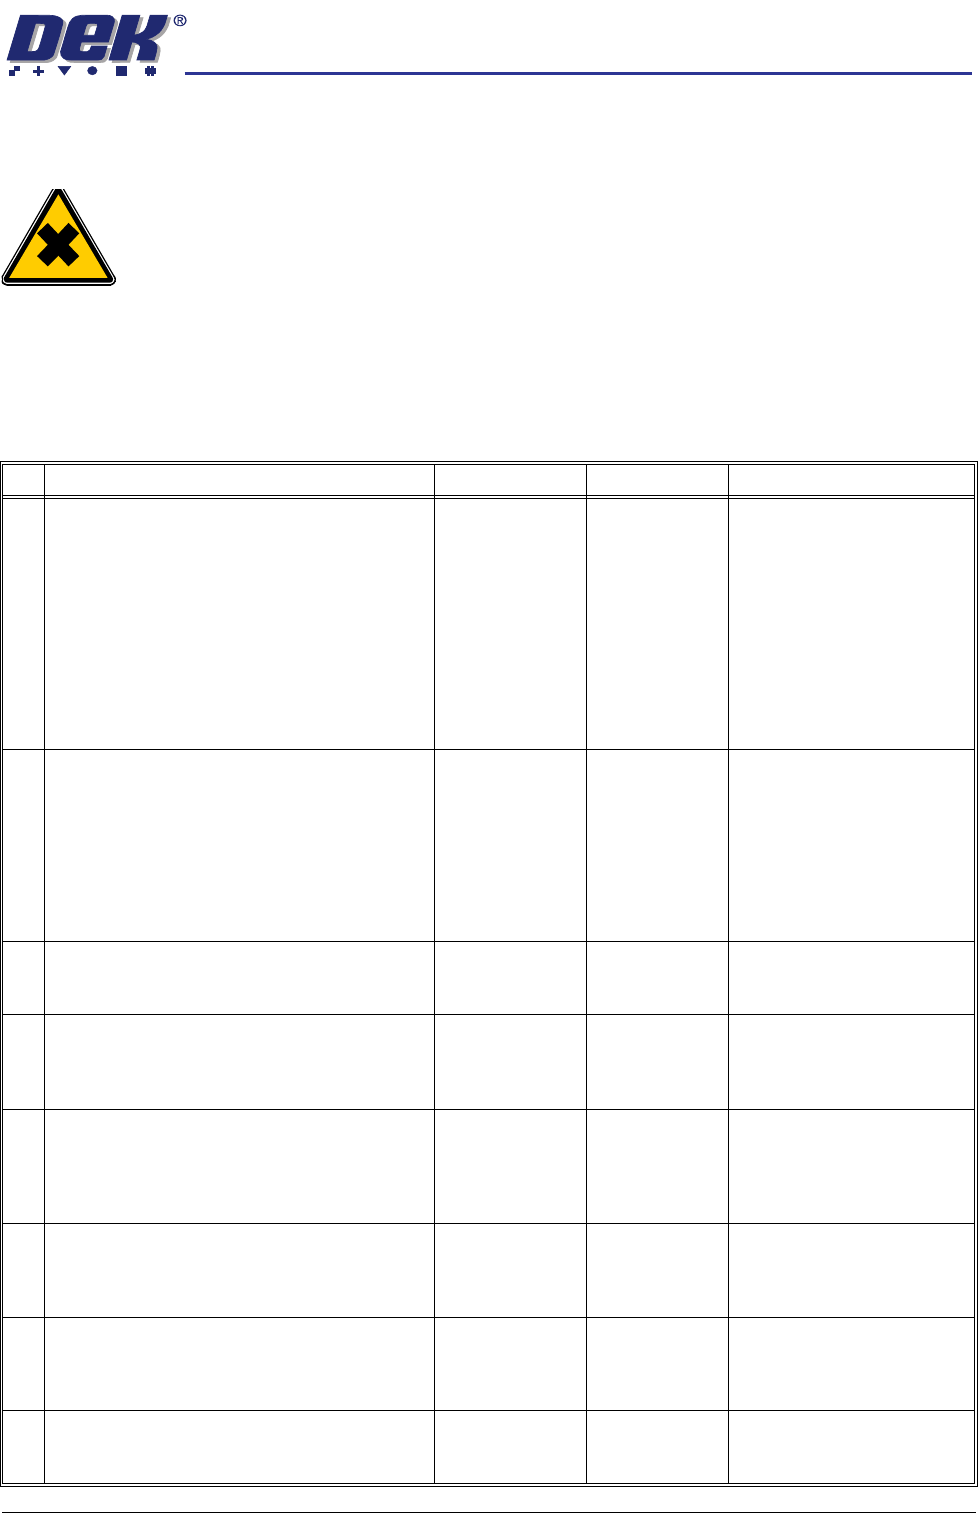
General
No Task Tools Completed Reference Figure
1 Inspect the following linear bearings for contam-
ination:
a. Camera Carriage
b. Paste Dispenser
c. Print Carriage
d. ProFlow
e. Rising Table
f. Transport Rails
NOTE
Refer to Cleaning and Lubrication - Linear Bear-
ings and Guide Rails, earlier in the chapter.
Spatula, THK
AFB Grease
Camera System
Paste Dispenser
Print Carriage
ProFlow Mechanism
Rising Table
Rail System
2 Inspect the following ballscrews for contamina-
tion:
a. Rising Table
b. Transport Rails
NOTE
Refer to Cleaning and Lubrication - Rising Table
and Transport Rail Ballscrews, earlier in the
chapter.
Spatula, THK
AFB Grease
Rising Table
Rail System
3 Paste Dispenser:
Remove any debris and clean the drip tray.
Spatula,
IPA Impregnated
Wipes
Paste Dispenser
4 Screen Change Mechanism:
a. Auto Drip Tray
b. Auto Drip Tray Actuator Pistons
Remove any debris and clean.
Spatula,
IPA Impregnated
Wipes
Screen Change Mechanism
5 Adjustable Screen Mount (ASM):
a. ASM Assembly
b. Pulley Assemblies
c. Stencil Guide Strips
Remove any debris and clean.
Spatula,
IPA Impregnated
Wipes
Adjustable Screen Mount
(ASM)
6 Camera:
a. Up and down camera lens
b. Board at stop opto
Remove any debris and clean.
Spatula,
IPA Impregnated
Wipes
Board Opto Locations
7 Underscreen Cleaner:
a. Linear Bearings
b. Magnet Assemblies
Remove any debris and clean.
Spatula,
IPA Impregnated
Wipes
Underscreen Cleaner
8 Vortex Plus Underscreen Cleaner (only):
Remove any debris and clean the filter housing.
Spatula,
IPA Impregnated
Wipes
Vortex Plus Underscreen
Cleaner