TS5000-user-guide.pdf - 第3页
14 17. Visually inspect the valve body to any foreign material and repeat cleaning process if necessary. 18. Insert a 0.1255” pin gauge into the valve body from the motor side . If the pin moves smoothly and easily throu…

2
CONTENTS
Page number
1. Specifications …………………………………………………3
2. Unpacking and inspection……………………………………..4
3. Description……….……………………………………………4
4. Theory of operation….…...……………………………………5
5. Setup instructions
5.1 Mechanical Mounting….……..…………………………6
5.2 Electrical Connection…....………………………………6
5.3 Air Connection ………………………………………7
6. Typical system setup ………………………………………7
7. Dispensing application ………………………………………8
8. Troubleshooting ………………………………………10
9. Maintenance and cleaning
9.1 Valve purging ………………………………………11
9.2 Thorough cleaning ………………………………………12
9.3 Valve reassembly ………………………………………14
9.4 Priming the valve ………………………………………15
10. Spare parts and accessories ……………………………16
11. Warranty …………………………………………………16
15
9.4 Priming the valve:
The valve is shipped with conditioner filled inside valve chamber to ensure the
valve is not run “dry” during initial start-up.
CAUTION: Running the valve dry (without dispense material) may cause
damage to the feed screw and chamber.
1. Attach a barrel of dispensing conditioner (Part number 7305XCON)
to the valve inlet.
2. Apply 8 psi pressure on the barrel and let the pressure push the
conditioner through the valve for 2 minutes. Do not apply more than
10 psi on the conditioner when priming as this may cause compressed
air pockets in the valve chamber.
3. Turn on the motor and let it run until a steady stream of fluid is being
dispensed.
4. Turn off motor.
5. Install appropriate dispense tip to the valve outlet. Do not over
tighten the dispense tip.
Note: Techcon makes available a torque wrench that is designed to
fit Techcon supplied dispense tip. (Part number: 5000-000-080 for
metal valves and 5000-000-082 for Delrin valves)
14
17. Visually inspect the valve body to any foreign material and repeat
cleaning process if necessary.
18. Insert a 0.1255” pin gauge into the valve body from the motor side.
If the pin moves smoothly and easily through the valve body, there
are no detrimental deposits in the valve. If the pin stop or snags,
gently push the pin through the hole to remove any deposits. If the
pin still does not want to move, please return the valve for repair.
19. Insert a 0.1262” pin gauge to into valve body from the motor side. If
the pin goes through the hole, please return the valve for repair.
9.3 Valve re-assembly
1. Reinstall the female luer lock fitting (10) into the valve body. Make
sure to apply some thread sealant on the fitting, such as Loctite 222.
2. Place the O-ring (8) on the clean out screw (9) and reinstall the clean
out screw assembly into the 45
o
feed shaft.
3. Lubricate the O-ring (3) with appropriate O-ring grease such as
Parker O-Lube.
4. Install O-ring (3) to the feed screw.
5. Gently slide the motor/feed screw assembly into the valve body
CAUTION: The fit between the feed screw and the chamber is very precise.
Extreme care must be taken during this operation.
6. Reinstall the two socket head screws (6) into the valve body.
Alternately tighten the screws a little at a time until both are secure.
Do not over tighten as this may distort the mounting plate and miss-
align the feed screw.
3
1. SPECIFICATIONS
Motor options: 2.7-Watt, 6-Watt, 6-Watt with digital encoder
Speed options: 125, 250, 400 RPM
Feed screw size options: 8-pitch standard
8-pitch high output
16-pitch standard
16-pitch shallow
Feed screw material options: Stainless steel
Delrin
Carbide
Feed screw chamber options: Stainless steel
Delrin
Valve body options: Anodized aluminum
Delrin
O-ring options: Viton, EPR
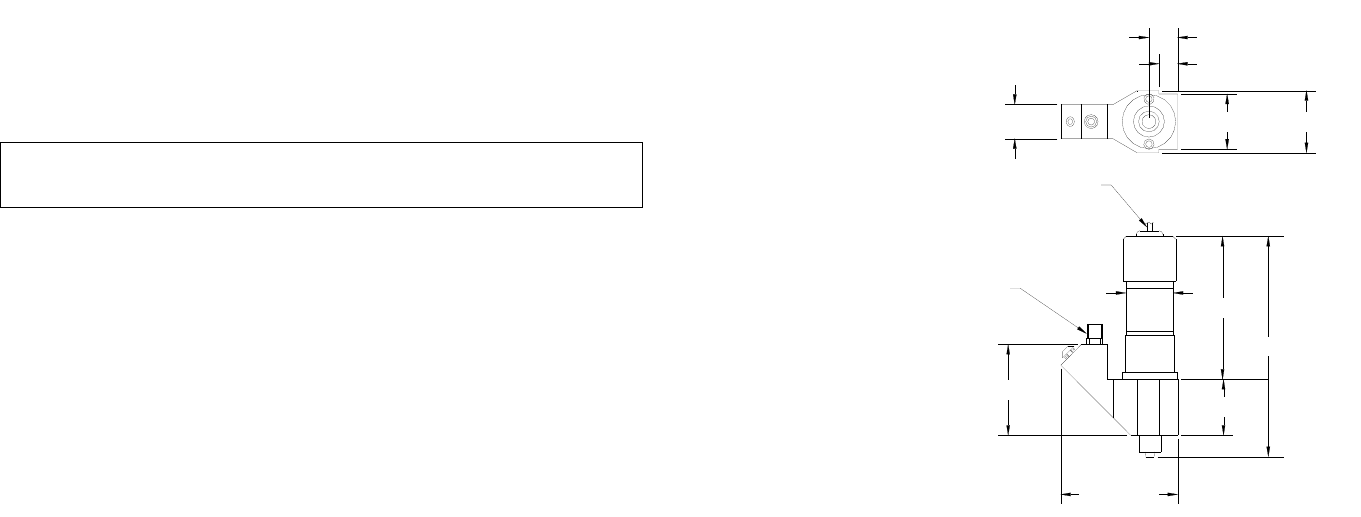
Figure 1.0 Valve with 2.7 Watt Motor
VALVE
TS5000
3.98" (101.0mm)
24" (610mm) LONG CALBE
FLUID INLET
.62" (15.7mm)
.52" (13.2mm)
.34" (8.6mm)
1.12" (28.5mm)1.00" (25.3mm)
2.13" (54.0mm)
2.58" (65.5mm)
1.01" (25.7mm)
.90" (22.9mm)
1.64" (41.7mm)
4
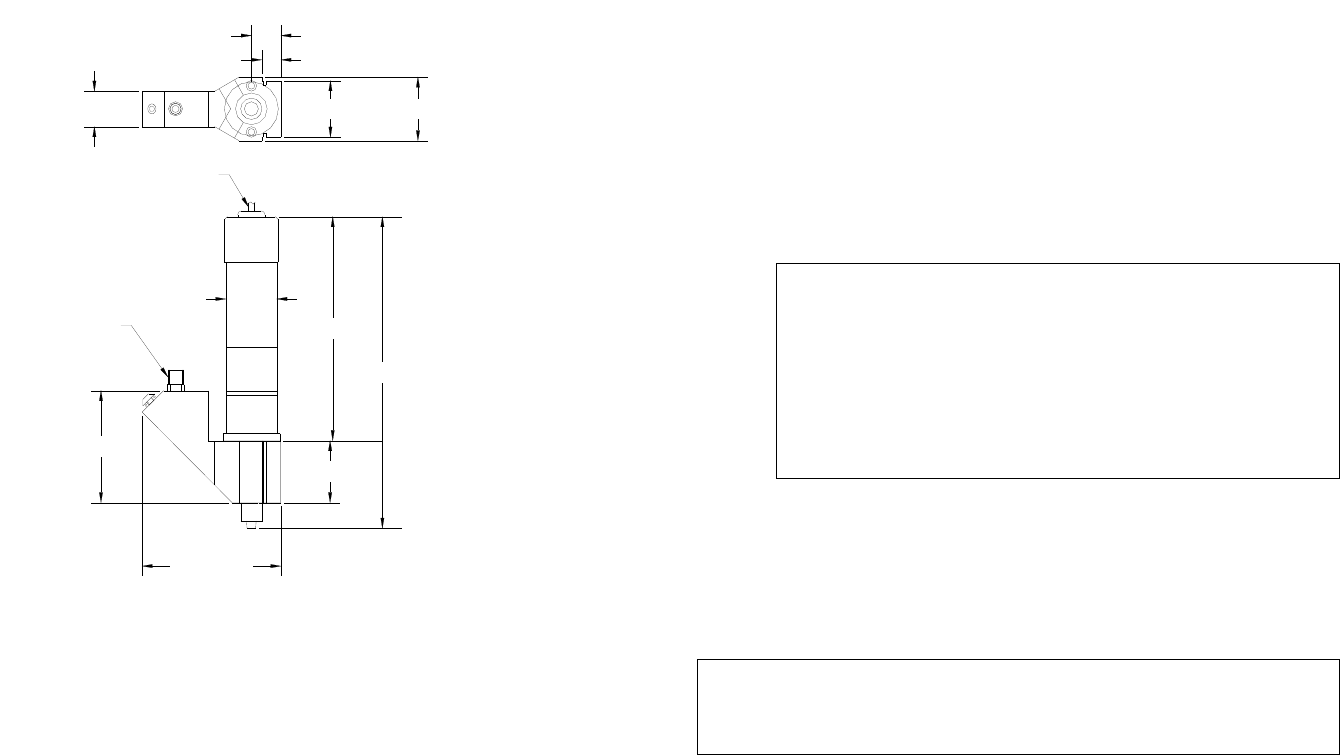
Figure 2.0 Valve with 6.0-Watt Motor
2. UNPACKING AND INSPECTION
Carefully unpack the valve and examine the items contained in the carton.
These will include:
• Valve Assembly
• Valve bracket
• Sample syringe kit
• Sample Needle Kit
• Cleaning kit
• User guide
3. DESCRIPTION
The TS5000 is a self contained fluid dispensing valve capable of depositing
shots down to 0.008” (0.200mm) in diameter at rates of 5 shots per second.
Fluid can also be accurately dispensed in continuous beads in widths from
0.008” (0.200mm) at rates up to 4” per second. In both cases, dot or bead,
accurate and repeatable dispensing can be accomplished in production by
following the instructions in this manual.
VALVE
TS5000
.90" (22.9mm)
3.94" (100.0mm)
5.48" (139.2mm)
.34" (8.6mm)
.52" (13.2mm)
.62" (15.7mm) 1.12" (28.5mm)1.00" (25.3mm)
1.97" (50.0mm)
2.45" (62.2mm)
1.09" (27.7mm)
24" (610mm) LONG CALBE
FLUID INLET
13
assembly. (Make sure not to tilt the motor during this process.) Turn
the motor off. If the motor/feed screw assembly still cannot easily be
removed, return the valve for repair.
8. Disconnect the motor cable (1) from the controller.
9. The entire feed screw (4) can now be cleaned with a solvent. Use the
brush included the cleaning for this process. Rho-Chem 7642 or a
similar solvent can be used.
CAUTION:
• Do not drop, or exert any forces on the feed screw. This will cause
permanent deflection in the alignment of the feed screw to the
motor shaft
• Do not remove the feed screw from the motor shaft during cleaning.
Doing so will cause misalignment between feed screw and motor
shaft
• Do not submerge motor in solvent
10. Visually inspect the feed screw as closely as possible and make sure
the feed screw is free of all foreign material. Repeat cleaning
operation if necessary
11. Remove the clean out screw (9) and O-ring (8) from valve body (5)
CAUTION: Do not remove the male luer lock fitting and locking hub (12) from the
valve body (5). This is a precisely aligned part. Removal of this part will damage
the valve permanently.
12. Using the brush provided, clean the feed screw chamber with solvent.
13. Using a micrometer to measure the major diameter of the feed screw
threads. If the diameter is measure less than 0.1240”, return the valve
for feed screw replacement.
14. Replace the O-ring (3) on the feed screw (Part number TSD1400-
010B)
15. Using the brush provided, clean the valve body with solvent.
16. Use dry air pressure to blow out passageways.