770715-EM-Eye-ESD-Event-Meter-Guide.pdf - 第4页
TB-91 19 Page 4 of 10 © 2024 DESCO INDUSTRIES INC Employee Owned SCS - 926 JR Industrial Drive, Sanford, NC 27332 East: (919) 718-0000 | West: (909) 627-9634 • Website: StaticControl.com Modular Assembly and Disassembly …
TB-9119 Page 3 of 10
© 2024 DESCO INDUSTRIES INC
Employee Owned
SCS - 926 JR Industrial Drive, Sanford, NC 27332
East: (919) 718-0000 | West: (909) 627-9634 • Website: StaticControl.com
Power Supply and Charger
Use only the power supply that comes with the EM Eye
Meter. Do not use any other power supply as it may
damage the meter.
Battery Care - Charging for the first time
NOTE: The power switch must be in the ON position
when charging the battery. To improve the battery life
we recommend performing three fully charge-discharge
cycles. For example: fully charge the meter for two
hours or overnight, then use the meter until it is fully
discharged (do not recharge it at half-charge-life).
Repeat this step two times. It would normally take two
hours to fully charge the battery, but since the meter
power is on while charging; it would extend the charge
time to four hours. Succeeding charging would be at any
duration. Use only the supplied charger.
Power On
Use the slide switch at the bottom of the meter to power
the device. If a new sensor was installed, a sequence
of initialization will take place for the first time for
approximately ten seconds. After that, the switch-on
action will take approximately three seconds. The main
display screen appears after the initialization and a
beep will sound. The EM Eye Meter will then perform a
battery check. If the battery is too low to provide reliable
operation, it will not turn on. The screen will go white
momentarily and then the meter will power up. After the
initial power up, the meter will go directly to the main
screen.
Features and Components
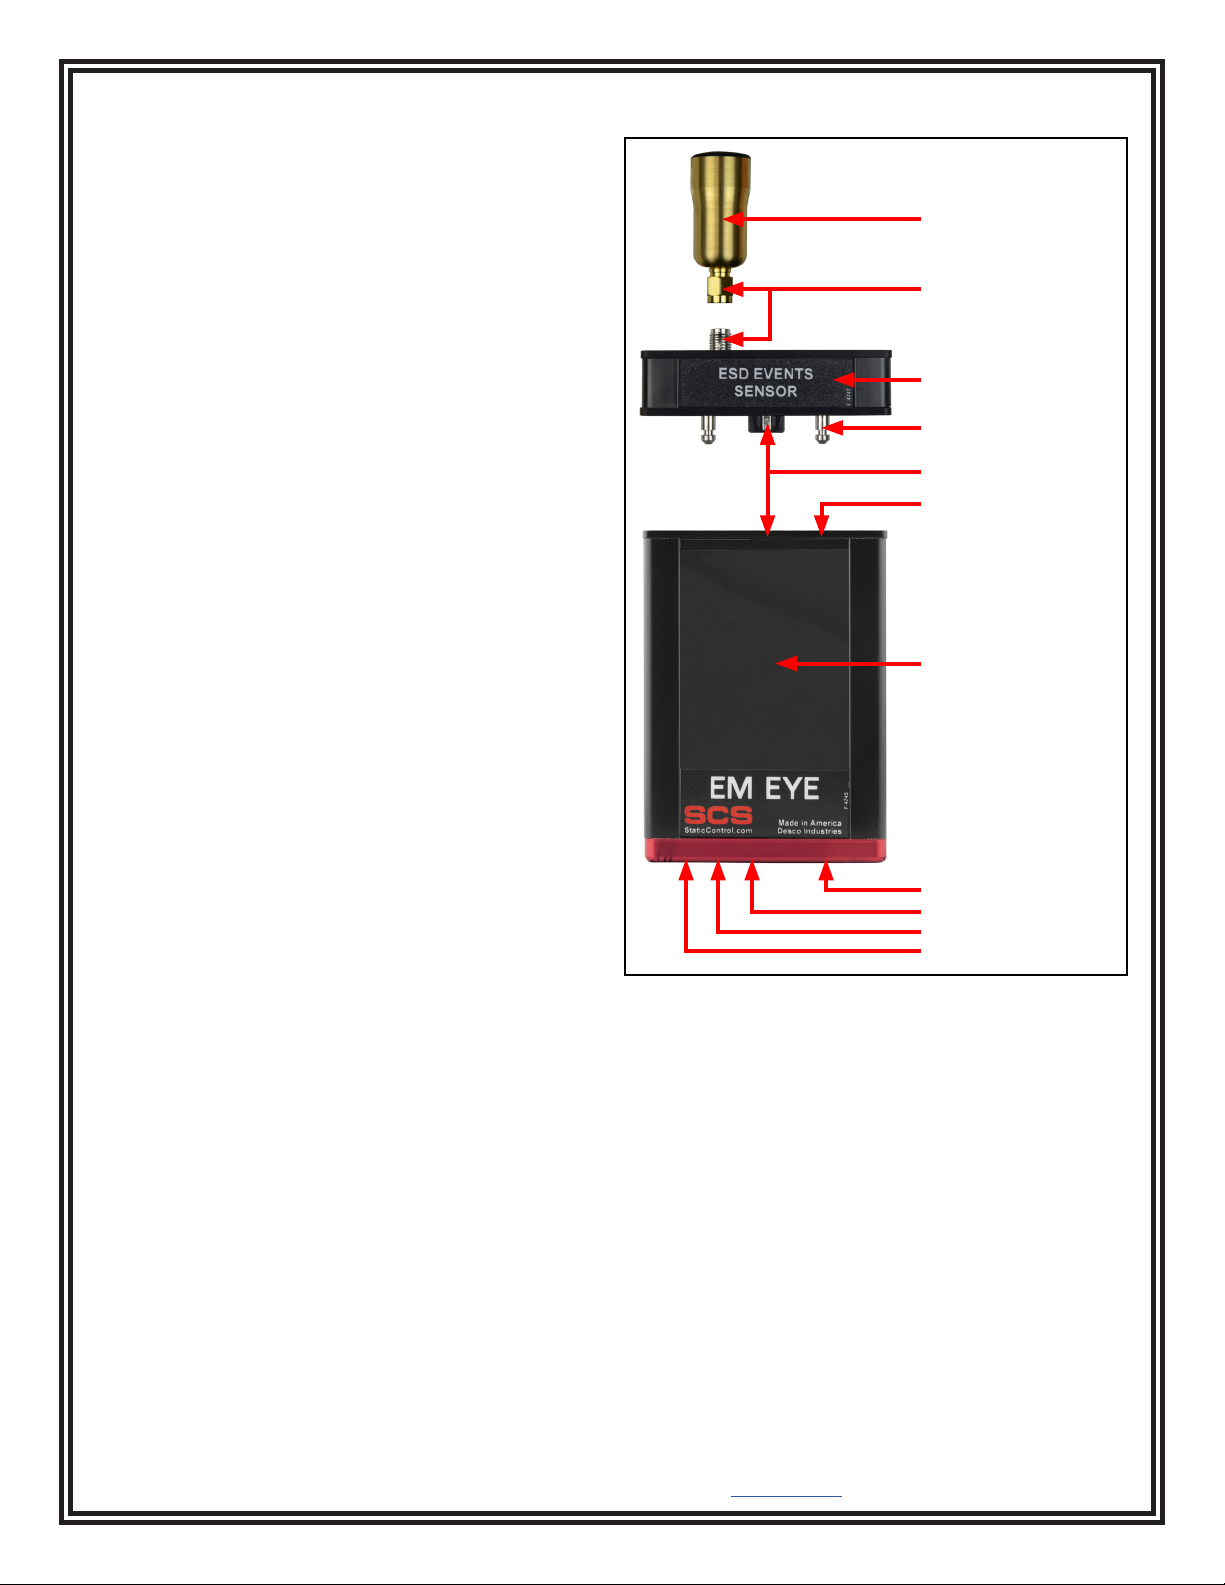
Figure 5. EM Eye features and components
Local directional antenna
Sensor module
SMA connectors
Alignment pin
Communication connectors
Alignment hole
Touchscreen display
microSD memory slot
Headphone jack
Power slide switch
Power jack
TB-9119 Page 4 of 10
© 2024 DESCO INDUSTRIES INC
Employee Owned
SCS - 926 JR Industrial Drive, Sanford, NC 27332
East: (919) 718-0000 | West: (909) 627-9634 • Website: StaticControl.com
Modular Assembly and Disassembly
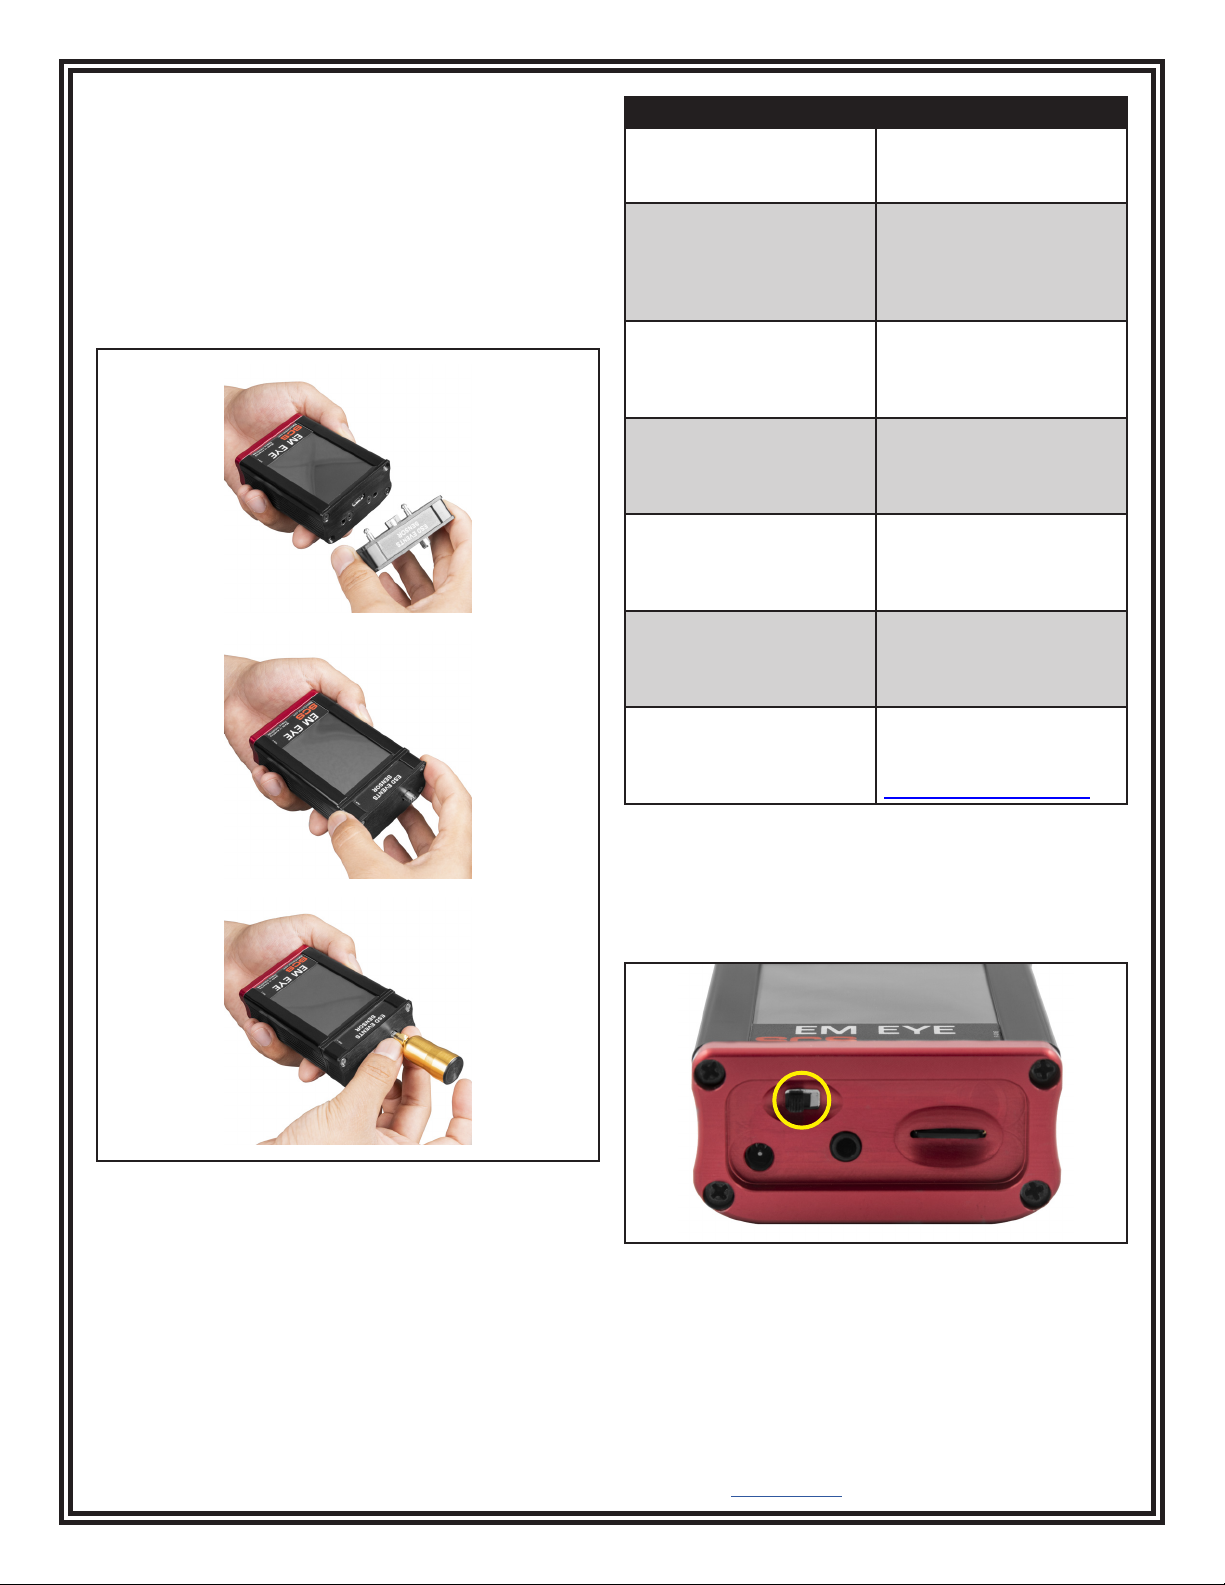
1. Position the sensor head so that the dowel pins
align with the holes.
2. With the initial head midway through, reposition it so
that it is parallel to the body. Press the sensor head
firmly against the body until both surfaces are flat
with each other.
3. Insert and screw in the antenna making sure that it
is not too tight or too loose. Do not use any tools.
Error Message Reason for Error
ERROR: Sensor is
disconnected. Click here
to turn device o.
The meter is turned
on without the sensor
module.
ERROR: Card was
removed. Data may be
lost and card could be
damaged. Click here to
close the window.
The storage card
(microSD) is removed
while the meter is
powered on.
WARNING: No memory
card. You can add it at
any time. Click here to
close the window.
The meter is turned on
with no storage card in
place.
PREPARING CARD FOR
RECORDING!!! DO NOT
REMOVE!!! PLEASE
WAIT.
A new card is inserted or
when a card is empty.
WARNING: This card
contains the data.
Remove the card or click
here to erase the data.
Inserting a card that has
contents other than the
EM Eye Meter les.
ERROR: Invalid memory
card. Format or replace
it. Click here to close the
window.
The card is not formatted
to FAT32. Formatting is
done using the PC.
ERROR!!! STACK
OVERFLOWED. Click
here to turn device o.
This is a fatal error. If
it appears even after
resetting, please contact
SCS Customer Service.
Power Reset
If the EM Eye Meter locks up or the display freezes,
cycle the power to the meter by sliding its power switch
to the OFF position and back to the ON position.
If the assembly is not done correctly, one of the
following error and warning messages may appear. To
correct, follow the instructions as indicated within the
message.
Figure 7. Location of the power switch at the bottom of
the EM Eye Meter
Figure 6. Attaching the sensor module to the EM Eye
Meter
TB-9119 Page 5 of 10
© 2024 DESCO INDUSTRIES INC
Employee Owned
SCS - 926 JR Industrial Drive, Sanford, NC 27332
East: (919) 718-0000 | West: (909) 627-9634 • Website: StaticControl.com
ESD Event Detection Sensor
The SCS EM Eye Meter will help you detect most ESD
events. This will help you make sound decisions in
tackling what may have been a daunting task. The EM
Eye Meter detects the magnitude of events and using
the filters built into the unit. It can provide approximate
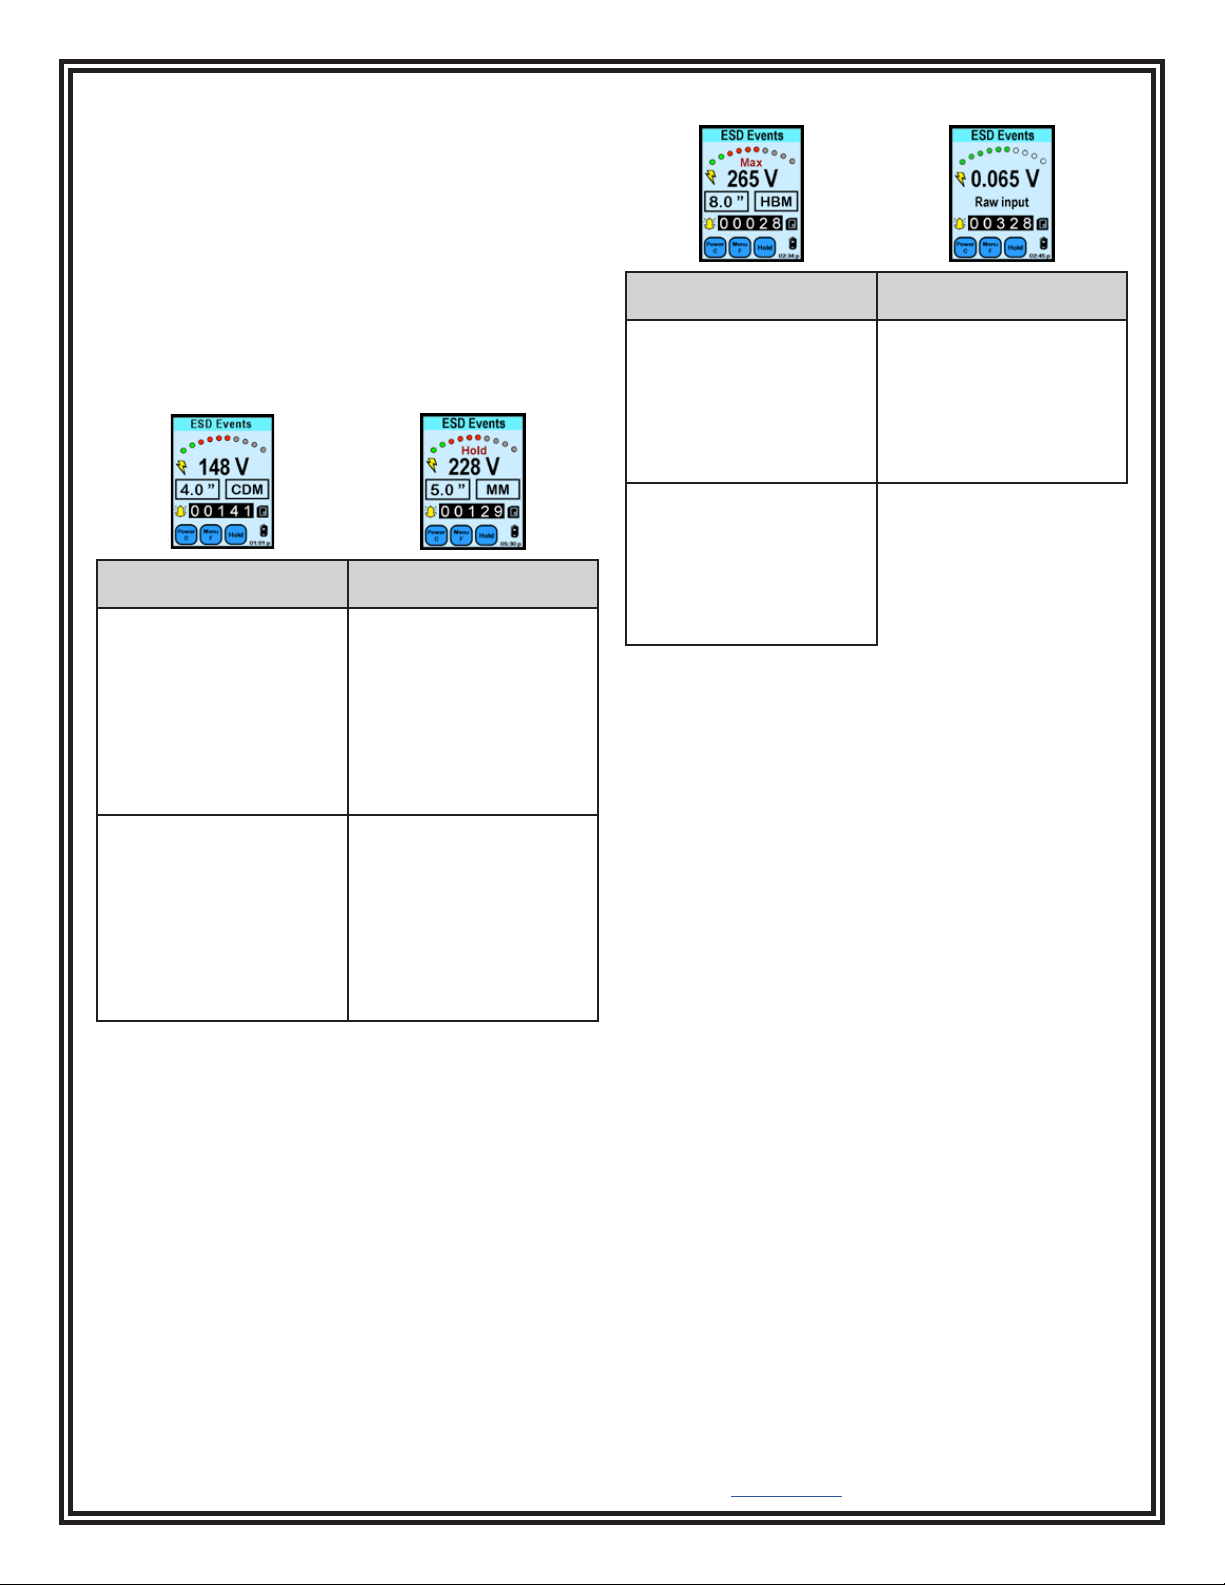
values for some ESD Events for models (CDM, MM,
HBM) using proprietary algorithms. Switching between
any of the modes will give you immediate data analysis.
Solving ESD problems requires data; a before-and-after
analysis of data may now be measured and used to
tailor ESD control programs.
CDM Mode MM Mode
In IC testing, ICs that are
sliding through tubes may
be charged up. Once the
lead touches the metal
tracks, a CDM event can
occur.
A moving, ungrounded
cart may accumulate
charges in its path. As
it approaches a metallic
worktable and bumps
into it, a discharge may
occur and may adversely
aect nearby products or
instruments
In feeder bowls where the
ICs are arranged for sort-
ing or orientation, voltages
may be induced by the
vibrating bowl.
In using a bad soldering
iron, induced voltages
may cause discharges to
the components mounted
into the PCB. Use ground-
ed tools and conrm that
no ESD events will be
detected by using the MM
mode.
HBM Mode Raw Input Mode
In IC testing, operators
that are handling an IC
(i.e. xing bent leads) may
be discharging through
the IC.
For engineers who want
to simply analyze raw
ESD signals for further
analysis, the Raw Input
mode provides actual
voltages received by an
antenna.
During picking up of an IC
by a person not properly
wearing a wrist strap, use
the EM Eye Meter to
alarm the operator of such
events.