manual-biron-100-precision-soldering-tool-jbc-0033098_ID-243824_EN.pdf - 第7页
7 40 mm 50 mm 60 mm 80 mm 100 mm 130 mm 130 mm par a manuales - c olor g r is 200 mm 300 mm Replacing Sealing Plugs Note: D ep end ing o n you r han dl e mod el, t wo dif fere nt s ea lin g plu g refe ren ce s are ava il…
Tool
ON
MENU
28174
24 W
100%
18 W
100%
12 W
100%
6 W
100%
0 W
100%
10 seconds/div
V1.2
CHARGE
450 ºC
350 ºC
250 ºC
150 ºC
50 ºC
JBC
210
348ºC
5,7 W
80%
350ºC
Tool
ON
MENU
24 W
100%
18 W
100%
12 W
100%
6 W
100%
0 W
100%
10 seconds/div
V1.2
WORK
450 ºC
350 ºC
250 ºC
150 ºC
50 ºC
80%
JBC
210
350ºC
Tool
ON
MENU
24 W
100%
18 W
100%
12 W
100%
6 W
100%
0 W
100%
10 seconds/div
V1.2
CHARGE
450 ºC
350 ºC
250 ºC
150 ºC
50 ºC
JBC
210
348ºC
5,7 W
80%
350ºC
JBC#1
Tool
ON
MENU
24 W
100%
18 W
100%
12 W
100%
6 W
100%
0 W
100%
10 seconds/div
V1.2
CHARGE
450 ºC
350 ºC
250 ºC
150 ºC
50 ºC
JBC
210
80%
350ºC
JBC#1
Tool1
Tool ID
28714
Hardware
Software
0028283
X886787
Update File
File
Hardware
Software
Select your Firmware
-
-
Update
MENU
JBC
210
Return to Work
JBC#1
B·IRON 100
B·IRON 500
User’s Manual
User’s Manual
Documents
MENU
JBC#1
JBC
210
Return to Work
2822
Work
Settings
Counters
Update
Documents
Light Theme
Dark Theme
Disconnect
Tool
ON
MENU
28174
24 W
100%
18 W
100%
12 W
100%
6 W
100%
0 W
100%
10 seconds/div
V1.2
CHARGE
450 ºC
350 ºC
250 ºC
150 ºC
50 ºC
JBC
210
348ºC
5,7 W
80%
350ºC
Work
Settings
Counters
Update
Documents
Light Theme
Dark Theme
Disconnect
JBC#1
348ºC
6 W
Work
JBC#1
MENU
Tool1
2822
Tool ID
Hibernation delay (seconds)
00:30
Sleep mode
Sleep temperature
150ºC
Minimum Temperature
100ºC
Maximum Temperature
400ºC
Working
Low battery
Power OFF
Charging
No cartridge
Tool Status
Temperature units
ºC
ºF
JBC
210
Lock Parameters
Locked
Unlocked
Work
JBC#1
MENU
Tool1
2822
Tool ID
Hibernation delay (seconds)
10
Sleep mode
Sleep temperature
150ºC
Minimum Temperature
100ºC
Maximum Temperature
400ºC
Working
Low battery
Power OFF
Charging
No cartridge
Tool Status
Temperature units
ºC
ºF
JBC
210
Lock Parameters
Locked
Unlocked
Work
JBC#1
MENU
Tool1
2822
Tool ID
Hibernation delay (seconds)
00:30
Sleep mode
Sleep temperature
150ºC
Minimum Temperature
100ºC
Maximum Temperature
400ºC
Working
Low battery
Power OFF
Charging
No cartridge
Tool Status
Temperature units
ºC
ºF
JBC
210
Lock Parameters
Locked
Unlocked
Work
Enter PIN
OK
MENU
450 ºC
350 ºC
250 ºC
150 ºC
50 ºC
80%
Work
Settings
Counters
Update
Documents
Light Theme
Dark Theme
Add device
Disconnect
MENU
450 ºC
350 ºC
250 ºC
150 ºC
50 ºC
JBC
80%
350ºC
Devices
Documents
Light Theme
Dark Theme
Work
Counters
Operation
The JBC Most Efficient Soldering System
This revolutionary technology can recover tip temperature extremely quickly. This allows the user to
work at a lower temperature.
Inactive
5 mins.
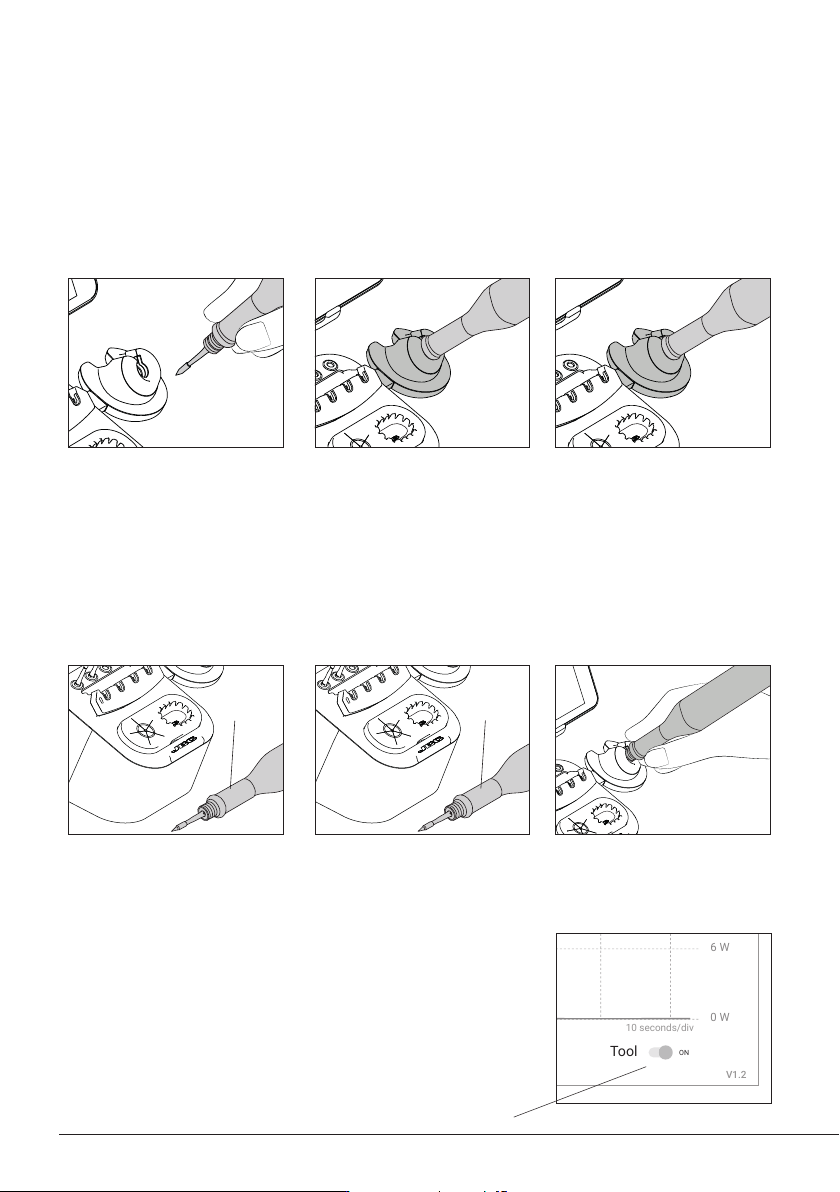
Tool Power Switch
Work
Charge Mode
When the tool is lifted from
the tool holder, the tip of the
assembled cartridge will heat
up to the selected working
temperature.
While the tool remains on the
tool holder, it charges and the
tip will gradually cool down to
room temperature.
Hibernation Mode
When the tool is away from
the tool holder and remains
inactive (no movement for at
least 10 seconds), the tool goes
into Hibernation Mode and the
tip temperature gradually cools
down to room temperature.
After automatically turning
off, put the tool back on the
tool holder to turn it on again.
If the tool has been inactive for
a longer period of time (at least
5 minutes), it automatically
turns off.
Automatic Turn Off Turning the Tool Back On
Sleep Mode
If Sleep Mode is activated
(see section “Settings”), upon
placing the tool on its holder,
besides charging it enters Sleep
Mode. The tip temperature will
drop down and remain at Sleep
temperature.
Note: The tool can also be switched off/on manually. Tap the
Tool power switch on the display (bottom right) to switch it off/
on (if the tool is turned off, it will remain connected up to 5
minutes to the station but will not heat up the cartridge).
Inactive
10 secs.
6
7
40 mm
50 mm
60 mm
80 mm
100 mm
130 mm
130 mm
para manuales - color gris
200 mm
300 mm
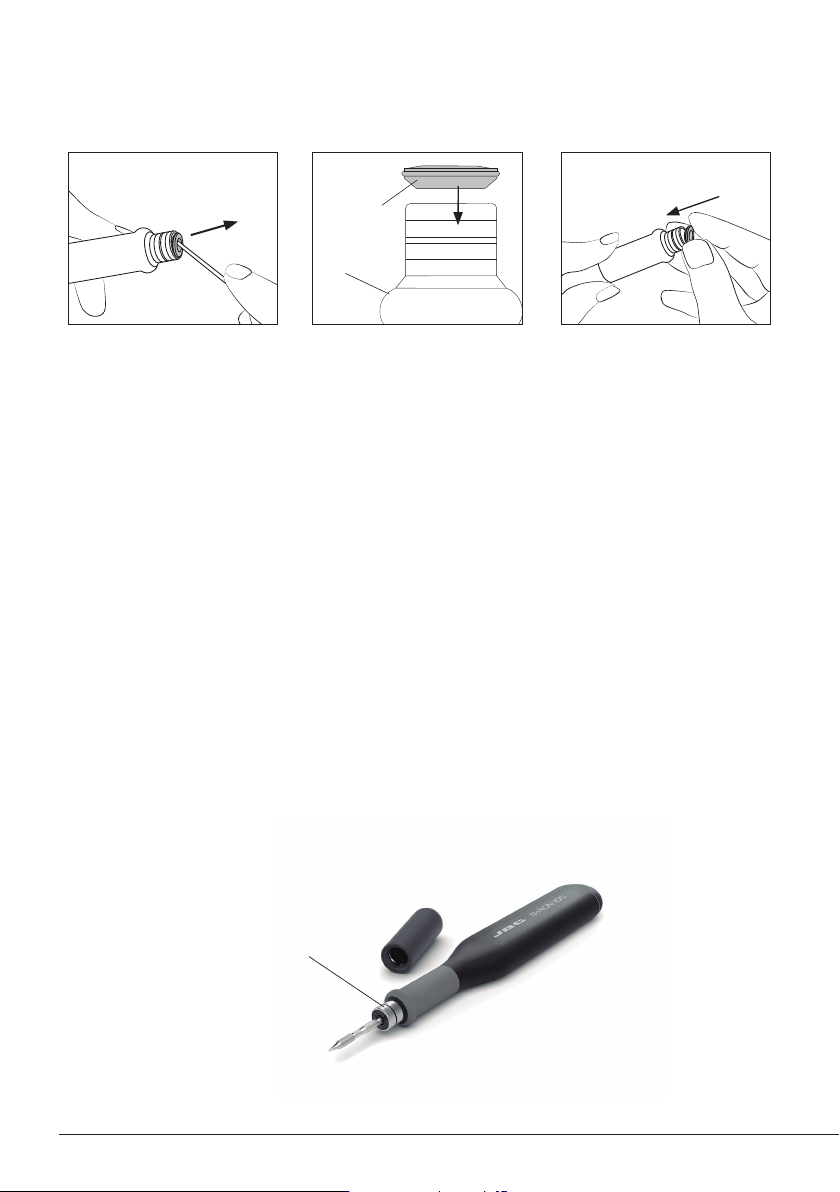
Replacing Sealing Plugs
Note: Depending on your handle model, two
different sealing plug references are available.
Before replacing the sealing plug, disconnect
the handle from the station and make sure the
device is not hot.
The sealing plug prevents undesirable flux vapors or particles from entering the handle. Its usage is
highly recommended for intensive applications when soldering is exposed to FOD environments or
for applications where the soldering iron works close to a vertical position.
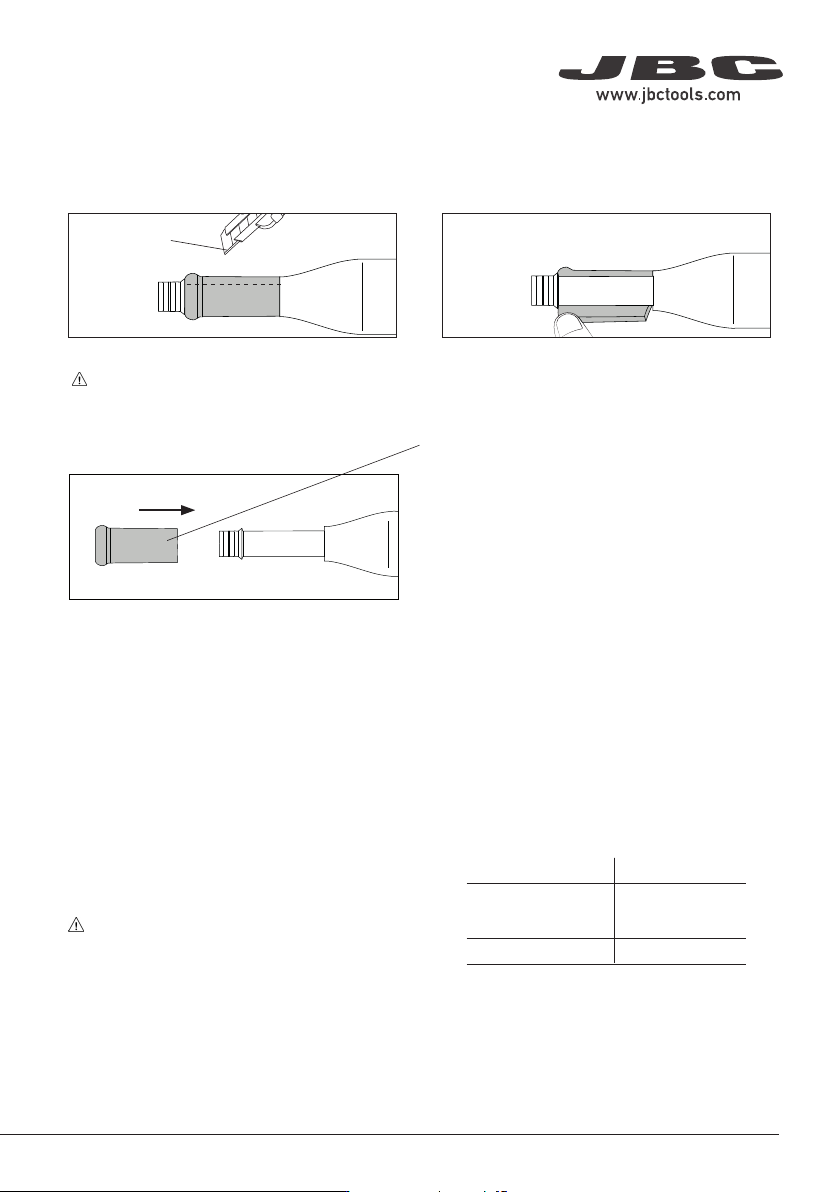
1. Cutting 2. Removing
Replacing Grips
Make a length-ways cut on the worn grip.
Be careful not to damage the handle.
Remove the worn grip.
Cutter
B0001
Grips for B·IRON Handles
3. Assembling New Grips
Firmly slide the grip onto the handle until it
locks into place.
Handle Sealing Plug
B·IRON 100 TOOL
OB4000
B·IRON 500 TOOL
B·NANO TOOL OB5000
Before carrying out maintenance, always extract the cartridge from the tool and disconnect the charging
stand from the mains. Allow the equipment to cool down.
- Use a damp cloth to clean the casing and the tool. Alcohol can only be used to clean the metal parts.
- Periodically check that the metal parts of the tool and tool holder are clean so that the charging
works properly.
- Maintain the tip surface clean and tinned prior to storage in order to avoid tip oxidation. Rusty and
dirty surfaces reduce heat transfer to the solder joint.
- Do not use liquids such as alcohol, thinner or benzene to clean the tablet.
- Repairs should only be performed by a JBC authorized technical service.
Maintenance
Safety
- Do not use the units for any purpose other than soldering or rework. Incorrect use may cause a fire.
- The power cord must be plugged into approved bases. When unplugging it, hold the plug, not the wire.
- Do not attempt to dismantle or open the housing of the tool as it may cause damage.
- Do not work on electrically live parts.
- The tool should be placed in the stand when not in use in order to charge the batteries.
- The soldering tip or nozzle, the metal part of the tool and the stand may still be hot even when the
station is turned off.
- Do not leave the tool unattended when it is on.
- Avoid flux coming into contact with skin or eyes to prevent irritation.
- Be careful with the fumes produced when soldering.
- Keep your workplace clean and tidy. Wear appropriate protection glasses and gloves when working
to avoid personal harm.
- Utmost care must be taken with liquid tin waste, which can cause burns.
- This appliance can be used by children over the age of eight and also persons with reduced physical,
sensory or mental capabilities or lack of experience provided that they have been given adequate
supervision or instruction concerning the use of the appliance and understand the hazards involved.
Children must not play with the appliance.
- Maintenance must not be carried out by children unless supervised.
- Do not expose the tablet to high temperatures, humidity or dust. Avoid direct sunlight.
- Do not drop the portable display or the tool, as it may cause damage or malfunction.
- Do not disconnect your device when it is in fi le transfer mode.
- Do not use the portable display in places where wireless communications are restricted.
It is imperative to follow safety guidelines to prevent electric shock, injury, fire
or explosion.
8
Handle
Chamfered
Side
Clean the contact
surfaces regularly to
ensure that the tool
gets charged correctly
2. Mounting Position 3. Inserting Sealing Plug1. Removing Sealing Plug
Note: The chamfered side has
to be positioned towards the
handle.
Push the sealing plug inside
the handle until the sealing
plug and handle edges are
aligned.
Introduce a small shaft or
screwdriver, not deeper than
8mm, lift and pull the sealing
plug. Never use a cartridge to
do this operation.