00197737-07_IM_WES7_DE_EN.pdf - 第14页
Windows Embedd ed Standard 7 / Inst allation Manual 12/2017 Edition 14 It the system parti tion is big enough, the Choose Recovery Option message is displ ayed and one of the following options may be sele cted: 1. Restor…

Windows Embedded Standard 7 / Installation Manual 12/2017 Edition
13
4.3 Installing the Windows Embedded Standard 7 Operating System
NOTICE
Before you start work, ensure that the DVD drive is set as the first boot device in the
BIOS to allow the computer to be booted from DVD. When starting the computer from
DVD or USB stick, perhaps only one monitor is active.
► If necessary, back up the machine data manually.
► Follow the instructions in the respective Assembly Instruction for the 3D Coplanarity Module,
item no:s. [00195344-xx] (for X-series), [00196842-xx] (for SX1/SX2) and [00197395-xx] (for
X-series S) or the instructions in the Operating Manual for BulkFeeder X, item no. [00198045-
xx] if you install Windows Embedded Standard 7 on a Coplan or BulkFeeder X computer.
4.3.1 Installing from DVD
► Insert the "Win.Emb.Std.7" installation DVD suitable for the computer into the DVD drive.
► Switch on the computer to start it from the DVD or reboot the computer, if it was already
switched on.
► Press any key, when the message Press any key to boot from CD Rom is displayed.
► Follow the instructions of the Restore Installation procedure.
4.3.2 Installing from USB Stick
► Insert the USB stick in a USB interface on the computer.
► Switch on the computer or reboot the computer, if it was already switched on.
► Either adjust the boot sequence in the BIOS settings accordingly (key F2) or start the computer
from USB stick via the Boot menu (key Esc or key F12).
► Follow the instructions of the Restore Installation procedure.
Selection of Restore options:
If the system partition size is too small on the hard disk, it is only possible to delete and re-partition
the complete hard disk (message Complete hard disk recovery).
Windows Embedded Standard 7 / Installation Manual 12/2017 Edition
14
It the system partition is big enough, the Choose Recovery Option message is displayed and
one of the following options may be selected:
1. Restore existing system partition only
The system partition will be restored only.
2. Restore complete system disk
The complete hard disk will be restored.
► Select an option and confirm your selection with OK (or cancel your selection with Cancel).
The operating system is installed (may take some minutes) and thereafter the computer is
automatically rebooted several times.
When the Windows login window is displayed, the installation is completed (the first boot may take
some minutes).
► Log on as "ASM_Admin" and enter a password.
► If you install from DVD: Remove the DVD from the DVD drive.
► If you install from USB stick: Check if the "SIPLACE WES7 Configurator"
(e.g. directory _WES7_Configurator) is available for run on the USB stick under
Siplace_WES7_USB (please refer to section 4.3.3).
If not, release the USB stick and remove it from the USB interface.
► For the newer computers (iBASE, Microbox 427D) with two monitor outputs, the Clone
Displays operating mode has to be set in the display properties under Display – Multiple
Display, if required. Otherwise it might happen that only one monitor is accessed or the task
bar is only available on one of the monitors. This setting can also be made in the SIPLACE
Windows Embedded Standard 7 Configurator with the Add-ons and Touch Screen Driver
button.
► Additionally, it may be necessary to set the "Screen resolution" to 1024 x 768
(for E-series: 1280 x 1024) and enable the Scale Full Screen setting in the display
properties.under Panel Fit.
4.3.3 Choosing the Computer Configuration
► If you use the CD: Insert the "SIPLACE WES7 Configurator" software CD into the DVD drive.
► Open Windows Explorer and navigate to the DVD drive or open the directory (e.g. directory
_WES7_Configurator) that contains the "SIPLACE WES7 Configurator" on the USB stick
(removable disk name: Siplace_WES7_USB).
► Double-click on the start.hta file from the software CD or from the USB stick to start the
"SIPLACE Windows Embedded Standard 7 Configurator".
Windows Embedded Standard 7 / Installation Manual 12/2017 Edition
15
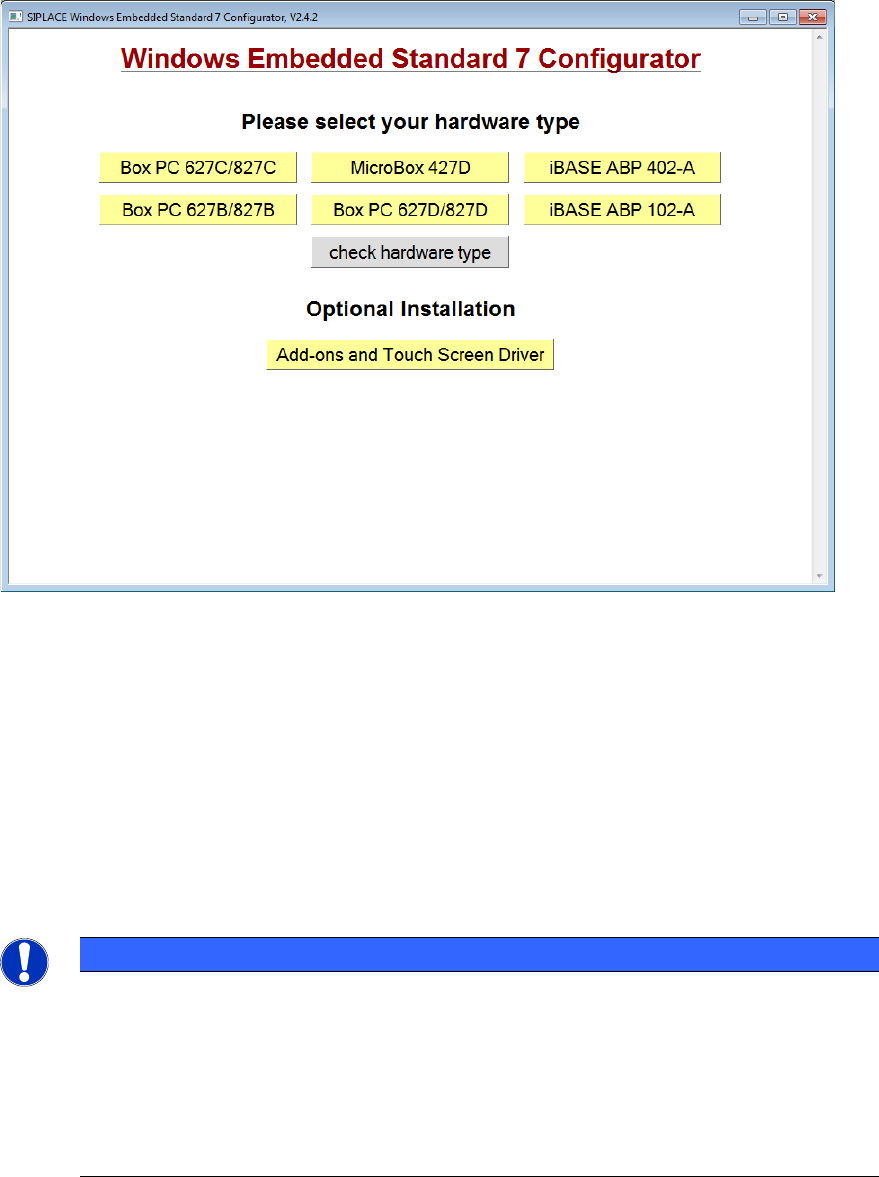
The following window is displayed:
Figure 4-2: Window "SIPLACE Windows Embedded Standard 7 Configurator"
► Click on the required hardware to select it and follow the further instructions displayed in the
succeeding windows.
► If necessary, enter the station IP-address for SIPLACE Pro LAN (required for a station
computer only).
The SIPLACE settings are automatically performed and the computer reboots.
After the reboot, you are logged on as Operator (station computer) or the Windows login window is
displayed (Coplan / BulkFeeder X computer).
► If no touch screen is used (Coplan / BulkFeeder X computer), remove the software CD from the
DVD drive or release the USB stick and remove it from the USB interface.
NOTICE
SIMATIC BoxPCs 627C/827C:
When shutting down a machine via the machine software GUI, the computer will be
switched off at the end and the It is now save to turn off the Computer
message will be displayed. For technical reasons, this message will not be displayed on
the SIMATIC BoxPCs 627C/827C.
Only the short No signal input or kein Eingangssignal monitor message is
displayed, thereafter the monitor LED starts flashing or changes from green to red.