TS5520-user-guide.pdf - 第7页
10 SPARE PARTS, CONT. Valve Front Section ITEM PART NUMBER DESCRIPTION QTY 16 5520-000-018 Spray Cone Cap 1 17 5520-000-020 Nozzle, Inc. Seat 1 18 T1000598 Nozzle Seat 1 19 TSD1400-008A Nozzle Adaptor O-Ring, Buna 1 20 5…
6
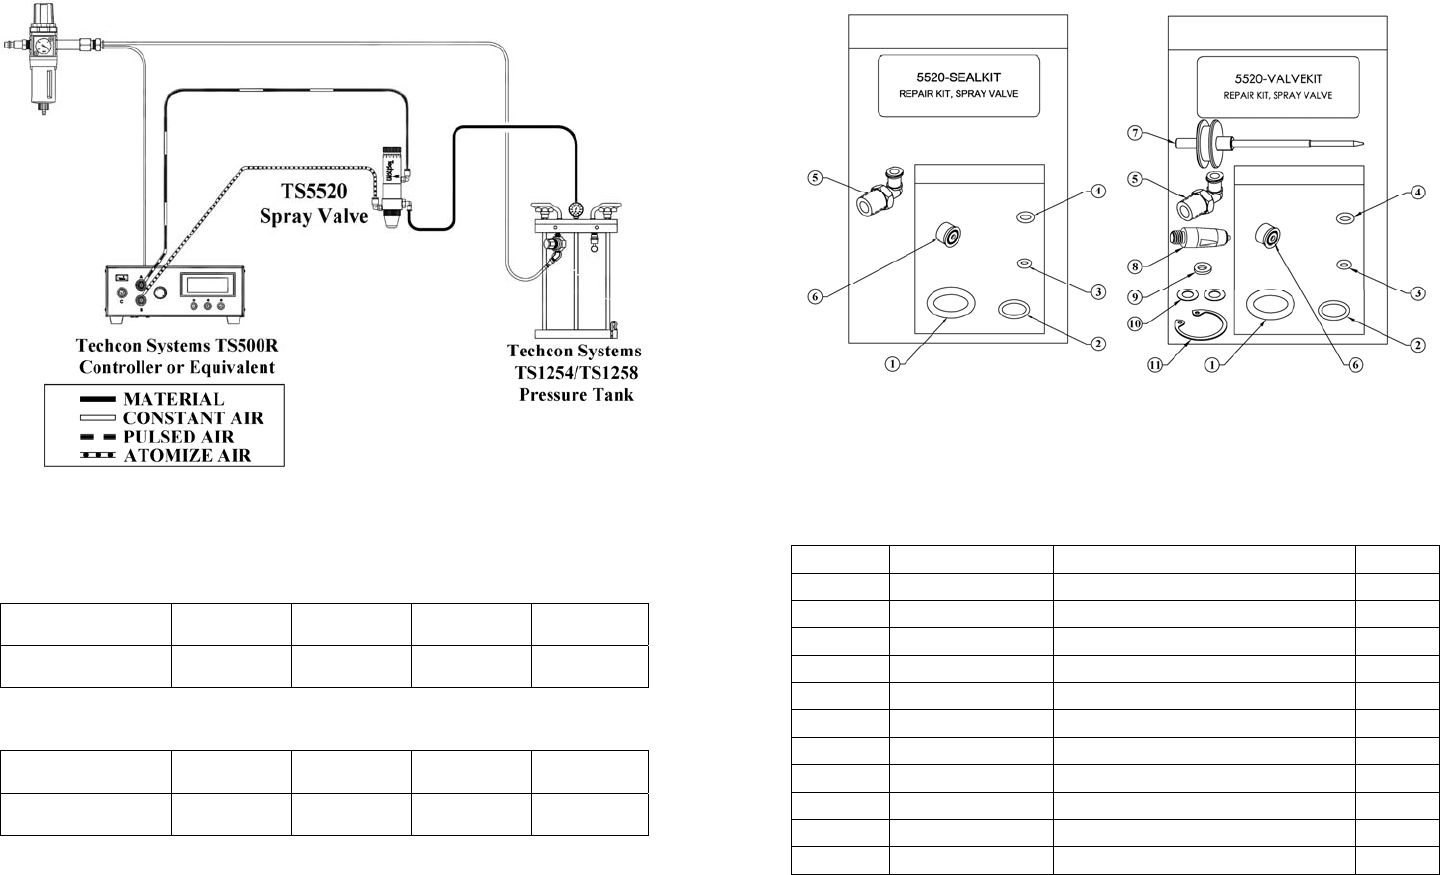
6. TYPICAL SYSTEM SET-UP
SPRAY AREA COVERAGE BY ROUND NOZZLE:
Distance from
Nozzle
1
''
(25.40mm)
2''
(50.80mm)
3''
(76.20mm)
6''
(152.40mm)
Diameter of spray
pattern
0.250''
(6.35mm)
0.500''
(12.70mm)
0.750''
(19.05mm)
1.500''
(38.10mm)
SPRAY AREA COVERAGE BY FAN NOZZLE:
Distance from
Nozzle
1''
(25.40mm)
2''
(50.80mm)
3''
(76.20mm)
6''
(152.40mm)
Diameter of spray
pattern
1.000''
(25.40mm)
1.500''
(28.10mm)
2.000''
(50.80mm)
3.250''
(82.60mm)
Spray coverage is determined by:
• Flow adjustment - turn end cap counterclockwise to increase material flow rate.
• Length of actuation, set at controller (valve open time).
• Fluid reservoir pressure
• Fluid viscosity
Figure 4.0
11
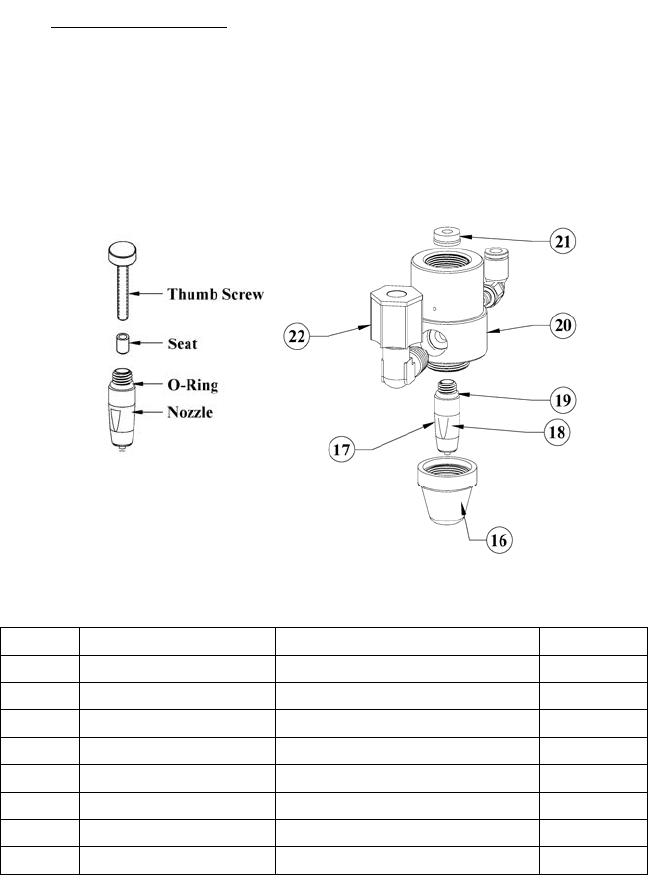
9. REPAIR KITS
ITEM PART NUMBER DESCRIPTION QTY
1 TSD1400-208A Piston O-Ring, Buna 1
2 TSD1400-013A O-Ring, Buna 1
3 TSD1400-006A O-Ring, Buna 1
4 TSD1400-008A O-Ring, Buna 1
5 TSD931-75 Luer Lock Adaptor, Elbow 1
6 TSD400-70 U-Cup Seal 1
7 5520-000-010 Needle/Piston Assembly 1
8 5520-000-020 Nozzle, Inc. Seat 1
9 TSD1109-45 Nylon Washer 1
10 TSD1109-43 Mylar Washer 2
11 TSD1120-15 Retaining Ring, Large 1
10
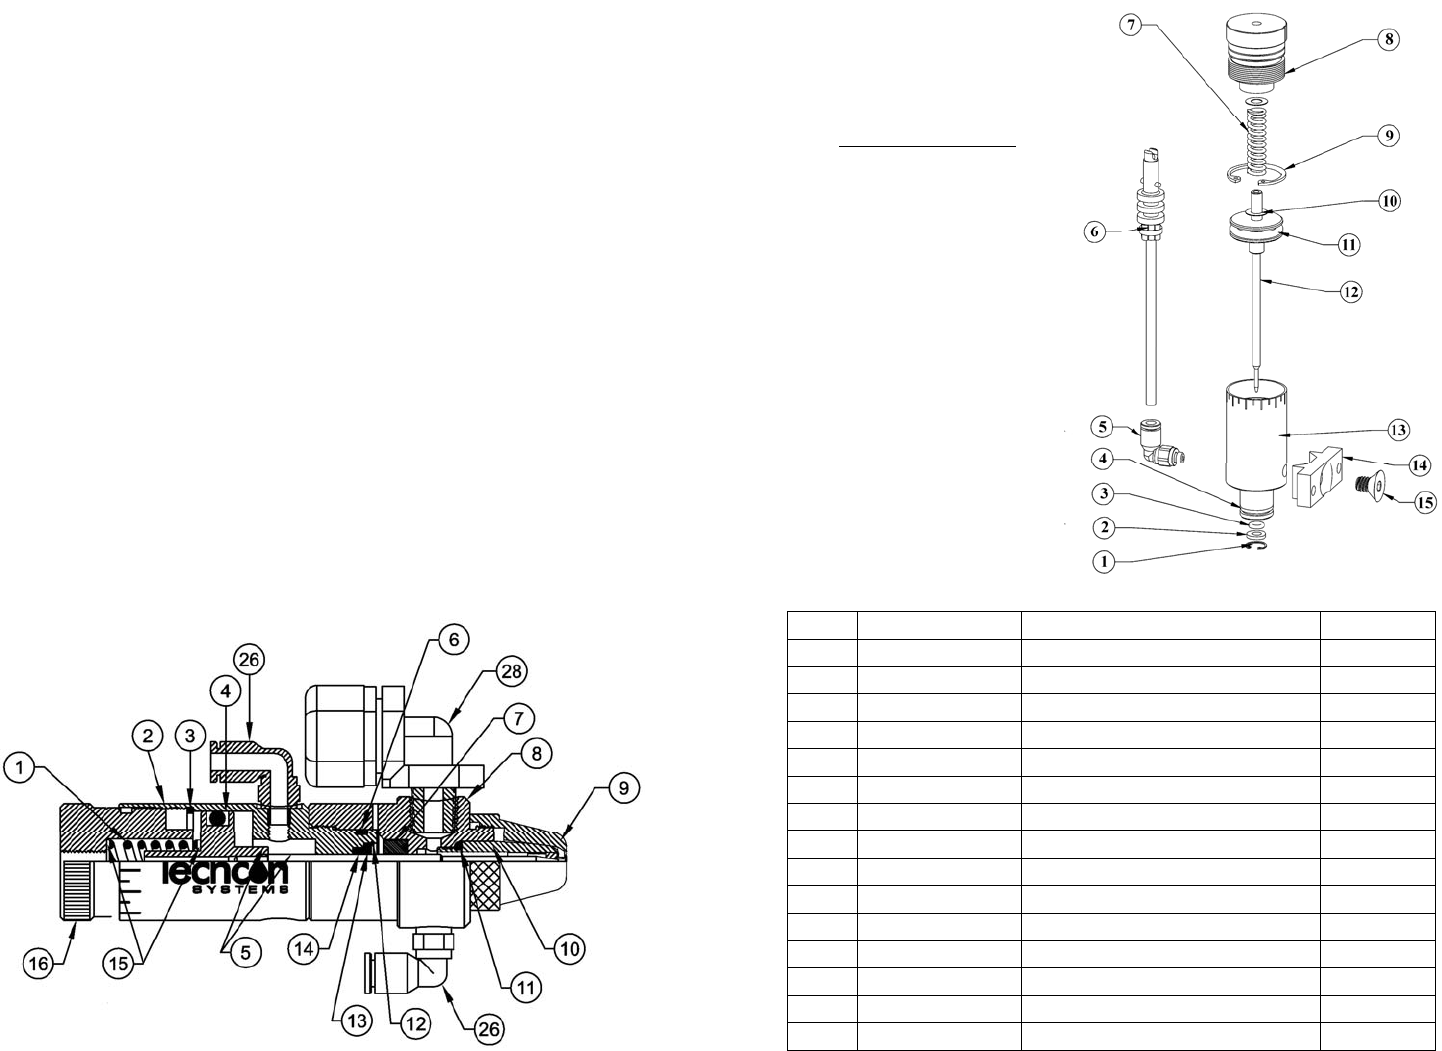
SPARE PARTS, CONT.
Valve Front Section
ITEM PART NUMBER DESCRIPTION QTY
16 5520-000-018 Spray Cone Cap 1
17 5520-000-020 Nozzle, Inc. Seat 1
18 T1000598 Nozzle Seat 1
19 TSD1400-008A Nozzle Adaptor O-Ring, Buna 1
20 5520-000-002 Body 1
21 TSD400-70 U-Cup Seal 1
22 TSD1003-16 Compression Fitting 1
Above TSD1113-28 Thumb Screw 1
Recommended lubricant:
All O-Rings & seals must be lubricated with Bimba HT-99, or equivalent, with
the exception of TSD400-70, which must remain dry.
Figure 6.0
7
• Distance between spray nozzle to spray surface
7. MAINTENANCE AND CLEANING:
Tool required: 5/8'' open-end wrench; Snap ring pliers, o-ring removal tool (P/N
TSD1597-7).
Normally, purging the valve with appropriate flush material or solvent after use is
sufficient for cleaning. However, some material may cause a buildup in the valve
chamber, in this case periodic and thorough cleaning will be required.
NOTE:
• Make sure the fluid pressure is released before valve is disassembled
• To replace seals, please order seal kit part number: 5520-SEALKIT
• To repair valve, please order valve kit part number: 5520-VALVEKIT
7.1 Thorough Cleaning
Refer to figure 5.0
1. Release fluid pressure.
2. Disconnect fluid line and remove fluid inlet fitting (28).
3. Disconnect valve air hoses.
4. Turn the stroke control knob (16) two turns counterclockwise from closed
position.
5. Hold the fluid housing (8) and rotate the air cylinder (2) counterclockwise.
When completely un-threaded, pull the two valve segments straight apart to
separate.
6. Inspect o-ring (6), replace o-ring if damaged found.
7. Remove cup seal (7), replace seal if damaged found.
8. Remove nozzle (10) and spray cone (9).
9. Clean the fluid housing (8), needle/piston assembly (5), nozzle (10) and
spray cone (9).
NOTE: Avoid using sharp probes for cleaning. Any nicks or scratches on the
seal or the surfaces of the needle/piston assembly may cause leakage.
10. Insert cup seal (7) into fluid housing (8) using 5420-SIT insertion tool.
Make sure the o-ring side is facing down.
11. Reinstall nozzle (10) and spray cone (9) to fluid housing (8).
12. Lubricate o-ring (6) with Bimba HT-99, or equivalent.
13. Thread the air cylinder/needle assembly into fluid housing.
14. Make sure not to cross thread.
7.2 Nozzle Seat Replacement (refer to figure 6.0)
1. Insert the thumb screw inside the nozzle (17) and rotate clockwise to attach
to the seat (18).
2. Secure the nozzle in a “soft jaw” vise and then pull the thumb screw, with
the seat attached, straight out.
8
3. Install the new seat on the thumb screw and then insert the thumb screw
straight into the nozzle. To ensure proper seat alignment, it is recommended
that the seat installation is done on an Arbor Press.
7.3 To Replace Seal in Air Cylinder
1. Hold the fluid housing (8) and rotate the air cylinder (2) counterclockwise.
When completely un-threaded, pull the two valve segments straight apart to
separate.
2. Remove stroke control knob (16) by rotating it in counterclockwise
direction.
3. Remove compression spring (1).
4. Using the snap ring pliers, remove the retaining ring (3).
5. Remove Mylar washers (15).
6. Pull the needle/piston assembly (5) straight out from the air cylinder (2).
7. Using the snap ring pliers, remove the retaining ring (12).
8. Remove the nylon washer (13) from the air cylinder.
9. Using o-ring removal tool, remove o-ring (14).
10. Replace all o-rings if necessary.
11. Lubricate all o-rings with Bimba HT-99, or equivalent.
12. Reinstall o-ring (14).
13. Reinstall nylon washer (13) and secure with retaining ring (12).
14. Thread the air cylinder (2) into fluid housing (8). Make sure not to cross
thread.
15. Reinstall needle/piston assembly (5) and secure with retaining ring (3).
16. Reinstall first Mylar washer (15) on the needle/piston assembly (5).
17. Reinstall compression spring (1) into air cylinder (2).
18. Reinstall second Mylar washer (15) in the stroke control knob (16).
19. Reinstall stroke control knob (16).
9
8. SPARE PARTS
Valve Rear Section
ITEM PART NUMBER DESCRIPTION QTY
1 TSD1120-2 Retaining Ring, Small 1
2 TSD1109-45 Nylon Washer 1
3 TD1400-006A O-Ring, Buna 1
4 TSD1400-013A O-Ring, Buna 1
5 TSD1003-20 Air Fitting, 4mm, Elbow 2
6 A0100478 Air Hose/Connector Assembly, 4mm 2
7 TSD1150-34 Spring 1
8 5520-000-007 End Cap 1
9 TSD1120-15 Retaining Ring, Large 1
10 TSD1109-43 Mylar Washer 2
11 TSD1400-208A Piston O-Ring, Buna 1
12 5520-000-010 Needle/Piston Assembly 1
13 5520-000-001 Air Cylinder 1
14 918-000-048 Mounting Bracket 1
15 TSD1106-36 Mounting Screw 1
Recommended lubricant:
All o-rings & seals must be
lubricated with Bimba HT-99,
or equivalent.
Figure 5.0