00197192-02_VD_EDM_2.1_DE_EN.pdf - 第20页
EDM V2.1 / Versio n Desc ription Ausgabe 11/2012 Edit ion 20 4.3.3 A utomatic P ush in the Clearing Pool If Auto Push is enabled, a push d ata pac kage is c reated a utom atically b y the Cle aring Po ol and sent to the …
EDM V2.1 / Version Description Ausgabe 11/2012 Edition
19
Figure 4-14: Accepting the push data packages
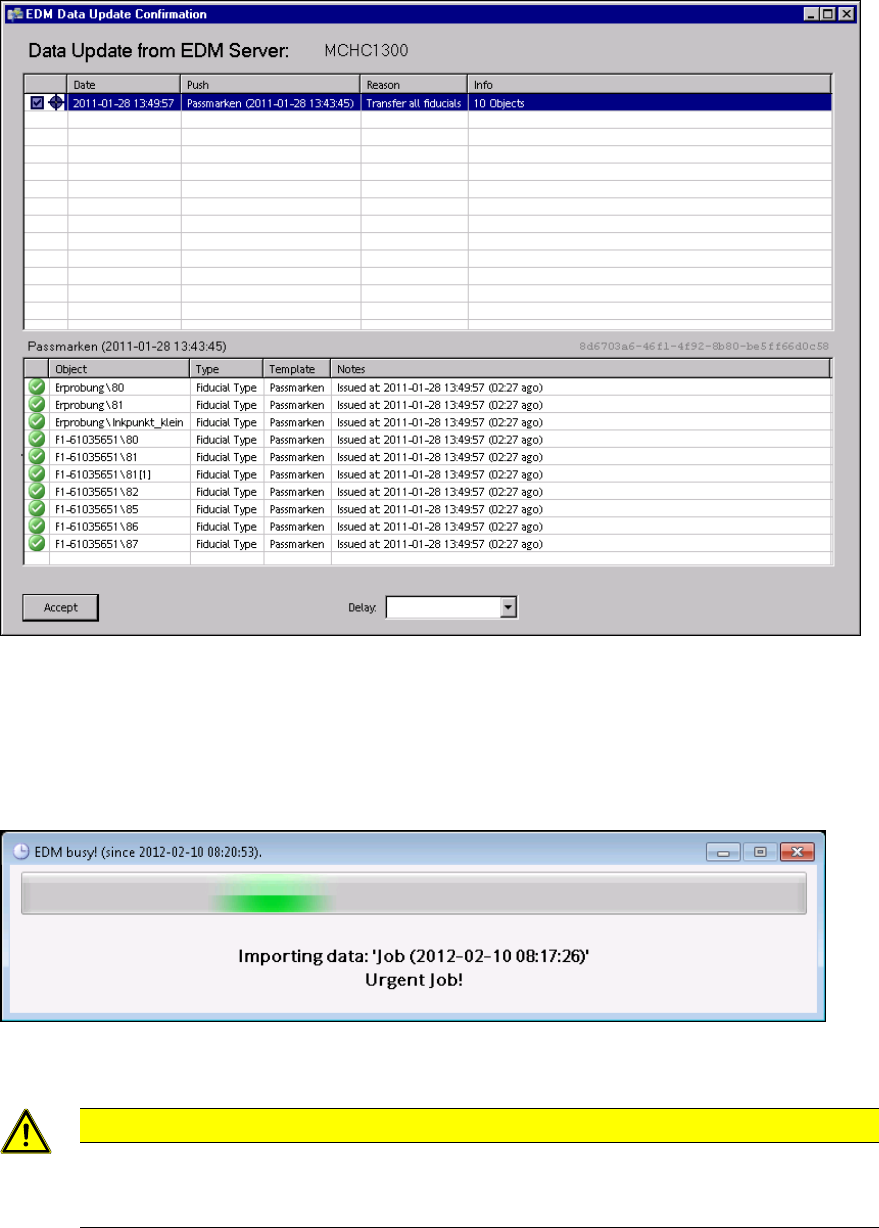
4.3.2.2 Importing the Objects
After the user has confirmed the dialog box on the Line Server, the objects transferred are imported
into SIPLACE Pro.
Figure 4-15: Importing the objects
CAUTION
Although Push Mode and Pull Mode are not mutually exclusive, concurrent SIPLACE
Pro export and import data models (e.g. an import data model in SIPLACE Pro Desk and
"pulling" with the EDM Client) should be avoided on the same EDM computer.
As soon as this dialog box closes, transfer is complete and the objects are available in the
SIPLACE Pro instance of the Line Server for further usage.
EDM V2.1 / Version Description Ausgabe 11/2012 Edition
20
4.3.3 Automatic Push in the Clearing Pool
If Auto Push is enabled, a push data package is created automatically by the Clearing Pool and
sent to the line if changes are completely rejected. This ensures that the most recent data is
available on the Line Server.
The configuration options are described in the EDM Installation Manual, section 5.2.4.2.
4.4 EDM Clearing Pool
In the EDM Clearing Pool, the change notifications of the single lines are collected to examine
them in terms of their relevance and, if necessary, return them to the SIPLACE Pro Master
Database. With the functionality already available in SIPLACE Pro, individual objects of a certain
type (components, component shapes, boards, placement lists, support pins, support pin lists) can
be compared attribute-by-attribute, and changes can be applied at this finely granulated level.
As of the EDM 2.1 version, the presentation of the change notifications has been improved:
● The previously "technical" content of the change notifications has been substituted by
significant descriptions of the actions that have been actually performed in SIPLACE Pro Desk
or at the machine.
● The changes made by a user can now be definitely assigned to the edited objects (Editors) in
SIPLACE Pro Desk.
Example: Movement of a feeder within a setup will now be displayed in the setup context and
not as a general change at the tables anymore.
The Clearing Pool can be installed independently of the EDM master service on a separate
workstation computer.
EDM V2.1 / Version Description Ausgabe 11/2012 Edition
21
Figure 4-16: Clearing Pool
An overview of the changed objects is displayed in the tree view to the left in the Clearing Pool (1).
In the drop-down list above the tree view you can switch between different views. The entry field (2)
beneath the tree view allows you to filter by a specific object name.
The change notifications of the selected object in the tree view are displayed as user actions to the
right in the Clearing Pool (3).
Additionally to the description of the change, information is displayed about the change type (e.g.
action name, action icon, list of the changed objects) and the name of the application that triggered
the change notification. The well-known columns for change date, comment and comment category
have been kept, the columns with the different user names (EDM, SPI, Windows) have been
merged. The other columns that referred to the low level SPI events (new and old value, changed
attribute, etc.) have been removed; the information is now displayed in the Description column. If
necessary, the format of the length entries displayed in the notifications may be adjusted with the
marked icon (9) in the footer.
At the bottom to the right in the display range there are icons with which you can customize the
view of the displayed information.
● With the column selection button (4) you may change the order, size and visibility of the
displayed columns.
● With the user selection button (5) you define for which user you wish to display the change
notifications (SIPLACE, Windows; EDM).
● With the detailing level button (5) you define how detailed the describing text will be displayed
(compact, normal, enhanced).
The describing text is always completely displayed in the tooltip.