00190935-01.pdf - 第41页
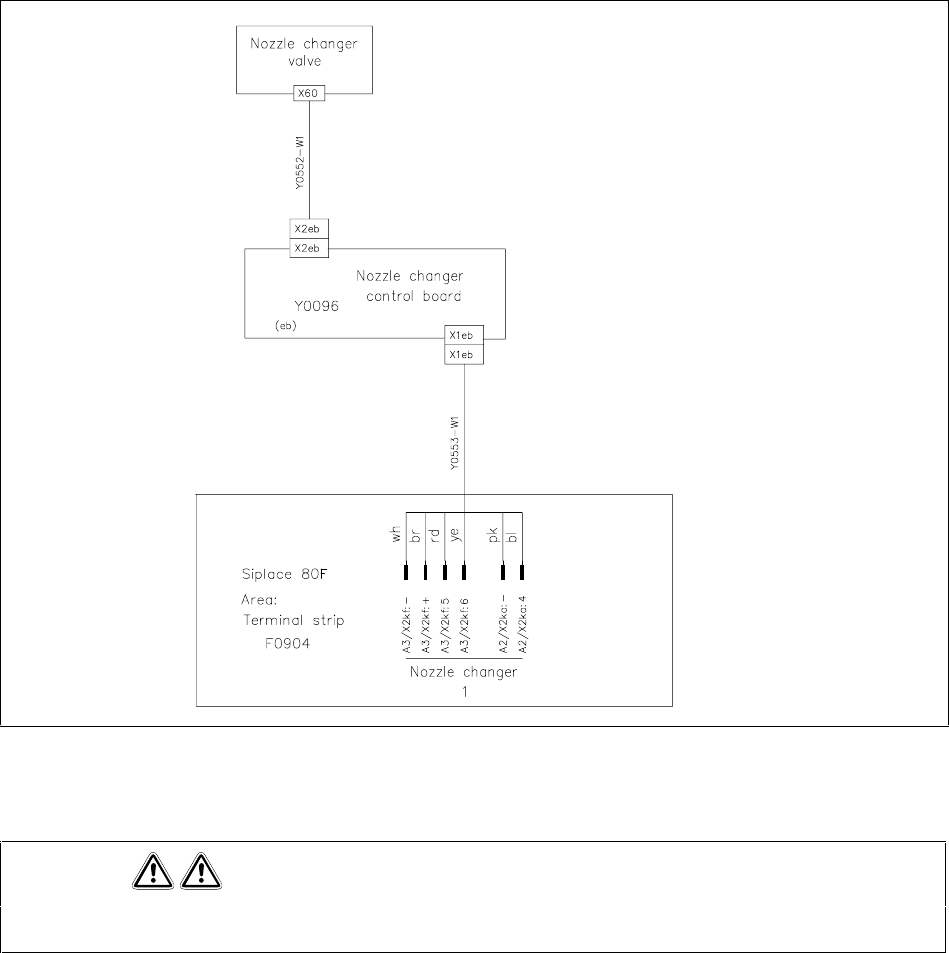
Nachrüstanleitung/Retrofitting Instructions Pipettenwechsler Siplace 80S15/F3/S20/F4 Nozzle Changer Ausgabe/Edition 03/97 Seite/Page 41 von/of 44 Figure 13: Connecting the power cable of the revolver head nozzle changer …
Pipettenwechsler Siplace 80S15/F3/S20/F4 Nozzle Changer Nachrüstanleitung/Retrofitting Instructions
Ausgabe/Edition 03/97
Seite/Page 40 von/of 44
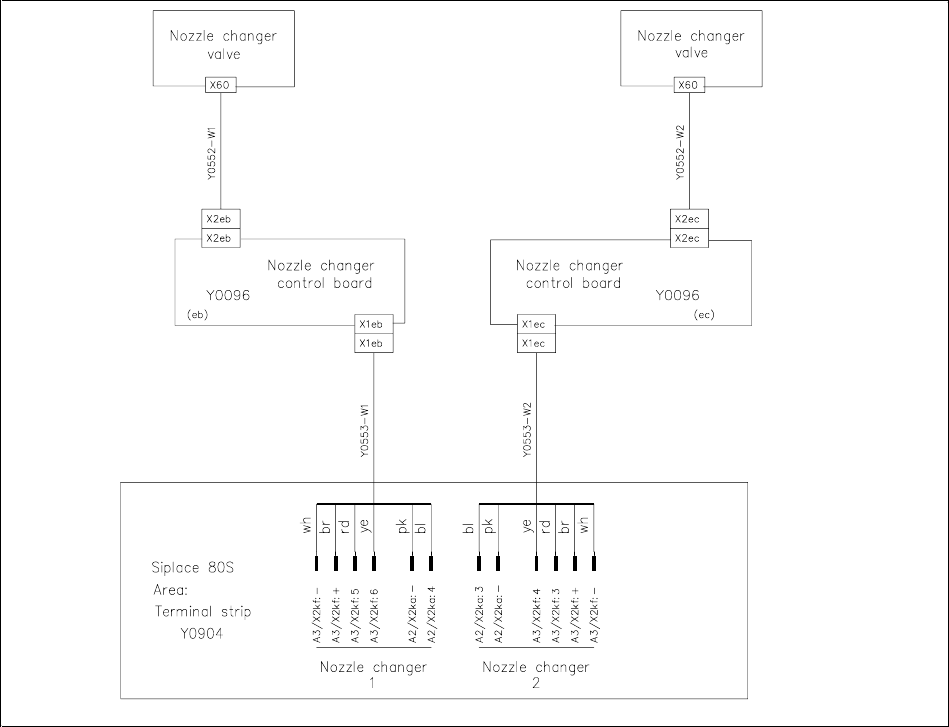
1.5.2.2 Electrical connections
• Guide the connecting cable Y0553-W1 or Y0553-W2 through the cable duct into the terminal strip
Y0904.
• Connect the terminal Y0553-W1 or Y0553-W2 on the nozzle changer to the terminal strip Y0904, as
shown in the following terminal diagrams (figures 12 and 13).
• Please note that there are differences between the Siplace 80S15 and 80F3.
Figure 12: Connecting the power cable of the revolver head nozzle changer to the Siplace 80S20
Nachrüstanleitung/Retrofitting Instructions Pipettenwechsler Siplace 80S15/F3/S20/F4 Nozzle Changer
Ausgabe/Edition 03/97
Seite/Page 41 von/of 44
Figure 13: Connecting the power cable of the revolver head nozzle changer to the Siplace 80F4
Please note
The cable Y0552-W1/W2 is supplied pre-installed and connected up.
1.5.2.3 Connecting the compressed air supply
• The procedure is described in section 1.5.1.5.

Pipettenwechsler Siplace 80S15/F3/S20/F4 Nozzle Changer Nachrüstanleitung/Retrofitting Instructions
Ausgabe/Edition 03/97
Seite/Page 42 von/of 44
1.5.2.4 Commissioning
• Check your station and line software versions against the software requirements.
• If necessary, install the station and line software required.
• Use the station editor on the line computer to configure the nozzle changer.
• In the station editor, assign the nozzle types used to the individual magazines.
• Determine the size of the nozzle changer using the SITEST Siplace testing program, as described in
the SITEST operating instructions.
1.6 Notes on use
• Before filling a magazine with a certain type of nozzle for the first time, attach an adhesive label
designating the nozzle type concerned to the magazine.
Please note
Each magazine can only contain ONE type of nozzle.
Remove the magazines from the machine before filling and only replace full magazines.
• Open the key plate and insert the nozzles into the nozzle holders.
• Close the key plate so that the nozzles cannot fall out of the magazine.
• Do not fill the magazines until all the nozzles on the revolver head have been returned to the
magazine.
• The various functions of the nozzle changer are described in the “Single functions” chapter of the
User's manual.
• See the UNIX line computer operating instructions for information on programming the nozzle changer
on the line computer.
Please note
Do not allow components to fall onto the magazines since this could cause the key plate to jam.
Do not allow components to fall onto free magazine slots since this could prevent the magazines being
placed correctly in the slots.
Regularly remove any components from the magazines and free slots.