00195467-01_Installation Manual Setup Center 2.2.pdf - 第18页
SIPLACE Setup Center 2.2 Installation Manual 5 Inst allation 5.1 Important Prep arations All computers must have been set up and prepared appropri ately in advance of the complete installation of SIPLACE Setup Ce nter to…
Installation Manual SIPLACE Setup Center 2.2
4.2.6.2 Central Database
Line Computer
Siplace Pro Setup Center GUI
Database Server
SIPLACE Pro
Database
Costumer LAN
Machine
Machine
SC Computer (Pre Setup Unit)
Setup Center GUI
Forced Setup
Verification
Forced Setup
Verification
CAN Bus
SIPLACE Setup Center
Database
Legende
Computer Software Package
Database
Siplace Pro
Line Computer
Siplace Pro Setup Center GUI
Machine
Machine
Forced Setup
Verification
Forced Setup
Verification
Line Computer
Siplace Pro Setup Center GUI
Machine
Machine
Forced Setup
Verification
Forced Setup
Verification
Machine
Forced Setup
Verification
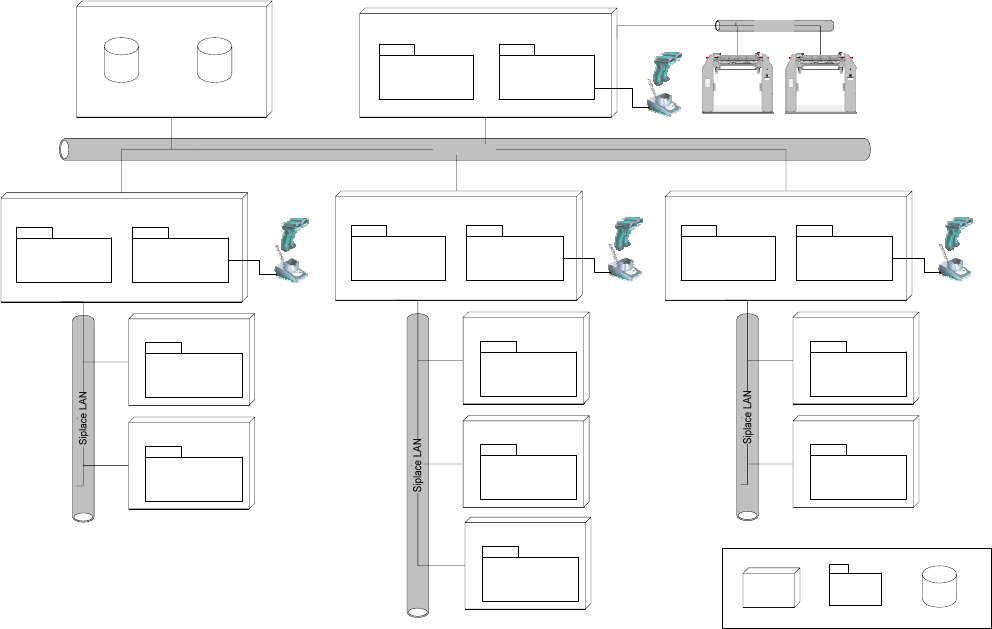
Fig. 4-3 system configuration Central Database
Usually the system configuration ‘Central Database’ is for manufacturing facility with more than
one production line. Prerequisites for the configuration is
• the SIPLACE Pro database is also installed centrally, or
• the SIPALCE EDM product is deployed, or
• a pre setup area with Setup Center is planned, or
• packaging units often moves between different placement lines
The Setup Center GUIs are connected to the local SIPLACE Pro and to the central Setup Center
Database. The docking stations are connected via CAN-Bus to the SC Computer. The pre setup
unit is the reason, why a central Setup Center Database is necessary.
17 of 90
-

SIPLACE Setup Center 2.2 Installation Manual
5 Installation
5.1 Important Preparations
All computers must have been set up and prepared appropriately in advance of the complete
installation of SIPLACE Setup Center to function correctly. 3
These preparatory measures demand knowledge about the administrative functions of Windows
and SQL Server. Please contact your system administrator for assistance if required. 3
Note:
Always exit the running setup verification via task manager/process before
the installation or uninstallation of Setup Center.
Note:
It is not necessary to uninstall the current version of Setup Center before the
installation of the new version of Setup Center.
Note:
If during the installation a note appears, that Microsoft Data Access Components
(MDAC) must be installed, accept this note.
5.1.1 Operation System Installation
The following steps are essential before conducting the installation of SIPLACE Setup Center
• Installation of Windows 2000 Server (SP3 or SP4) or Windows 2000 Workstation (SP3 or
SP4) or Windows XP with SP1a
• Furthermore, you require Windows 2000/XP administrative rights and write rights for all
computers on which you are installing SIPLACE Setup Center.
Note:
You are required to have administrator rights for the installation proedure!
18 of 90
Installation Manual SIPLACE Setup Center 2.2
5.1.2 MSDE Installation
If the database decision of SIPLACE Setup Center Database (5.1.1) is made to use a MSDE
installation, this must be done prior installing SIPLACE Setup Center.
Installing MSDE is done by executing the file \3rdpartyinstaller\MSDE\SETUP_Step.cmd on the
Setup CD.
If the TCP port 1433 is not available then the alternate installer
\3rdpartyinstaller\MSDE\SETUP_Step_dynamic_port.CMD must be used.
See the file \3rdpartyinstaller\MSDE\readme.txt for more details.
Note:
This installer creates a MSDE instance with the name “SIPLACE_MSDE”.
5.2 Hardware Installation
We recommend performing the installation in the specified order: 5
1) Installation of hardware
2) Installation of software, see page
This chapter describes the hardware installation procedure.
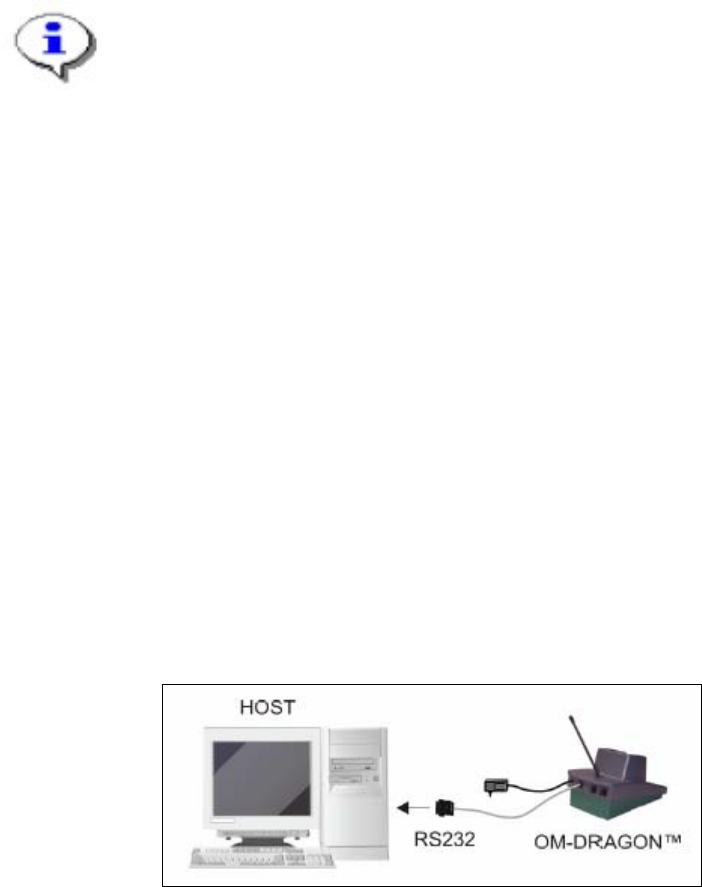
5.2.1 Dragon Scanner’s Cradle
• The Dragon scanner’s cradle needs to be connected to the Setup Center PC’s COM-port.
The default port is COM1.
• If the COM1 port is already in use another COM port need to be configured
(Another port can be configured in the Setup Center after installation: open Setup Center
setting dialog – menu Options/Settings – dialog Scanner/Dragon Scanner/Serial Port).
• Connect the cradle to the Setup Center PC according to the following picture:
Fig. 5-1 RS232 Connection
19 of 90
-