manual-biron-500-precision-soldering-tool-jbc-0034642_ID-251816_EN.pdf - 第12页
If the d own load ed too l fi rmwa re up date fi le c onta ins a n ewer version than the one already installed , the cu rre nt an d new ve rs ion are d isp laye d ( 1 ). T ap “ Upd ate” to star t th e upd ate (2) . Th e …
Tool
ON
MENU
28174
24 W
100%
18 W
100%
12 W
100%
6 W
100%
0 W
100%
10 seconds/div
V1.2
CHARGE
450 ºC
350 ºC
250 ºC
150 ºC
50 ºC
JBC
210
348ºC
5,7 W
80%
350ºC
Tool
ON
MENU
24 W
100%
18 W
100%
12 W
100%
6 W
100%
0 W
100%
10 seconds/div
V1.2
WORK
450 ºC
350 ºC
250 ºC
150 ºC
50 ºC
80%
JBC
210
350ºC
Tool
ON
MENU
24 W
100%
18 W
100%
12 W
100%
6 W
100%
0 W
100%
10 seconds/div
V1.2
CHARGE
450 ºC
350 ºC
250 ºC
150 ºC
50 ºC
JBC
210
348ºC
5,7 W
80%
350ºC
JBC#1
Tool
ON
MENU
24 W
100%
18 W
100%
12 W
100%
6 W
100%
0 W
100%
10 seconds/div
V1.2
CHARGE
450 ºC
350 ºC
250 ºC
150 ºC
50 ºC
JBC
210
80%
350ºC
JBC#1
Tool1
Tool ID
28714
Hardware
Software
0028283
X886787
Update File
File
Hardware
Software
Select your Firmware
-
-
Update
MENU
JBC
210
Return to Work
JBC#1
B·IRON 100
B·IRON 500
User’s Manual
User’s Manual
Documents
MENU
JBC#1
JBC
210
Return to Work
2822
Work
Settings
Counters
Update
Documents
Light Theme
Dark Theme
Disconnect
Tool
ON
MENU
28174
24 W
100%
18 W
100%
12 W
100%
6 W
100%
0 W
100%
10 seconds/div
V1.2
CHARGE
450 ºC
350 ºC
250 ºC
150 ºC
50 ºC
JBC
210
348ºC
5,7 W
80%
350ºC
Work
Settings
Counters
Update
Documents
Light Theme
Dark Theme
Disconnect
JBC#1
348ºC
6 W
Work
JBC#1
MENU
Tool1
2822
Tool ID
Hibernation delay (seconds)
00:30
Sleep mode
Sleep temperature
150ºC
Minimum Temperature
100ºC
Maximum Temperature
400ºC
Working
Low battery
Power OFF
Charging
No cartridge
Tool Status
Temperature units
ºC
ºF
JBC
210
Lock Parameters
Locked
Unlocked
Work
JBC#1
MENU
Tool1
2822
Tool ID
Hibernation delay (seconds)
10
Sleep mode
Sleep temperature
150ºC
Minimum Temperature
100ºC
Maximum Temperature
400ºC
Working
Low battery
Power OFF
Charging
No cartridge
Tool Status
Temperature units
ºC
ºF
JBC
210
Lock Parameters
Locked
Unlocked
Work
JBC#1
MENU
Tool1
2822
Tool ID
Hibernation delay (seconds)
00:30
Sleep mode
Sleep temperature
150ºC
Minimum Temperature
100ºC
Maximum Temperature
400ºC
Working
Low battery
Power OFF
Charging
No cartridge
Tool Status
Temperature units
ºC
ºF
JBC
210
Lock Parameters
Locked
Unlocked
Work
Enter PIN
OK
MENU
450 ºC
350 ºC
250 ºC
150 ºC
50 ºC
80%
Work
Settings
Counters
Update
Locate Tool
Documents
Light Theme
Dark Theme
Disconnect
MENU
450 ºC
350 ºC
250 ºC
150 ºC
50 ºC
JBC
80%
350ºC
Devices
Documents
Light Theme
Dark Theme
Work
Counters
PDS
JBC’s display (android)
Other android devices iOS devices
Copy the unzipped files on the device used with B·IRON:
Folder: Folder: Path:
\Internal shared
storage\Android\data\
es.infinitysource.jbc_
soldering.JBCBiron\files
\Internal shared storage\
Android\data\com.
jbctools.jbcbiron\files
Files > On my iPad > JBC
B.iron
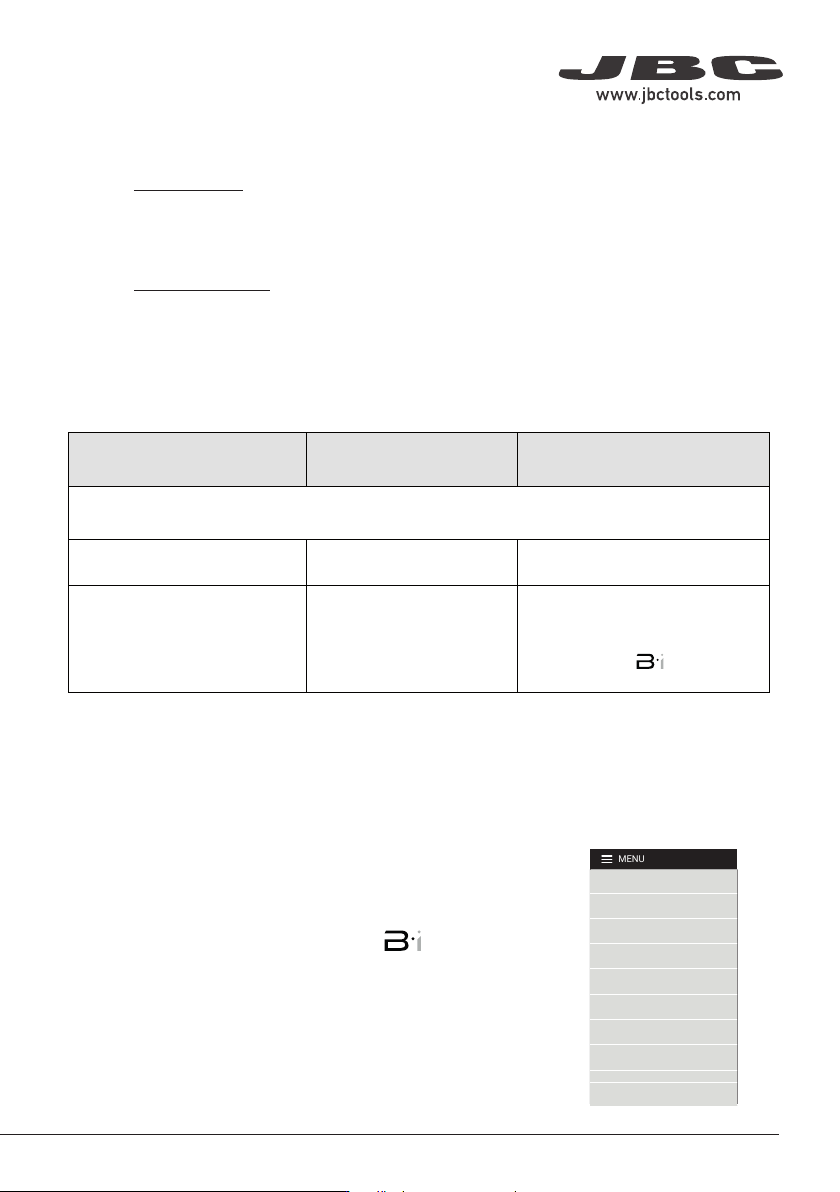
Tool firmware updates are not executed automatically; they must
be carried out by the user.
On the display you are using with B·IRON, and with the latest app
version installed, access the B·IRON app:
Select he tool you want to update. Then in the main menu select
“update”.
Note: At least one tool must be connected to see the expanded
menu options.
Executing the Tool Firmware Update File
Display without Internet connection:
Download the firmware update file to another device with an Internet connection from JBC’s website:
https://www.jbctools.com/jbcsoftware.html and unzip the downloaded file.
Then do as described in the table.
Main menu
with expanded
menu options
Downloading the Tool Firmware Update File
Display with Internet connection:
Download the firmware update file to the display used with B·IRON from https://www.jbctools.com/
jbcsoftware.html. Go to the internal folder and unzip the downloaded file.
Then copy the downloaded program to the internal storage of the display used with B·IRON. Access
the internal storage of the display and run the downloaded program. Once the program is completed,
the app will be updated to the latest version.
Note: For JBC displays, swipe down to open the internal storage folder.
App Versions
App Update
Make sure that the required app version is installed on the display (tablet or smartphone):
- Handles require app versions 1.6 or higher.
- Tweezers require app versions 1.7 or higher.
App Installation
On JBC’s portable display (Android), the
B·IRON app is already installed.
On the user’s smartphone or tablet
(Android / iOS), go to the App Store/Play Store
and search for “JBC B.IRON” on the search
bar. Note: Internet connection is required to
download the app.
Alternatively, scan these QR codes to
access the B·IRON app page directly:
Display with Internet connection (Android / iOS)
Update the app via Google Play (Android) or the App Store (iOS).
Display without Internet connection (Android)
Download JBC’s installer program to another device with an Internet connection from
JBC’s website: https://www.jbctools.com/jbcsoftware.html
JBC Software
No installation or initial download are required for newly purchased JBC products. Both JBC
display and tools come with its current software/firmware installed and updated, and are ready
to use.
Note:
App: If a third-party display (tablet or smartphone) is used, the B·IRON app must be downloaded from
JBC’s web page and installed on the device.
Firmware: The tool’s firmware is not automatically updated and the updates must be carried out manually
by the user. To do so, follow the instructions on the next page.
11
40 mm
50 mm
60 mm
80 mm
100 mm
130 mm
130 mm
para manuales - color gris
200 mm
300 mm
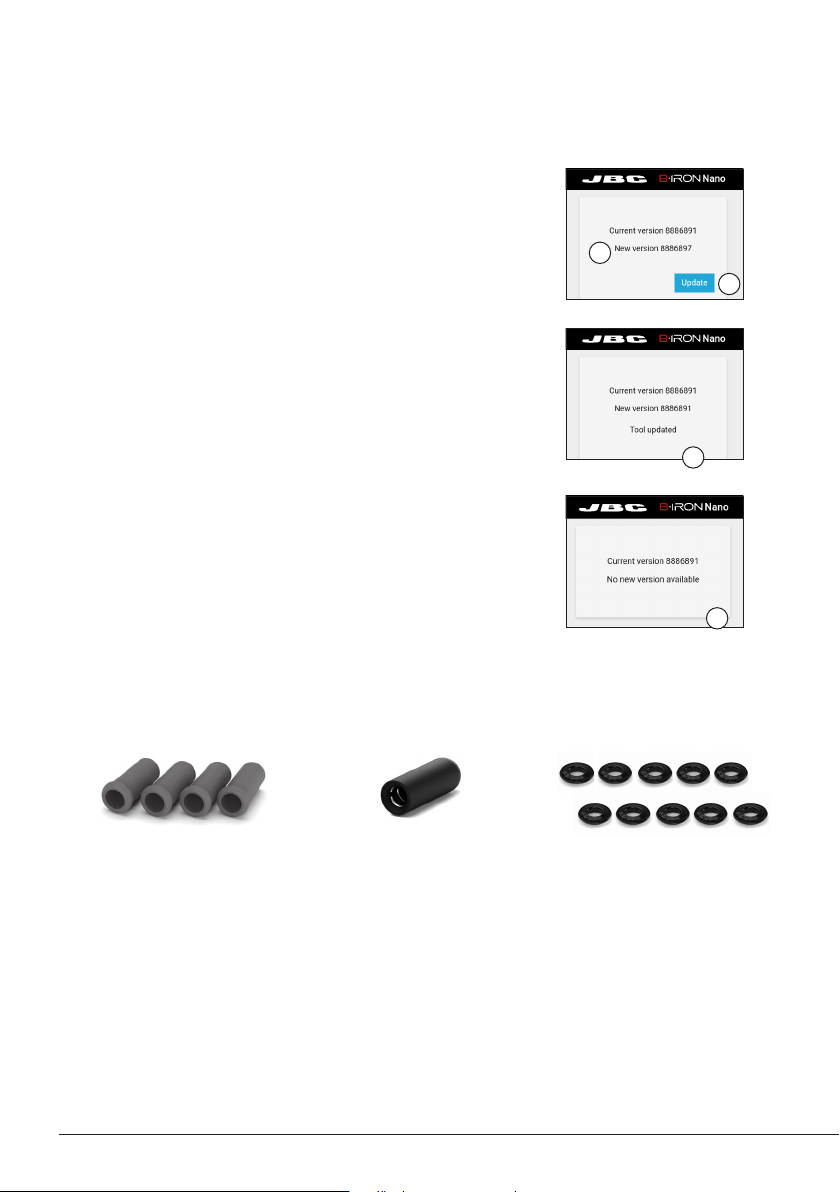
If the downloaded tool firmware update file contains a newer
version than the one already installed, the current and new version
are displayed (1). Tap “Update” to start the update (2).
The update process takes about 10 minutes.
The B·IRON status light continuously changes its color during the
update process.
Once the update is completed, “Tool updated” (3) will be displayed.
If “No new version available” is displayed (4), no update is possible
or required.
Executing the Tool Firmware Update File (continuation)
3
1
2
4
Replacement Parts for B·500 Handles
B5050
Soft Foam Grips for B·IRON
Handles
Reference includes 4 grips
B1596
Safety Cap for B·IRON
Handles
Reference includes 1 cap
OB4000
Sealing Plugs for B·100 &
B·500 Handles
Reference includes 10 sealing plugs
12
Sealing
plug
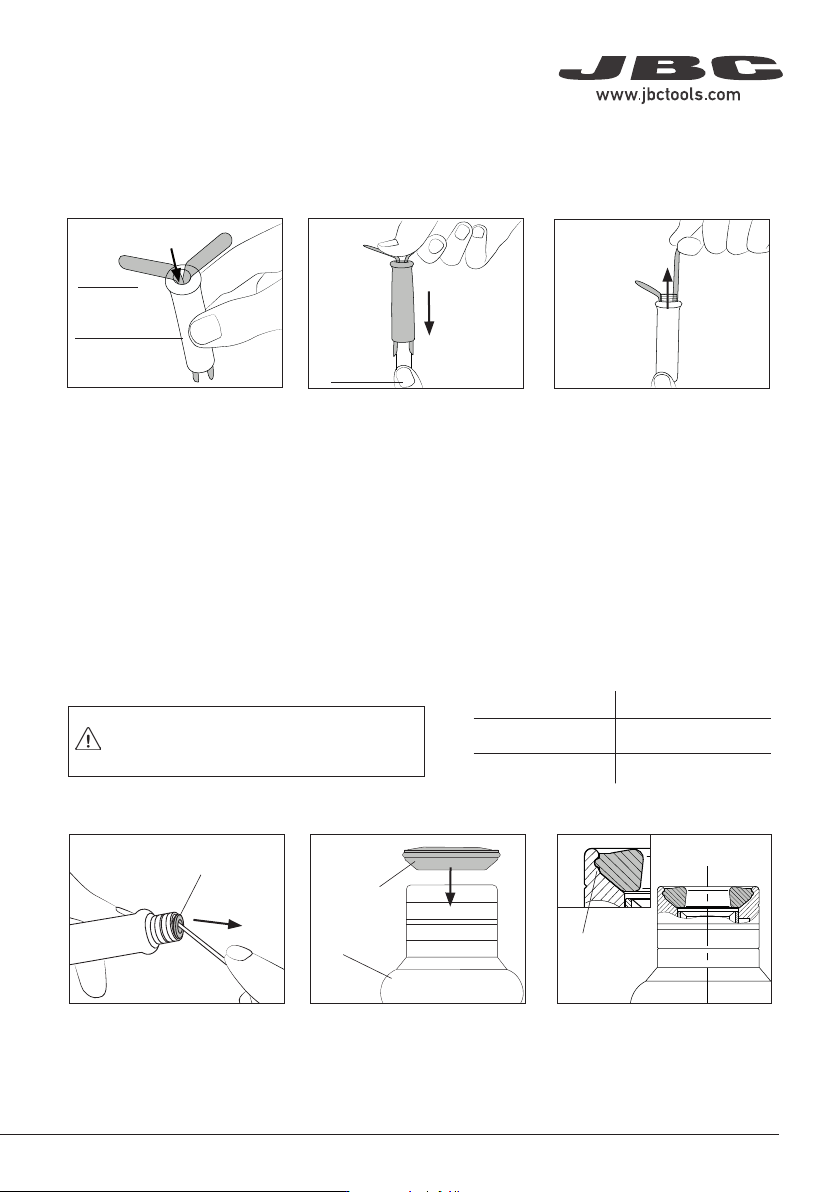
Before replacing the sealing plug,
disconnect the handle from the station and
make sure the device has cooled down.
The sealing plug prevents undesirable flux vapors or particles from entering the handle and its usage
is highly recommended. If the sealing plug is not used, this can lead to incorrect cartridge contact and
may render the tool unusable.
Push the sealing plug inside
the handle.
Note: The chamfered side
of the sealing plug has to be
positioned towards the handle.
Make sure the sealing plug is
placed correctly.
The edge of the sealing plug
must rest in the groove of the
tool bushing.
Introduce a small shaft or
screwdriver, not deeper than
8mm, lift and pull the sealing
plug. Never use a cartridge to
do this operation.
Handle
Chamfered
Side
Sealing plug references:
(each ref. includes 10 sealing plugs)
Replacing Sealing Plug for B·100 & B·500 Handles - OB4000 includes 10 sealing plugs
Replacing Sealing Plug for B·NANO Handles - OB5000 includes 10 sealing plugs
Edge inside
the groove
Handle
Chamfered
side
Sealing plug
in touch with
the bushing
Remove the worn sealing plug
by unscrewing it by hand.
Position the chamfered side
upwards and screw the new
sealing plug into the handle
bushing until it stops.
Make sure the sealing plug is
placed correctly.
The shoulder of the plug must
be in touch with the bushing.
View: inside
Sealing
Plug
Sealing Plugs
For B·NANO handles, the use of the sealing plug is mandatory. Without the use of the
sealing plug, the cartridges cannot be properly inserted.
Note: Check the condition of the plug periodically
and replace it as soon as wear or cracking is
detected.
Handle Sealing Plug Ref.
B·NANO OB5000
B·100 and B·500 OB4000
Make a length-ways cut on the
worn grip. Be careful not to
damage the handle.
Remove the worn grip. Firmly slide the new grip onto
the handle until it locks into
place.
Cutting Worn Grip Removing Worn Grip
Replacing Rubber Grips - B5051 includes 4 grips
Cutter
Assembling New Grips
Worn Grip
New Grip
Apply vaseline inside the
grip for easier fitting
Maintenance - B·IRON Handles
Replacing Soft Foam Grips - B5050 includes 4 grips
Insert the fitters into the new
grip.
Push the grip with the fitters
onto the handle.
To remove the fitters, hold the
grip and pull the fitters out. Use
pliers if necessary.
CD-Q:
OK
Fitter
New Grip
CD-Q:
OK
CD-Q:
OK
Hold this way
so the fi tters
can slide
Handle
Inserting Fitters Assembling Grips Removing Fitters
13
40 mm
50 mm
60 mm
80 mm
100 mm
130 mm
130 mm
para manuales - color gris
200 mm
300 mm