manual-biron-500-precision-soldering-tool-jbc-0034642_ID-251816_EN.pdf - 第5页
1 3 4 1 2 Mark Retention Clamps C 11 5 C a r t r i dg e C 210 Car tridge C a r t r i d g e E x ch a n ge r T o insert a cartridge, carry out the same steps as befor e in r everse or der . Note: Car t rid ge s mus t be in…
Reference Mark
Reference Mark
Reference Ring
Reference Ring
Ring
Ring
Inserting C115 Cartridges
Push the cartridges inside the handle until the
reference ring rests against the sealing plug.
Inserting C115 Cartridges
Push the cartridges inside the tweezers until
the first ring rests against the tool.
Inserting C210 Cartridges
Push the cartridges inside the handle until
the reference mark is aligned with the edge
of the handle.
C210 Cartridge Holder
The cartridge holder (4x slots) is used to
store cartridges. It allows having different
cartridges quickly at hand and it works with
C210 Cartridges.
Cartridge Holder
Slots
C115 Cartridge Adapters
(Ref. B0643 includes 4 adapters)
Since C115 Cartridges have a smaller diameter
than C210 Cartridges, adapters must be used
to store them in the cartridge holder.
These adapters must simply be inserted from
above into the slots of the cartridge holder.
C115 Cartridge Adapters
(Ref. B0643 includes 4 adapters)
Since C115 Cartridges have a smaller diameter
than C210 Cartridges, adapters must be used
to store them in the cartridge holder.
These adapters must simply be inserted from
above into the slots of the cartridge holder.
Cartridge
Adapters
Cartridge
Adapters
ø 1
ø 1,5
ø 3,5
4
Conical Chisel Conical Bent Bevel
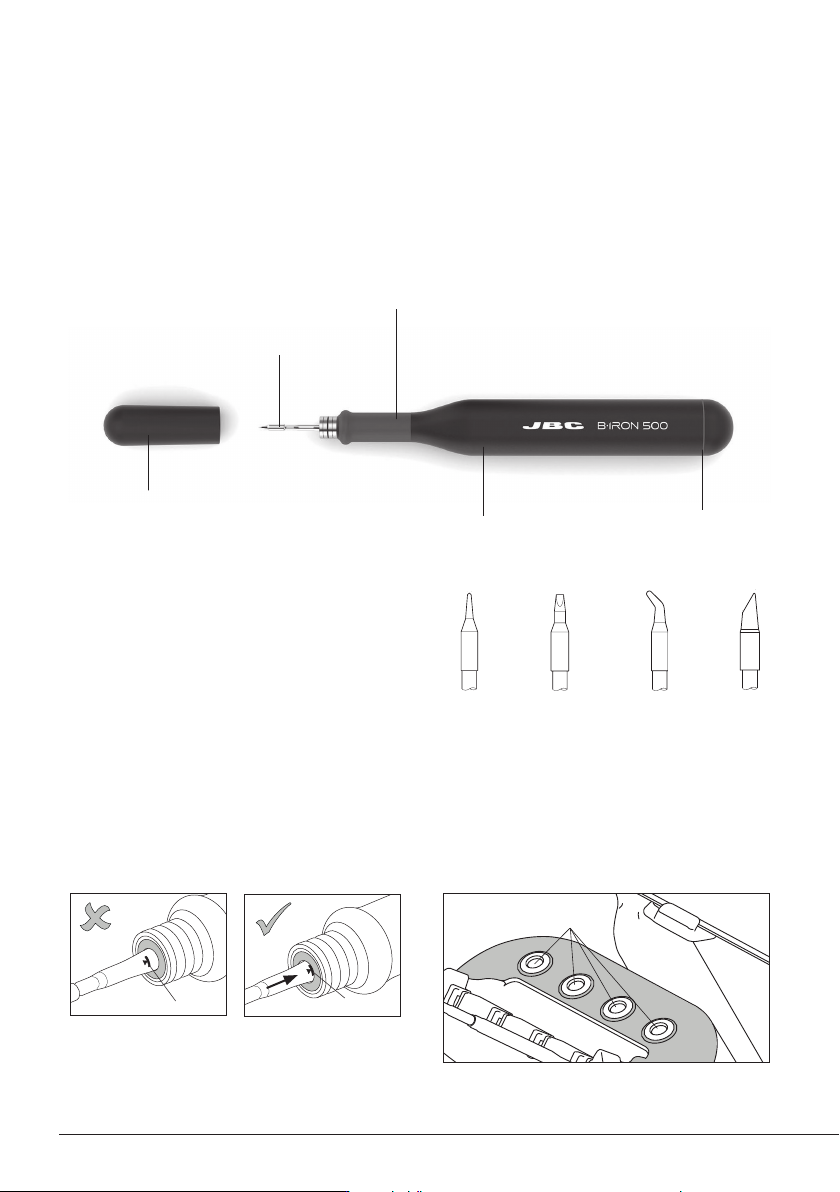
B·500 Handle works with C210 Cartridges.
Find the model that best suits your soldering
needs on www.jbctools.com
Compatible Cartridges*
Features
C210*
Cartridge Range
Status LightbandHandle
B5050
Grips for B·IRON
Handles
B1596
Safety Cap
for B·IRON Handles
* Not included, sold separately.
B·500 performs up to 500 medium-sized SMD soldering joints per charge and is the ideal tool for
continuous and intensive work with larger components or ones connected to ground planes.
Note: To charge the tool a B·IRON station is needed.
1
3
4
1
2
Mark
Retention
Clamps
C115
Cartridge
C210
Cartridge
Cartridge
Exchanger
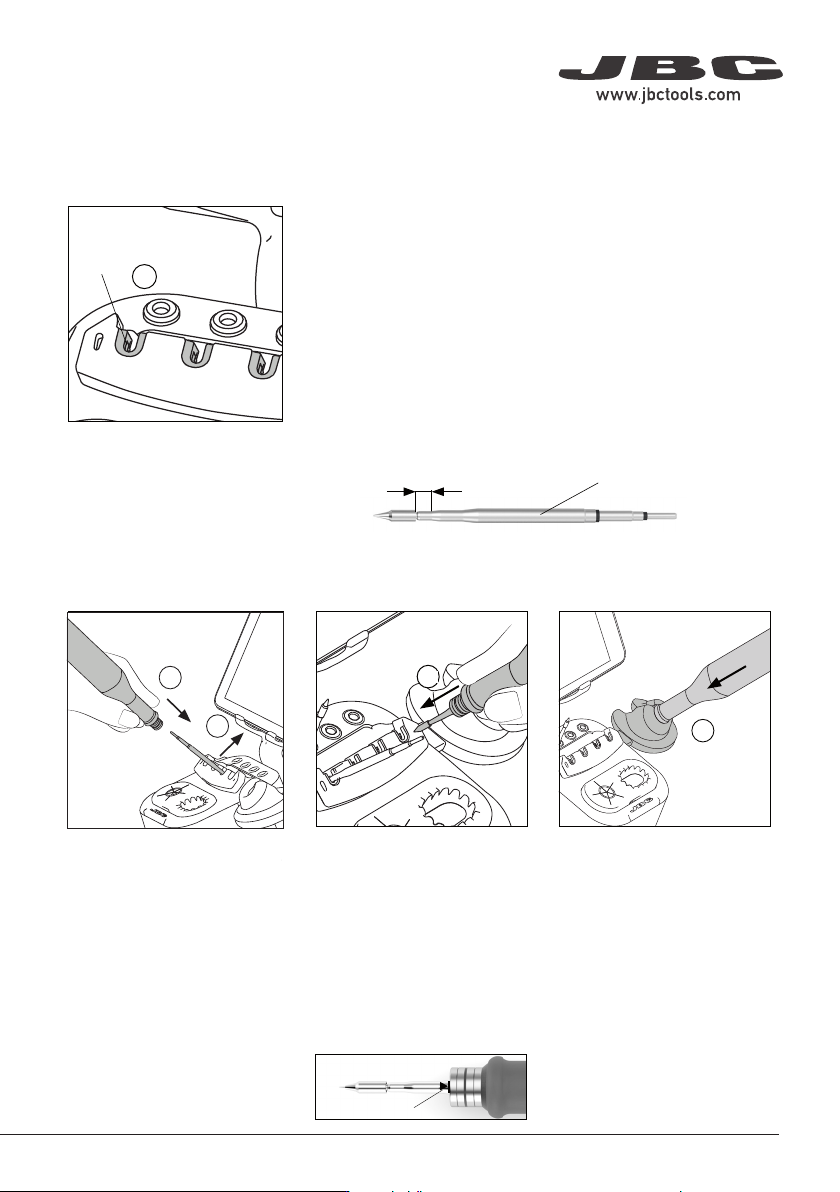
To insert a cartridge, carry out
the same steps as before in
reverse order.
Note: Cartridges must be inserted up to the mark for a proper
connection and function.
Place the tool in the charging
holder (4) to charge it. A beep will
sound when the tool is properly
placed and charging. The volume
can be adjusted using the left
button on the display.
Important: Charge the tool
completely before using it for
the first time.
A full charge takes:
-30min for B·100
-60min for B·500
-30min for B·NANO
-45 min for B·TWEEZERS
Gently press the tip against
the holes on the sides of the
cartridge exchanger (3) to
ensure that the cartridge is
appropriately inserted.
Place the tool with the cartridge
over the cartridge exchanger
slots and press down (1) until it
clicks. To remove the cartridge
pull the handle out (2).
The exchanger is suitable for C115 and C210 cartridges.
C115 Cartridges
The holding area of C115 Cartridges is delimited by the two
rings at the cartridge shaft (x).
Cartridge Exchanger
The cartridge exchanger allows
to insert / change cartridges
safely without switching the
tool off. Cartridges are held in
place thanks to the retention
clamps (1).
C210 Cartridges
The holding area of C210 Cartridges goes from the collar of
the tip until the cartridge begins to widen (x).
Cartridge Changing
Cartridge Fixing Tool Charging
Station Set Up (continuation)
x
x
Cartridge Insertion and Tool Charging
1
2
Place the tool over a cartridge
and press the tool down to insert
the cartridge (1). To release the
tool with the cartridge inserted
from the extractor, lift the tool
upward (2).
Cartridge Inserting
Reference Mark
Reference Mark
Reference Ring
Reference Ring
Ring
Ring
Inserting C115 Cartridges
Push the cartridges inside the handle until the
reference ring rests against the sealing plug.
Inserting C115 Cartridges
Push the cartridges inside the tweezers until
the first ring rests against the tool.
Inserting C210 Cartridges
Push the cartridges inside the handle until
the reference mark is aligned with the edge
of the handle.
C210 Cartridge Holder
The cartridge holder (4x slots) is used to
store cartridges. It allows having different
cartridges quickly at hand and it works with
C210 Cartridges.
Cartridge Holder
Slots
C115 Cartridge Adapters
(Ref. B0643 includes 4 adapters)
Since C115 Cartridges have a smaller diameter
than C210 Cartridges, adapters must be used
to store them in the cartridge holder.
These adapters must simply be inserted from
above into the slots of the cartridge holder.
C115 Cartridge Adapters
(Ref. B0643 includes 4 adapters)
Since C115 Cartridges have a smaller diameter
than C210 Cartridges, adapters must be used
to store them in the cartridge holder.
These adapters must simply be inserted from
above into the slots of the cartridge holder.
Cartridge
Adapters
Cartridge
Adapters
5
40 mm
50 mm
60 mm
80 mm
100 mm
130 mm
130 mm
para manuales - color gris
200 mm
300 mm
Tool Selection
Tool
ON
MENU
28174
24 W
100%
18 W
100%
12 W
100%
6 W
100%
0 W
100%
10 seconds/div
V1.2
CHARGE
450 ºC
350 ºC
250 ºC
150 ºC
50 ºC
JBC
210
348ºC
5,7 W
80%
350ºC
Tool
ON
MENU
24 W
100%
18 W
100%
12 W
100%
6 W
100%
0 W
100%
10 seconds/div
V1.2
WORK
450 ºC
350 ºC
250 ºC
150 ºC
50 ºC
80%
JBC
210
350ºC
Tool
ON
MENU
24 W
100%
18 W
100%
12 W
100%
6 W
100%
0 W
100%
10 seconds/div
V1.2
CHARGE
450 ºC
350 ºC
250 ºC
150 ºC
50 ºC
JBC
210
348ºC
5,7 W
80%
350ºC
JBC#1
Tool
ON
MENU
24 W
100%
18 W
100%
12 W
100%
6 W
100%
0 W
100%
10 seconds/div
V1.2
CHARGE
450 ºC
350 ºC
250 ºC
150 ºC
50 ºC
JBC
210
80%
350ºC
JBC#1
Tool1
Tool ID
28714
Hardware
Software
0028283
X886787
Update File
File
Hardware
Software
Select your Firmware
-
-
Update
MENU
JBC
210
Return to Work
JBC#1
B·IRON 100
B·IRON 500
User’s Manual
User’s Manual
Documents
MENU
JBC#1
JBC
210
Return to Work
2822
Work
Settings
Counters
Update
Documents
Light Theme
Dark Theme
Disconnect
Tool
ON
MENU
28174
24 W
100%
18 W
100%
12 W
100%
6 W
100%
0 W
100%
10 seconds/div
V1.2
CHARGE
450 ºC
350 ºC
250 ºC
150 ºC
50 ºC
JBC
210
348ºC
5,7 W
80%
350ºC
Work
Settings
Counters
Update
Documents
Light Theme
Dark Theme
Disconnect
JBC#1
348ºC
6 W
Work
JBC#1
MENU
Tool1
2822
Tool ID
Hibernation delay (seconds)
00:30
Sleep mode
Sleep temperature
150ºC
Minimum Temperature
100ºC
Maximum Temperature
400ºC
Working
Low battery
Power OFF
Charging
No cartridge
Tool Status
Temperature units
ºC
ºF
JBC
210
Lock Parameters
Locked
Unlocked
Work
JBC#1
MENU
Tool1
2822
Tool ID
Hibernation delay (seconds)
10
Sleep mode
Sleep temperature
150ºC
Minimum Temperature
100ºC
Maximum Temperature
400ºC
Working
Low battery
Power OFF
Charging
No cartridge
Tool Status
Temperature units
ºC
ºF
JBC
210
Lock Parameters
Locked
Unlocked
Work
JBC#1
MENU
Tool1
2822
Tool ID
Hibernation delay (seconds)
00:30
Sleep mode
Sleep temperature
150ºC
Minimum Temperature
100ºC
Maximum Temperature
400ºC
Working
Low battery
Power OFF
Charging
No cartridge
Tool Status
Temperature units
ºC
ºF
JBC
210
Lock Parameters
Locked
Unlocked
Work
Enter PIN
OK
MENU
450 ºC
350 ºC
250 ºC
150 ºC
50 ºC
80%
Work
Settings
Counters
Update
Locate Tool
Documents
Light Theme
Dark Theme
Disconnect
MENU
450 ºC
350 ºC
250 ºC
150 ºC
50 ºC
JBC
80%
350ºC
Devices
Documents
Light Theme
Dark Theme
Work
Counters
8
7
9
6
10
11
Status Lightband
Safety Cap
Status Lightband Detail
Color Tool Status
Green More than 50% charged
Orange Between 20% and 50% charged
Red Less than 20% charged
Green
blinking
Charging
(more than 50% charged)
Orange
blinking
Charging
(between 20% and 50% charged)
Red
blinking
Charging
(less than 20% charged)
No
color
Safety cap on the handle
and/or power off
Blue
blinking
Locate Tool function activated
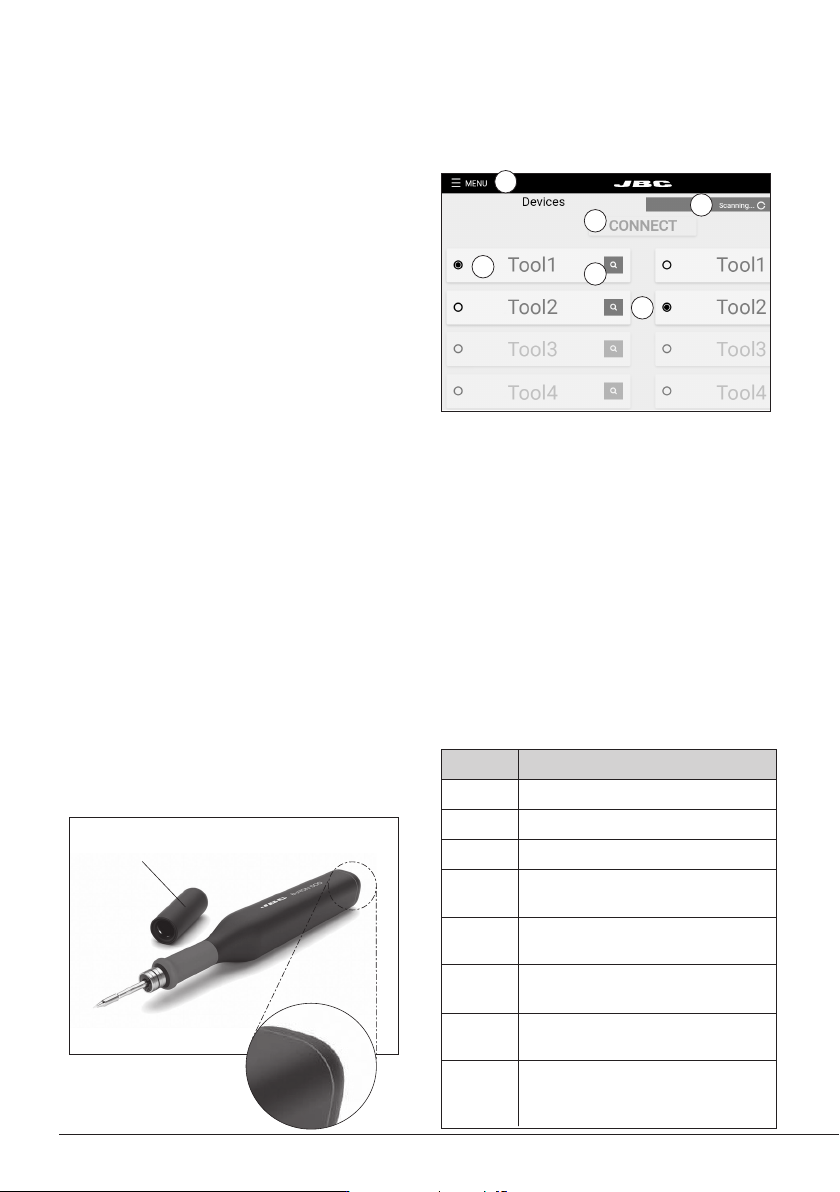
Make sure that the charging base is connected to
the mains.
Note: Tools supplied with a station are already
connected to the station.
Scanning another tool (this process can take a while):
Place the tool in the charging holder to activate it.
The status light band color indicates the charge level
(see table below).
If the scanning process does not run automatically,
tap “scan” (6) on the display while the tool remains
in the charging holder. When the tool is shown in
the device list on the display, select it (11) and tap
“connect” (7). Now the tool is ready for soldering.
The status lightband on the tool indicates its
status (see table on the right).
Tool search function:
When in doubt of which tool corresponds to the tool’s name, use the tool search function. Tap on the
magnifying glass symbol (8) next to the tool’s name. The light band on the corresponding tool blinks in
blue for fi ve seconds to identify it.
Working with two tools (works also for charging bases with only one charging holder):
It is possible to connect up to two tools at the same time. If a tool is already connected, fi rst disconnect
it from the device by selecting “Menu” (9) and tapping on “Disconnect”.
Place the second tool in the charging holder and scan it (6). The second tool is also shown in the device
list on the display (10). To work with two tools, select one from the left-hand column (11) and the other
one from the right-hand column (10). Then tap on “connect” (7).
Tool Connection
Device List
6