00195447-02_Installation_604_01_SP1_EN_DE.pdf - 第21页
Installation Manual, Station Software Version 604.01 SP1 Issue 12/2007 5 Inst allation Manual 5.1 Inst allation sequence See section 5.2 See section 5.3 See the separate installation m anual for installing the “Windows X…
Installation Manual, Station Software Version 604.01 SP1 Issue 12/2007
4.4 Network configuration
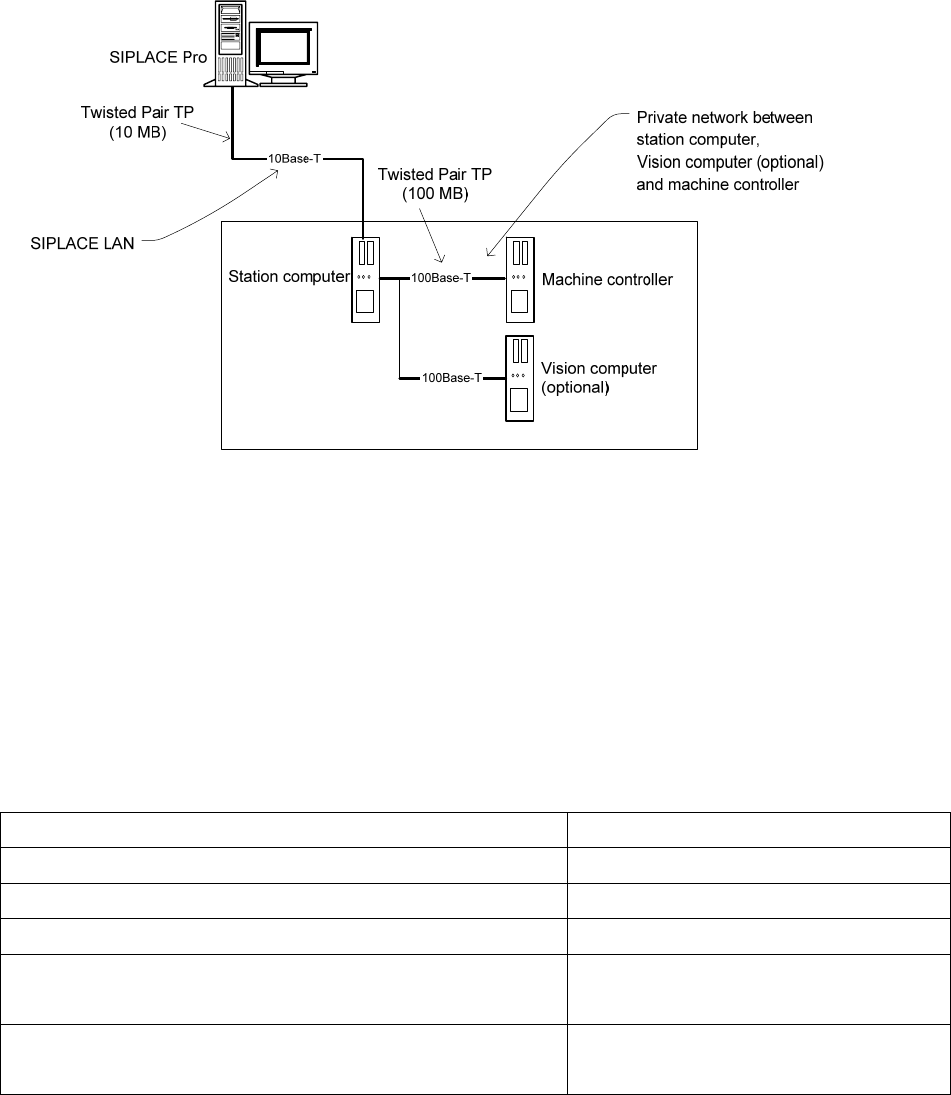
Fig. 4-4: Network connections between the machine and SIPLACE Pro
A separate private network (100 Mbit) is set up between the station computer (and optionally the Vision
computer) and the machine controller via a subnet mask.
Fixed IP addresses for the station computer, Vision computer and machine controller can thus be assigned
for all SIPLACE machines. These IP addresses are not known outside the private network, for instance in
the SIPLACE LAN or customer LAN.
These IP addresses need not be further configured by the operator while the station software is being
installed.
IP address, station computer 192.168.255.249
IP address, machine controller 192.168.255.250
Vision computer IP Address 192.168.255.251
Subnet mask, station computer/machine controller 255.255.255.248
IP address range, SIPLACE LAN or
IP address range, customer LAN
172.22.xxx.xxx
is configured on-site
Subnet mask for SIPLACE-LAN or
subnet mask for customer LAN
255.255.0.0
is configured on-site
Table 4-10: Network configuration
20 of 47
Installation Manual, Station Software Version 604.01 SP1 Issue 12/2007
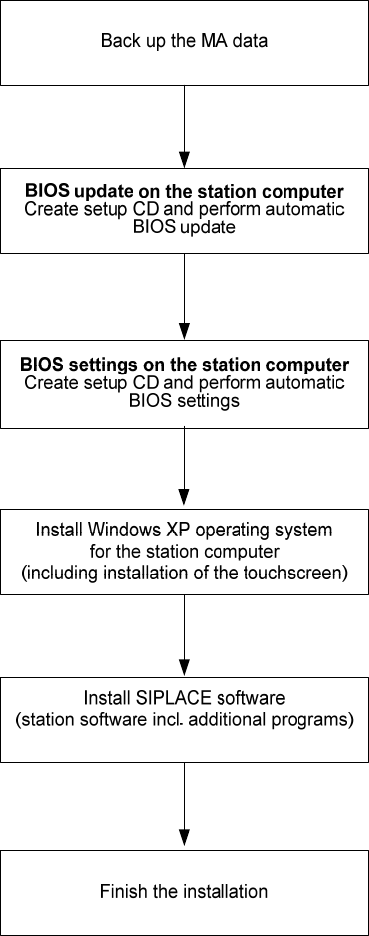
5 Installation Manual
5.1 Installation sequence
See section
5.2
See section
5.3
See the separate installation manual for installing the “Windows
XP operating system” (item no. 00194575-xx)
For calibrating the touchscreen, see sections
5.4.3.
See sections
5.4 and 5.5
See section
5.6
21 of 47
Installation Manual, Station Software Version 604.01 SP1 Issue 12/2007
5.2 Automatic BIOS update on the station computer
Note:
If the BIOS version is ≤ 1.50, you must update the BIOS at first.
A setup CD must first be created to automatically make the BIOS update on the station computer. To do
this, you require a computer running Windows XP that is fitted with a CD-RW drive.
The image files necessary for creating the CD (see table below) are in the "BIOS-Images" folder of the CD
for version 604.01 SP1 of the software.
Station computer / computer type BIOS settings / ISO image
SMP16-CPU086 CPU086_MC_SR_BIOS_Update.iso
Table 5-1: File required for creating the Setup CDs for making the BIOS update on the station computer
5.2.1 Creating a setup CD
→ Insert an empty writable CD in the drive on any computer equipped.
→ Insert the CD for version 604.01 SP1 of the software in the drive.
→ In the Windows Explorer, open the "BIOS-Images" folder on the CD.
→ Open the image file (see table above) using the installed CD writing program and follow the
instructions on screen.
→ Once the CD has been written, remove the CDs from the drives.
5.2.2 Making the BIOS update on the station computer
Note:
Before you start work, ensure that the CD-ROM drive is set as the first boot device in the
BIOS to allow the computer to be booted from CD.
→ Insert the CD you have created in the drive on the station computer and boot from the CD by
switching the machine on.
The BIOS update is now performed automatically.
→ After the settings have been made, remove the CD from the drive and switch the machine off again.
22 of 47