00194335-02.pdf - 第22页
2 Retrofit instructions Coplanarity module - SIPLACE HF ser ies Coplanarity module 10/2004 Edition 22 2.4 Prep ara tory work : Switch th e placeme nt machine o ff at the main switch. : Dock out t he compon ent tables on …

Coplanarity module 2 Retrofit instructions Coplanarity module - SIPLACE HF series
10/2004 Edition
21
2.3.1 Safety instructions for laser units
Permission to operate components that are classified as lasers is withdrawn if
– mechanical damage to the unit is observed, or
– any work is done on the mechanical or electrical parts of the unit.
Even damaged or missing screw locking paint on laser components (e.g. cover plates, fas-
teners, adjusting potentiometer) counts as work.
– Only SIEMENS service engineers, or the machine owner's service engineers who have
been trained by SIEMENS are allowed to replace laser components.
– Repairs to laser units are carried out at the SIEMENS factory exclusively.
2
2.3.2 Definitions
2
PLEASE NOTE 2
2
2
2
Caution 2
2 Retrofit instructions Coplanarity module - SIPLACE HF series Coplanarity module
10/2004 Edition
22
2.4 Preparatory work
: Switch the placement machine off at the main switch.
: Dock out the component tables on the relevant side of the machine.
: Remove the side wall cover on location 4.
: Remove the computer unit.
2.5 Retrofit
: Remove the reject bin from the relevant side of the machine.
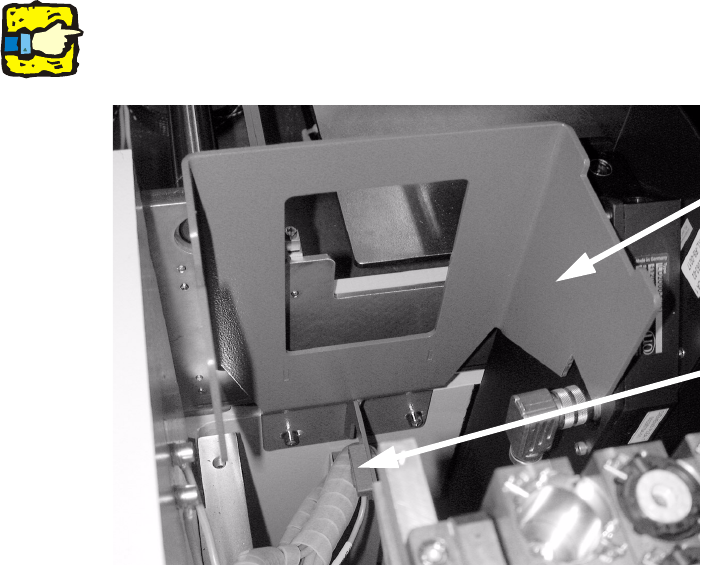
: On older machines:
Remove the mount for the reject bin together with the sensor (M5 hexagon, size 1 slotted).
2
Note the installation position of the sensor. 2
2
2
2
2
2
2
Mount for
reject bin
Sensor

Coplanarity module 2 Retrofit instructions Coplanarity module - SIPLACE HF series
10/2004 Edition
23
: Screw the coplanarity module onto the mount (3 M4 x 8 screws counter sunk).
2
: Screw on the mount for the coplanarity module (2 x M6x12):
Top screw + bottom screw (in top holes in the base).
2
2
: Open the door of the extension kit without servo unit on the output belt side.
: Pull the connecting cable for the coplanarity module through the machine base using the
threading aid.
2
2
2
2
2
2
2
2
2
2
2
2
Screws