00196743-01 - Install Guide SIPLACE Explorer 2.7_en.pdf - 第64页
4 Co nfi gur at io n Ins t a llat i on and Con f i gur at ion Guid e SI PLA CE Ex plo rer 4.1 Stan da rd Moni tori ng A p plic at ion (S MA) Ed ition 03 /201 0 EN 64 → In th e Main tena nce S ched ule panel cl ick on th …
Installation and Configuration Guide SIPLACE Explorer 4 Configuration
Edition 03/2010 EN 4.1 Standard Monitoring Application (SMA)
63
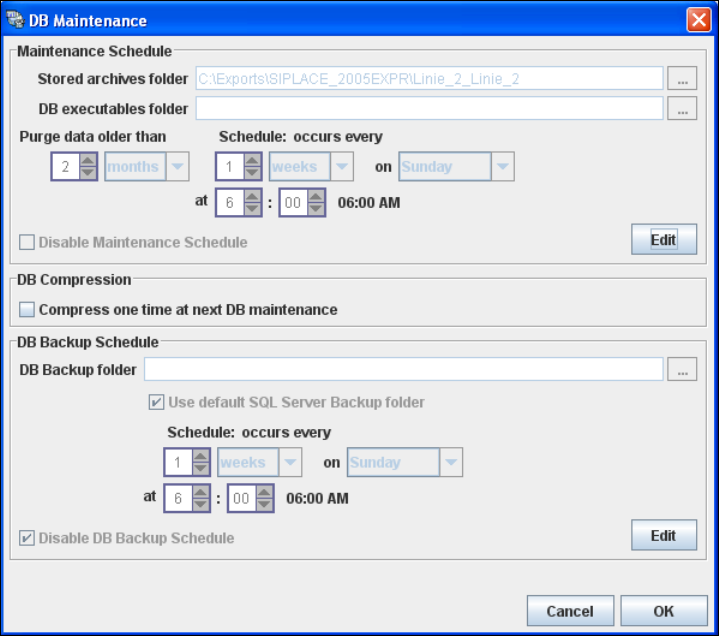
→ The DB Maintenance dialog box will open. In this dialog box the following functionalities
are available:
– create a new archiving schedule for the database
– edit the default maintenance schedule
– database compression
– automate the database backup
The archiving process involves taking data from the database and saving it in a file, so that
the size of the database can be controlled. 4
All input fields will be disabled. To start or edit a DB maintenance schedule, you must have
administrator privileges for the database and the database connection must already be
established. 4
4
Fig. 4 - 19 DB maintenance

4 Configuration Installation and Configuration Guide SIPLACE Explorer
4.1 Standard Monitoring Application (SMA) Edition 03/2010 EN
64
→ In the Maintenance Schedule panel click on the Edit button.
→ The DB Administrator Login dialog box will open.
4
Fig. 4 - 20 DB administrator login
→ Enter the access data here and confirm your entries with OK.
→ The input fields in the DB Maintenance dialog box will be enabled. The following details
can be defined:
– The file and path for the archived data
– A schedule specifying the intervals and times when data is to be removed from the line
system database and stored in the archive.
– When to execute the maintenance schedule.
– The archiving schedule defined here will be stored in the database and can be called up
when required.
4
Fig. 4 - 21 DB maintenance

Installation and Configuration Guide SIPLACE Explorer 4 Configuration
Edition 03/2010 EN 4.1 Standard Monitoring Application (SMA)
65
→ In the DB Backup Schedule panel click on the Edit button.
→ The DB Administrator Login dialog box will open.
4
Fig. 4 - 22 DB administrator login
→ Enter the access data here and confirm your entries with OK.
→ The input fields in the DB Maintenance dialog box will be enabled. The following details
can be defined:
– The file and path for the saved data
– A schedule specifying the intervals and times when data is to be removed from the line
system database and stored in the archive.
– When to execute the backup schedule.
– The backup schedule defined here will be stored in the database and can be called up
when required.
– Database compression with the next database maintenance.
4
Fig. 4 - 23 DB backup
→ Check your entries and confirm with OK.
→ Once you have defined all settings in Step 5, click on Next to continue with the next step.