ts9800-user-guide-7511-0360_A.pdf - 第20页
20 6.5 Set up Step 1: Touch the ‘ Login ’ icon to enter the login screen Step 2: Enter th e defau lt password ‘ 0000 ” in the password window. Then tou ch ‘ Accept ’ icon to save and exit . At tention : For changing the …
19
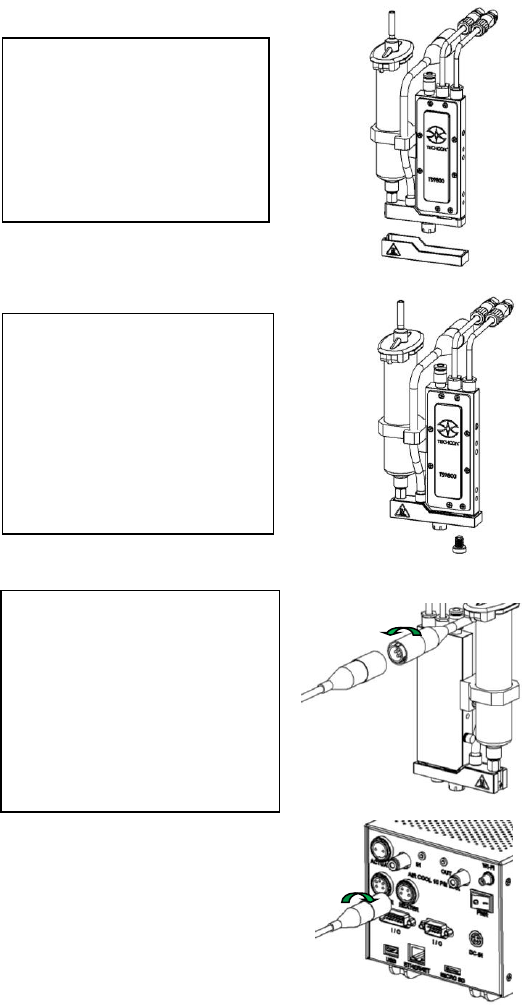
6.4 Mounting & Connection ( w/ Heater)
a
Step 1:
• Slide the heat guard over
the fluid manifold. The
alignment is done by the
nozzle adjustment nut and
the fluid manifold with
heating module.
Step 2:
• Use the 4mm hex wrench to
install the provided M6
screw from the bottom to
secure the heat guard in
place. Caution: Do not
over-tighten the screw since
it can damage the heat
guard.
Step 3:
• Connect the heater cable (4-
pins) from the valve’s
heating module to the
‘HEATER’ port of the
controller. Caution: After
connecting, tighten the
locking sleeve to secure the
connection.
20
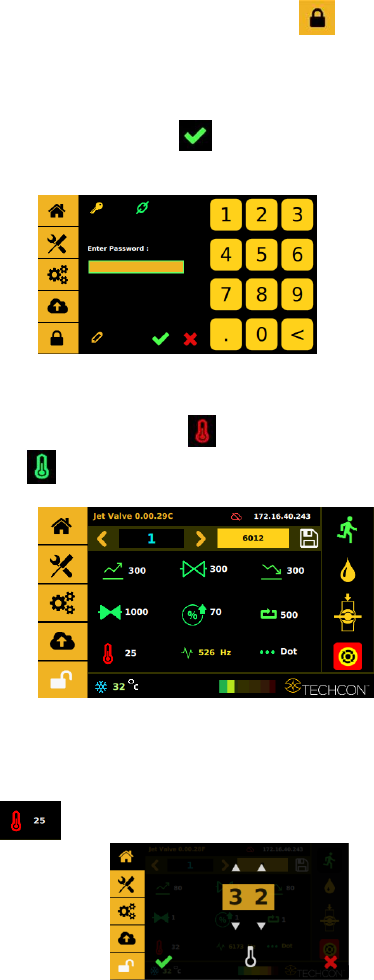
6.5 Setup
Step 1:
Touch the ‘Login’ icon to enter the login screen
Step 2:
Enter the default password ‘0000” in the password window. Then touch
‘Accept’ icon to save and exit . Attention: For changing the password,
refer to section 9.5.1.
Step 3:
Touch the “Temperature” icon to turn the heater ON and the icon will
turn green .
Step 4:
Touch the value field next to the temperature icon to enter the temperature
setting
screen .
21
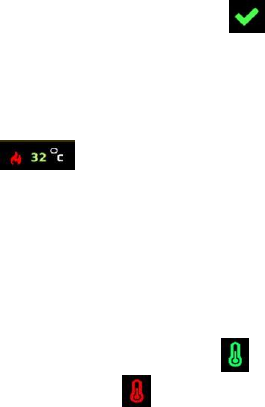
Step 5:
Touch the up and down arrows to set the desired temperature. Then touch the
‘Accept’ icon to save and exit . Note: Maximum temperature setting is
90°C.
Step 6:
Watch the fluid manifold’s temperature reading at the bottom of the screen
. Once this temperature reaches the correct temperature setting, then
start the dispensing.
Warning: Do not touch nozzle or fluid manifold with your fingers once the
heater is turned on. Use provided tools for making any adjustment if necessary.
Step 7:
Touch the ‘Temperature’ icon again to turn OFF the heater and the icon will
turn back to red .