ts9800-user-guide-7511-0360_A.pdf - 第24页
24 For pre-cleaning purposes, disconnect pressure remove the dispensing fluid, th e n co nnect an em pty but clean syringe to the valv e. Use t he pressurised air hook up to the syringe to push out any residue fluid left…

23
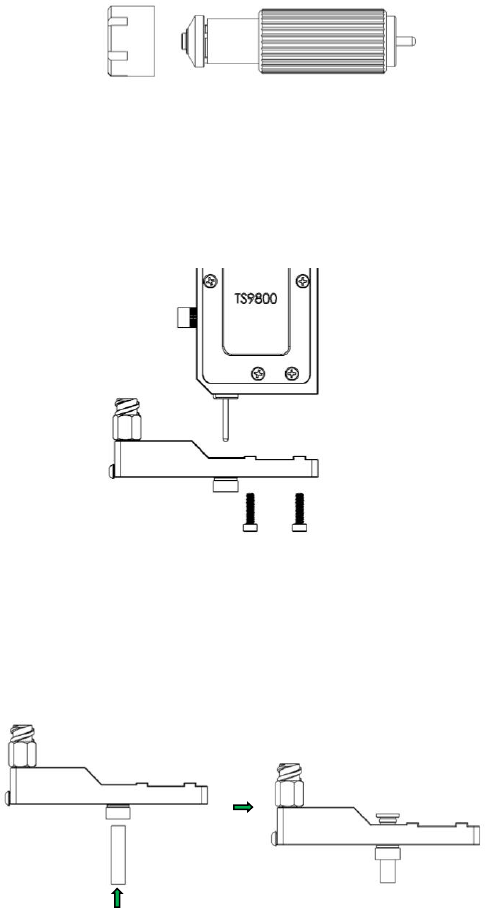
5. Place new nozzle insert on the nozzle bushing with the smaller end
facing outward and screw the assembly back into the nozzle adjustment
nut using provided tools. Caution: Keep the assembly in vertical
position while tightening to keep the nozzle seating in the proper
position. Use both tools to help torque the bushing onto the nut.
6. Screw the nozzle assembly unit back onto the fluid manifold and repeat
section 4.3 for nozzle calibration.
7. Re-connect or turn On the fluid supply and pressure. Run the several
purge cycles to remove air bubble from the nozzle replacement. Wipe
and Clean the nozzle tip and the system is now ready for dispensing.
Attention: Inspect the nozzle’s cleanliness under microscope if available.
7.3 Cleaning
WARNING:
• Proper gloves and eye protection must be worn before
disassembling the valve for cleaning.
• Never use wire brushes or machines that cause surface abrasion.
Unsuitable cleaning fluids may damage the valve. Before using
extremely aggressive cleaning liquids or solvents, make sure to
check that all fluid contacting parts are compatible.
The following cleaning tool kit (9800-CLEANKIT-XX) which consists
of the following:
1. Pin Vise
2. Cleaning wires (XX will designate the wire diameter)
3. Cleaning brush
24
For pre-cleaning purposes, disconnect pressure remove the
dispensing fluid, then connect an empty but clean syringe to the
valve. Use the pressurised air hook up to the syringe to push out any
residue fluid left in the valve out.
The cleaning of the TS9800 Jet Valve can be carried out via:
• Purge fluid path with appropriate cleaning solutions
To remove the remaining dispensed fluid, purge the system with
an appropriate cleaning solution (refer to the material safety
data sheet of the dispensed media and suitable cleaning
solution). For this method, connect a syringe filled with an
appropriate cleaning solution to the valve, then connect the
syringe to the supply pressure. Touch and hold the ‘Purge’ icon
on the controller to purge the system. Run the purge until
the system is clean. Ideally the only material left during the
purging should be the cleaning solution, that would be a good
indicator that the fluid path is clean.
• Thorough Cleaning
1. Perform the above step to purge the system with an appropriate
cleaning solution. Turn the system Off and disconnect all the
connections to the valve.
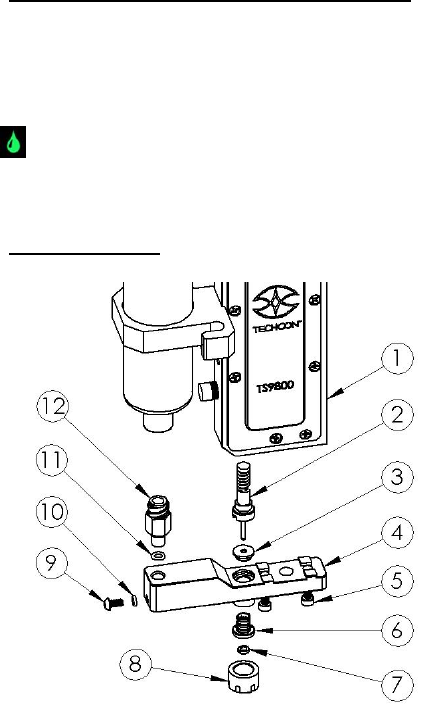
2. Remove the nozzle adjustment nut (8) by using the nozzle
adjustment tool to rotate it counter-clockwise.
3. Remove the nozzle bushing (6) with the nozzle insert (7) from
the nozzle adjustment nut by using the nozzle installation tool to
rotate it counter-clockwise.
25
4. Remove the nozzle insert (7) from the nozzle bushing (6).
5. Use the provided 2mm hex key to remove the two mounting
screws (5) and pull the fluid manifold (4) from the valve body
(1). Caution: When remounting the fluid manifold, it’s highly
recommended to torque the two mounting screws to 2.5 – 3.0 lb-
in (0.28 - 0.33 N-m).
Note: Perform step 6 only if the tappet seal (3) must be replaced or a
thorough cleaning is required. If the manifold is removed for whatever
reasons on a regular basis the tappet seal should also be replaced on a
regular basis.
6. Remove the tappet seal (3) from the fluid manifold (4) by
inserting the provided tappet seal tool from the fluid manifold’s
outlet hole and slowly push upward on the seal.
• To install a new tappet seal, carefully place the seal in the
centre hole of the fluid manifold so that the small end of the
seal is facing inward. Make sure that the seal is positioned
evenly and centrally to the hole, then slightly push the seal
with your thumb to engage the seal to the hole. Caution: Do
not push the seal all way inside the hole with your thumb.