00197191-02_IM_SIPLACE_Pro_10.1_EN.pdf - 第22页
Installation Manual 4 Installation of SIPLACE Pro and possible Setup Types SIPLACE Pro 10.1 Edition 09/2012 20 4 Fig. 4.1 - 1 Central Database 4.1.2 Dedicated Dat abase For every Line you have a dedicated SIPLACE Pro Ser…

4 Installation of SIPLACE Pro and possible Setup Types Installation Manual
Edition 09/2012 SIPLACE Pro 10.1
19
4 Installation of SIPLACE Pro and pos-
sible Setup Types
Various setup types are available for installation to enable you to install the system components
you want to have on the specific computer. To achieve this, various setup types have been defined
which install the required system components accordingly.
Note
After a new installation or reinitialization of the database, it is necessary to import the standard
shape library in SIPLACE Pro desk go to Tools-->Import-->Standard Shape Library... 4
The following setup types are at your disposal:
(1) Custom
(2) SIPLACE Pro Complete System
(3) SIPLACE Pro Desk
(4) SIPLACE Pro Line Control GUI
(5) SIPLACE Pro Line Control Server
(6) SIPLACE Pro Programming System
(7) Siplace Pro Server.
Refer to 4.3 on page 28 for details about the contents and installation procedure of the individual
setup types.
4.1 Factory Layouts and Setup Types
The following graphics show examples of typical factory layouts with the respective setup types
installed on the workstations.
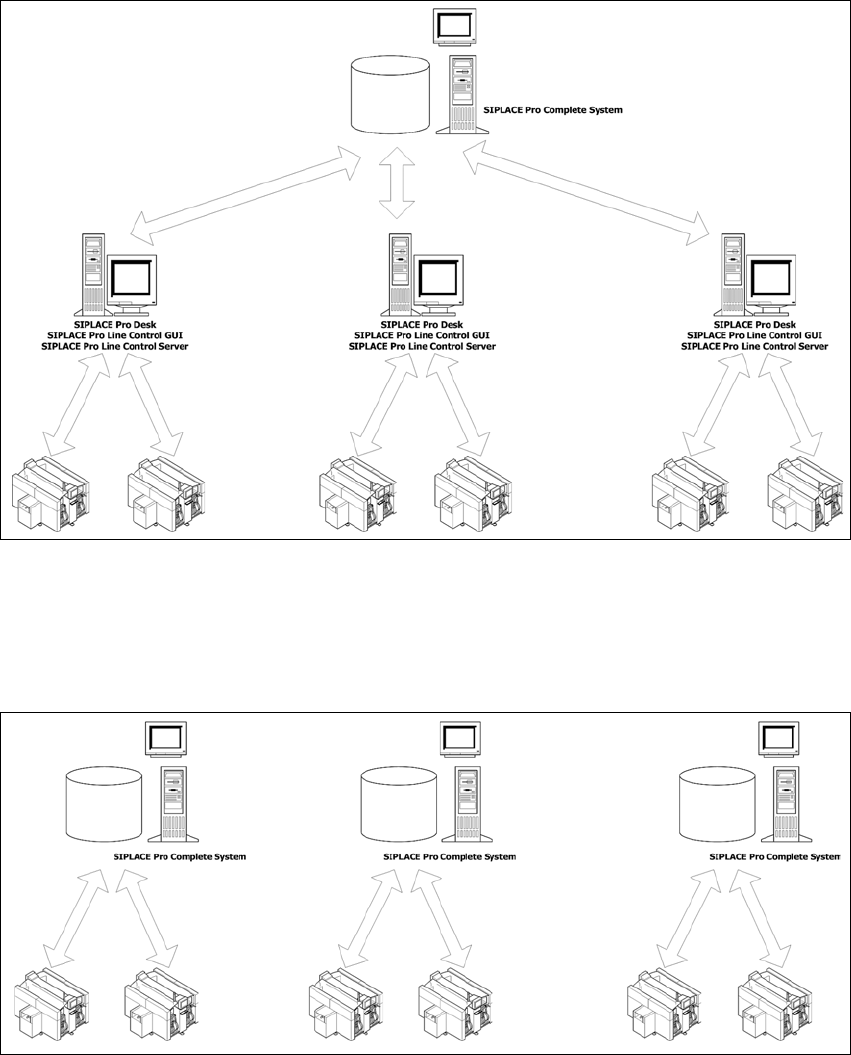
4.1.1 Central Database
You use one central database, which contains all data for all lines. This makes it possible to share
the same data for all lines, like component shape definitions.
Installation Manual 4 Installation of SIPLACE Pro and possible Setup Types
SIPLACE Pro 10.1 Edition 09/2012
20
4
Fig. 4.1 - 1 Central Database
4.1.2 Dedicated Database
For every Line you have a dedicated SIPLACE Pro Server. Databases are independent.
4
Fig. 4.1 - 2 Dedicated Database
4 Installation of SIPLACE Pro and possible Setup Types Installation Manual
Edition 09/2012 SIPLACE Pro 10.1
21
4.2 Starting installation – first steps
These steps are identical for all setup types. The subsequent steps only differ once you have
selected the setup type you require.
Run through the following steps to start the installation and then refer to the relevant section
for your specific setup type.
Step 1
Insert the SIPLACE Pro installation CD into the CD-ROM drive. The installation routine starts
automatically.
You can also start the installation by running the Setup program located in the root directory
on the installation CD.
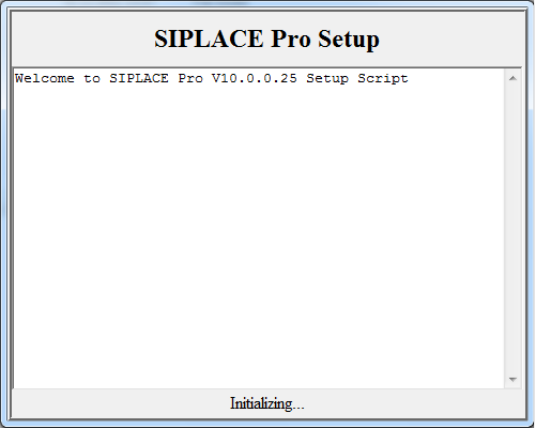
This starts the Initializing screen 4
4
Fig. 4.2 - 1 Example of "Initializing" dialog box
After initialization, Setup will check for already installed versions of SIPLACE Pro. 4
If Setup doesn't find a version which needs to be upgraded, the window will close and Setup
will skip to the language selection. See Step 2 on page 24. 4