Nordson_EFD_RV_Series_Operating_Manual.pdf - 第107页
RV Series Automated Dispensing Systems 107 www.nordsonefd.com info@nordsonefd.com +1-401-431-7000 Sales and service of Nordson EFD dispensing systems are available worldwide. Fill Area Click Function Used in tandem with …
RV Series Automated Dispensing Systems
106 www.nordsonefd.com info@nordsonefd.com +1-401-431-7000 Sales and service of Nordson EFD dispensing systems are available worldwide.
Fiducial Mark
Click Function
Causes the system to search for the two fiducial marks specified in the No. (number) field of each Fiducial Mark
command. The two fiducial marks are then used by the Fiducial Mark Adjust command to adjust the dispense
program accordingly for any orientation changes between workpieces.
NOTES:
• For the best results, enter Fiducial Mark commands before any dispense or setup commands.
• Two Fiducial Mark commands must be present in a program for the system to perform this adjustment
function correctly.
• A Fiducial Mark is different from a Find Mark. A Find Mark is used only to check the XY position of a workpiece
whereas a Fiducial Mark is used to check the orientation of a workpiece.
• Refer to “About Marks” on page24 for more information on marks.
Fiducial Mark Adjust
Click Function
Double-click
address and
select from
drop-down
menu
Adjusts the program (from one workpiece to another) for any XY orientation changes in workpiece placement.
The system determines orientation correctness by finding two Fiducial Marks. Refer to “Fiducial Mark” on
page106.
NOTES:
• This command is used only in conjunction with a Step & Repeat command.
• Two Fiducial Mark commands must be present in a program for the system to perform this adjustment
function correctly.
• Refer to “About Marks” on page24 for more information on marks.
AppendixA, Command Function Reference
(continued)
RV Series Automated Dispensing Systems
107www.nordsonefd.com info@nordsonefd.com +1-401-431-7000 Sales and service of Nordson EFD dispensing systems are available worldwide.
Fill Area
Click Function
Used in tandem with Fill Start and Fill End, the Fill Area command fills a defined area in a specific way using the
specified Width and Band parameters. Refer to the explanations below this table for an example of each Fill Area
type. The correct sequence of commands for a fill area is: (1) Fill Start, (2) Fill Area, (3) Fill End.
NOTE: Line Start can be used in place of Fill Start, and Line End can be used in place of Fill End.
Parameter Description (see illustration examples)
Type (see below for
an example of each)
1. Rectangle (S path)
2. Circle (outer to inner)
3. Rectangle (outer to inner)
4. Rectangle Band
5. Circle Band
6. Rectangle (inner to outer)
7. Circle (inner to outer)
Width The distance (in mm) between the center of the bead being dispensed and the bead
that spirals next to it.
Band The width (in mm) the completed fill must be (from one end to the other).
Appendix A, Command Function Reference
(continued)
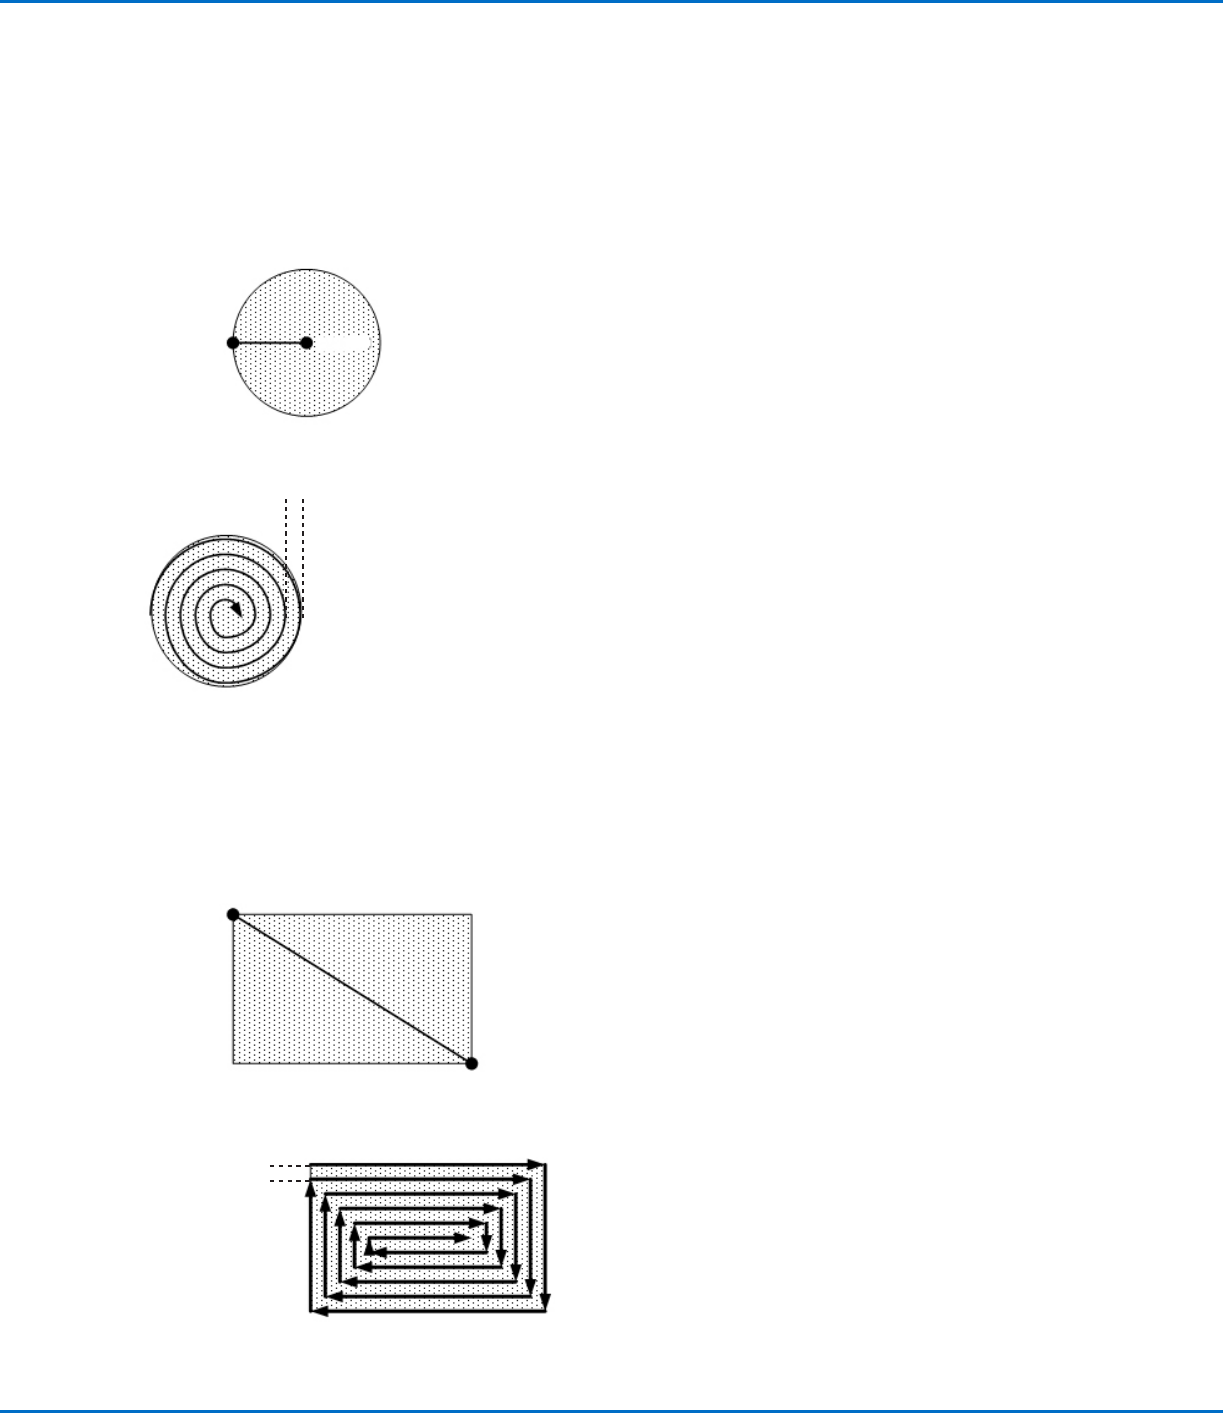
Fill Area: 1. Rectangle (S path)
This command fills the defined area by passing the tip back and forth along the X axis (in an S-shaped path) at the specified
Band distance while moving the Y axis in the specified Width distance after each pass along the X axis. After entering a Fill Area
Rectangle command, enter a Line Start point at the top left corner of the area to be filled and a Line End point at the bottom right
corner of that area.
NOTE: In any Fill Area command, the Z and R values for Line Start and Line End must match.
Line Start
Line End
Fill Area
EXAMPLE: if a Width of 5mm is entered, the tip makes the following path:
Width = 5mm
RV Series Automated Dispensing Systems
108 www.nordsonefd.com info@nordsonefd.com +1-401-431-7000 Sales and service of Nordson EFD dispensing systems are available worldwide.
Fill Area: 2. Circle (Outer to Inner)
This command fills the defined area by moving the tip along a spiral path from the outside of the circle to the center. After entering
a Fill Area Circle command, jog the tip to a point on the outside limit of the circle to be filled and enter that location as a Line Start
point. Then jog the tip directly across to the center of the circle and enter that location as a Line End point.
NOTE: In any Fill Area command, the Z and R values for Line Start and Line End must match.
Line End
Line Start
Fill Area
EXAMPLE: if a Width of 5mm is entered, the tip makes the following path:
Width = 5mm
Fill Area: 3. Rectangle (Outer to Inner)
This command fills the defined area by moving the tip along a square, spiral-shaped path from the outside of the rectangle to the
center. After entering a Fill Area Rectangle command, enter a Line Start point at the top left corner of the area to be filled and a
Line End point at the bottom right corner of that area.
NOTE: In any Fill Area command, the Z and R values for Line Start and Line End must match.
Line Start
Line End
Fill Area
EXAMPLE: If a Width of 5mm is entered, the tip makes the following path:
Width = 5mm
AppendixA, Command Function Reference
(continued)