YS24 保养手册.pdf - 第15页
3-13 3 Periodic maintenance items 2.3.4 Cleaning and greasing the PU-axis ball screw T he PU (push-up) axis is designed to prevent flexing or warping of the board during clamping and is important because it prevents depr…
3-12
3
Periodic maintenance items
2.3.3 Cleaning and greasing the Y-axis linear guide
e
1
Make the preparations for the
cleaning and greasing work.
1. Take off all accessories susceptible to the
magnetic fields, such as a wristwatch
and/or magnetic ID card.
2. Press the emergency stop button to put
the machine in the emergency stop
state.
2
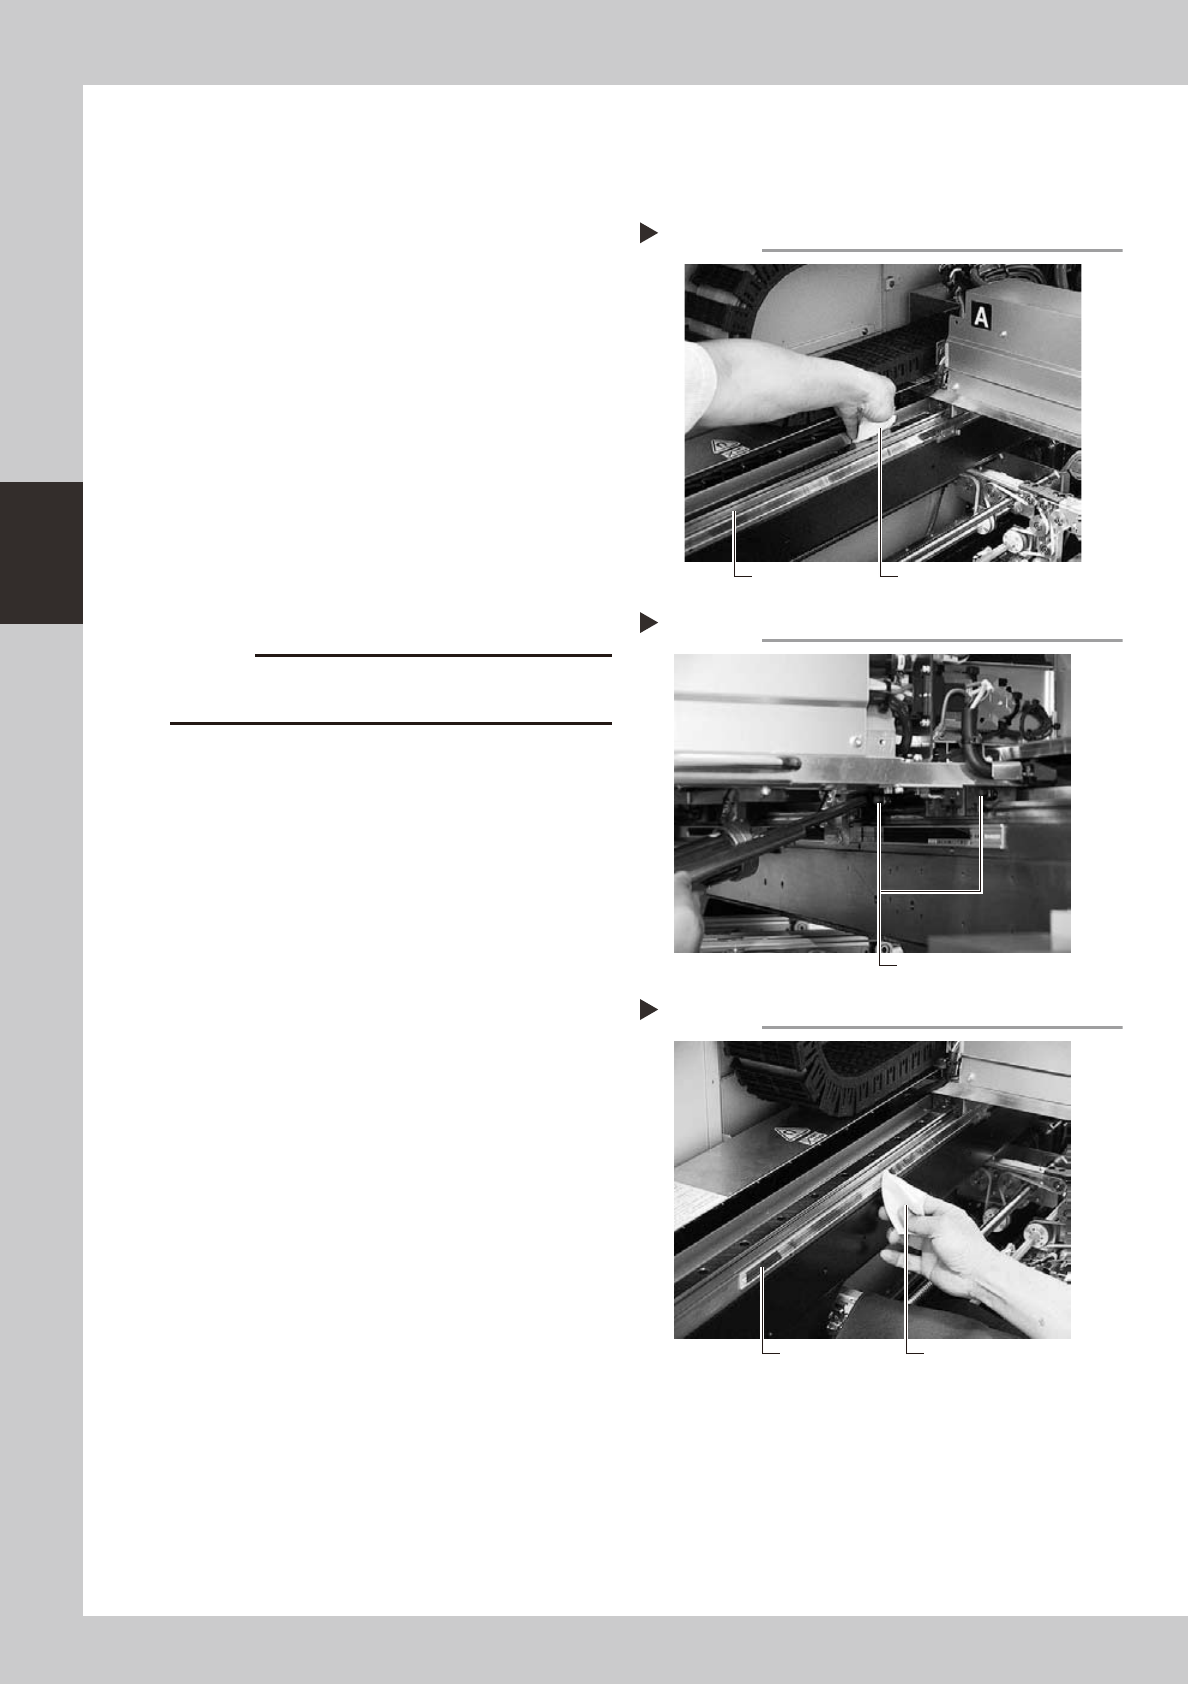
Clean the linear guide.
1. Move the Y-axis to one end, and wipe
away the old grease and dirt from the
linear guide with a lint-free cloth or
paper towel (for clean room).
2. Next, move the axis to the opposite side
of its axis and wipe the linear guide on
the opposite side.
53371-L2-00
c
Wipe away thoroughly the old grease in the grooves of
the linear guide rails.
3
Apply new grease to the guide rails.
Use the grease gun (standard nozzle) to
supply the specified grease (NSL) through
the grease nipples for the Y-axis linear guide
(two places each, four places in total).
53372-L2-10
4
Remove excess grease.
After moving the axis back and forth several
times by hand, wipe away excess grease.
5
Clean the linear scale.
After the grease has been applied, wipe the
linear scale with a lint-free cloth or paper
towel (for clean room).
53373-L2-00
Cleaning the Y-axis linear guide
Step 2
Guide rail Cleaning cloth
Cleaning the linear scale
Step 5
Linear scale Cleaning cloth
Greasing the Y-axis linear guide
Step 3
Grease nipple (2 places)
3-13
3
Periodic maintenance items
2.3.4 Cleaning and greasing the PU-axis ball screw
The PU (push-up) axis is designed to prevent flexing or warping of the board during clamping and is important
because it prevents depressing of the board during component mounting.
The PU axis also prevents deviations in the component mounting accuracy due to the board depressing during
component mounting, so it is important to regularly clean and inspect the PU axis to ensure it operates
correctly.
c
the PU axis by the user will void the warranty.
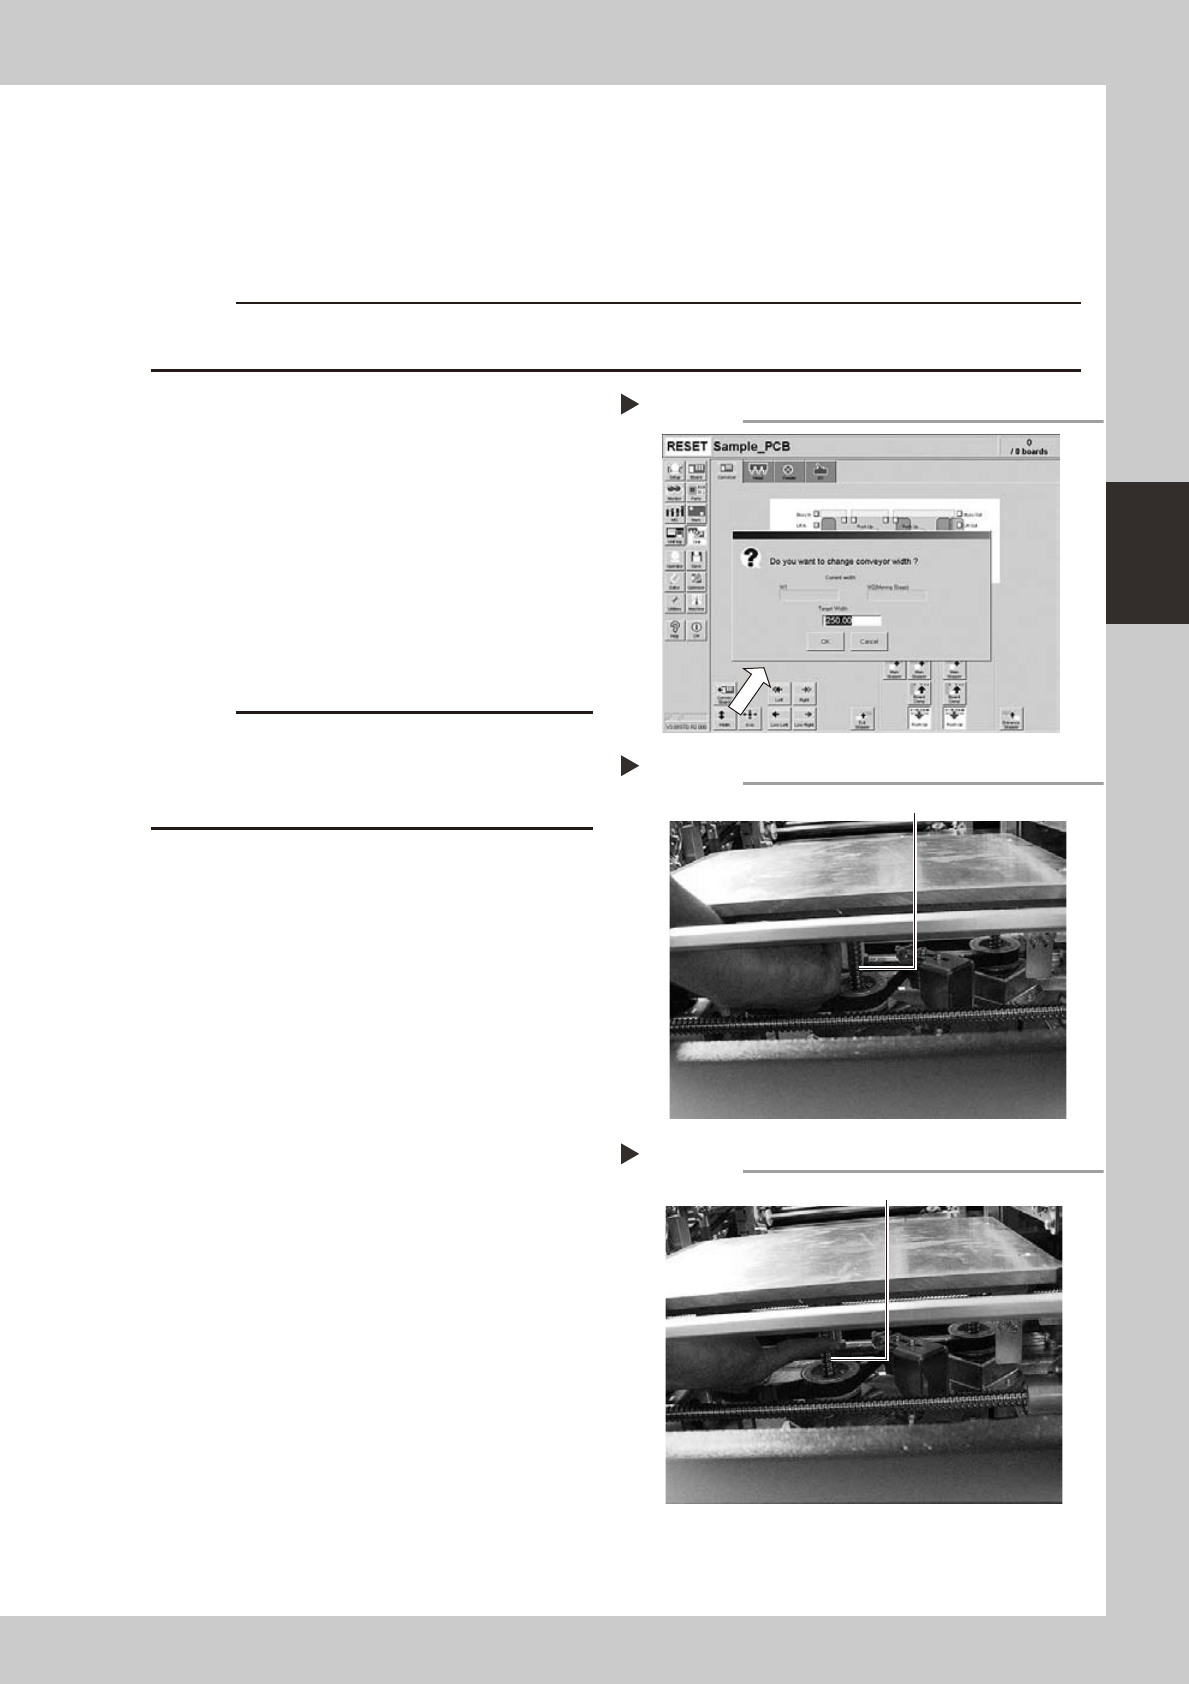
1
Set the conveyor width to
maximum.
Press the [Width] button to display the
"Conveyor Width" dialog. Enter the maximum
conveyor width from the specifications and
press [OK]. The conveyor is changed to the
width that was just entered.
54310-L2-00
2
Raise the push-up unit.
Manually raise the push-up unit on a stage
you want to grease up.
c
handling.
e
3
Remove the old grease by hand.
After pressing the emergency stop button,
thoroughly rremove the old grease from the
ball screws (three places) by hand.
53374-L2-00
4
Apply the new grease by hand.
Apply as much as 2 cm of new grease to
your finger, and rub it evenly into the ball
screw grooves.
53331-L2-00
5
Raise and lower the push-up unit
manually.
After cancel emergency stop, raise and
lower the push-up unit several times
manually to spread the grease evenly. After
the grease is well spread, raise the push-up
unit and leave it in that state.
e
6
Wipe away excess grease by hand.
After pressing the emergency stop button,
wipe away excess grease by hand.
Again raise and lower the push-up unit
several times manually and if there is no
problem then lower the push-up unit.
Setting the conveyor width
Step 1
Cleaning the ball screw
Step 3
Ball screw (3 places)
Applying the grease
Step 4
Ball screw
3-14
3
Periodic maintenance items
2.4 Inspecting and cleaning the conveyor belt (bimonthly)
Inspect the conveyor belt for wear. As the belt wears away, slippages may occur that prevent securely
conveying the boards. It is therefore necessary to make periodic checks for wear of the conveyor belt.
Belt wear may also cause trouble such as erroneous detection of the conveyor sensor due to dust from belt
wear accumulating on the sensor surface, or dust from belt wear accumulating in the belt guide grooves may
cause the belt to stick, etc.
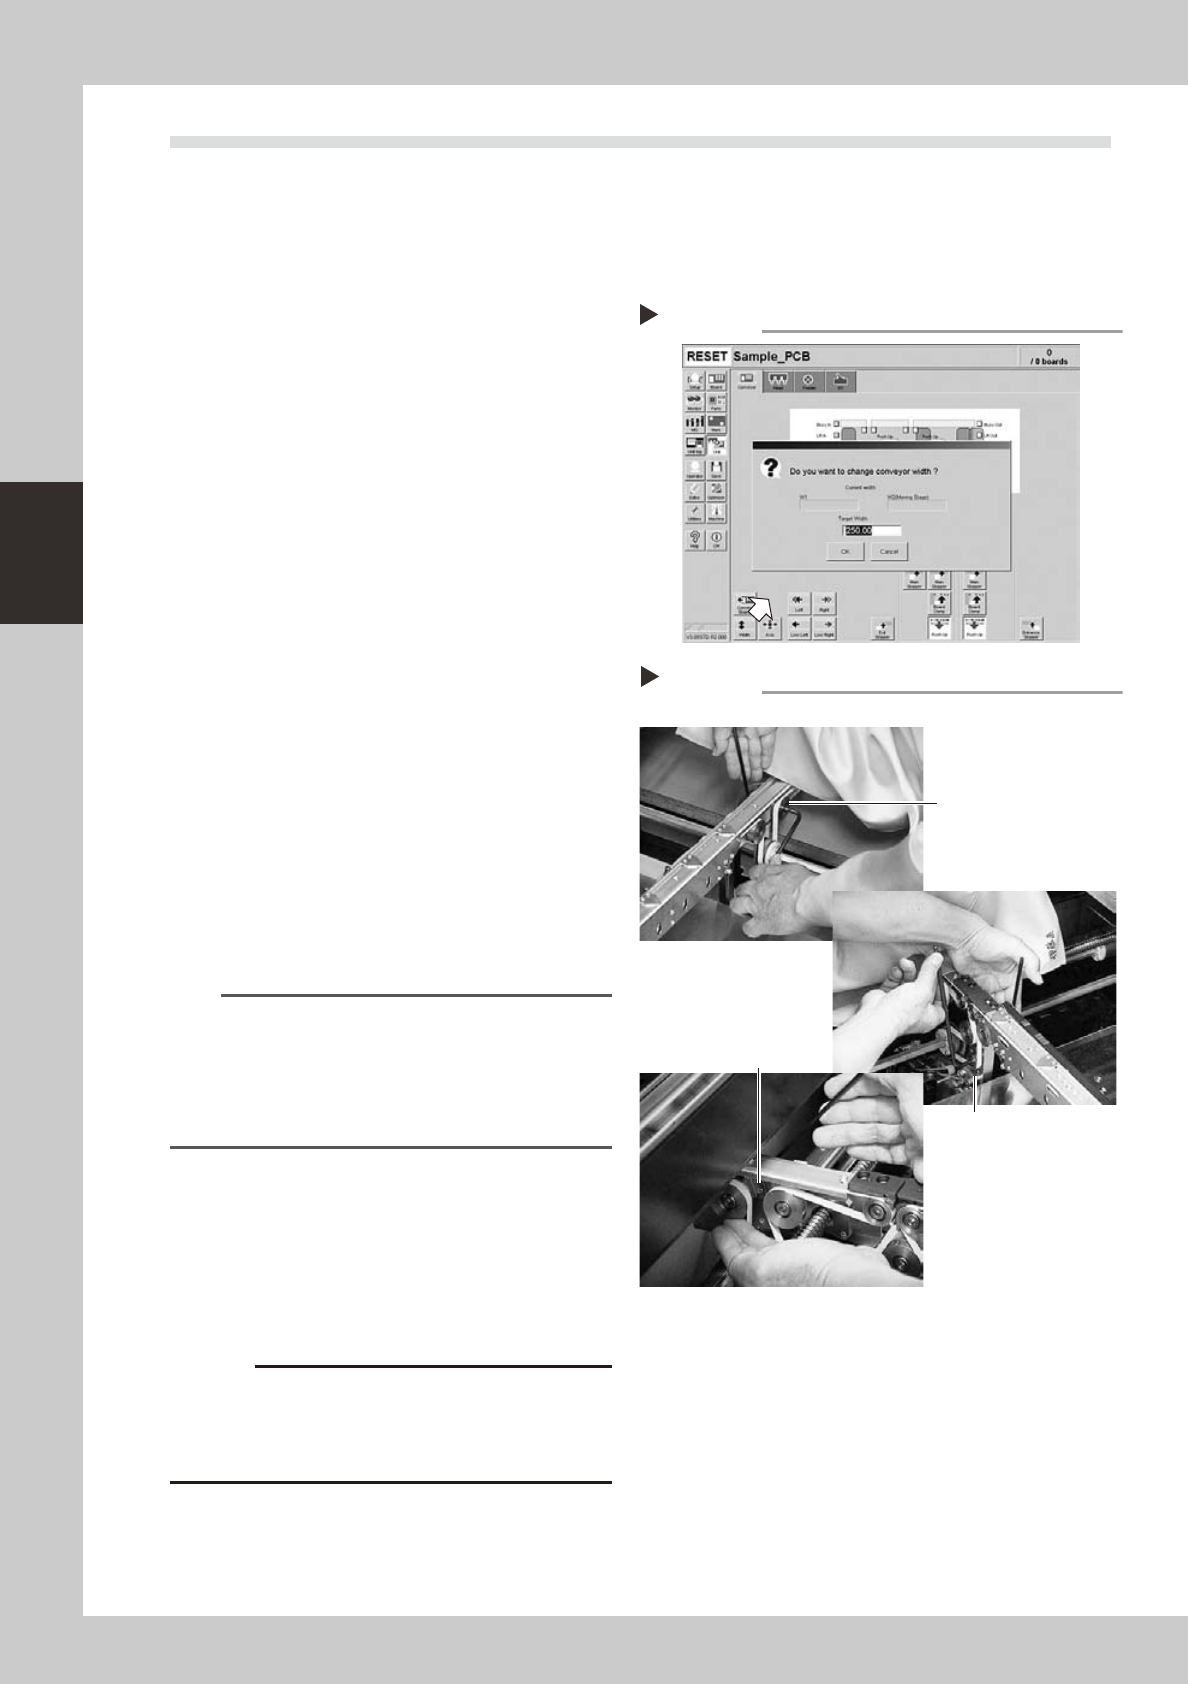
1
Change the conveyor width to a
convenient width for maintenance
work.
1. Press the [Width] button to display the
"Conveyor Width" dialog.
2. In the "Target Width" box, enter a width
large enough for maintenance work
(about 200mm) and press [OK].
The conveyor is changed to the width
that was just entered.
54304-L2-00
e
2
Loosen the tension on the conveyor
belt.
Press the emergency stop button and then
use a 4mm and 5mm hex wrenches to
loosen the belt tension of each conveyor.
53332-L2-00
3
Remove the conveyor belt.
Remove the conveyor belt from the pulley
and the belt groove of the board guide.
4
Check for wear on the board
conveying side of the conveyor belt.
After removing the belt in step 3, check for
wear on the board conveying side of that
conveyor belt.
TIP
About half (3 to 4 mm) the belt width is used for board
conveying. If the board conveying side of the conveyor
belt is worn, then you can still reuse the belt by
switching the used side with the opposite side. However,
this will cause errors after long-term use, so early belt
replacement is recommended.
5
Clean the pulley and the belt
groove on the board guide.
Using the vacuum ASSY (option), suck in belt
wear dust particles from the belt groove or
the sensor detection surface. Also, clean the
pulley and other parts for the conveyor belt
of each conveyor.
c
sometimes adhere to and darken the outer
Changing the conveyor width
Step 1
Step 2
Tension pulley
Tension pulley
Tension pulley stay
Loosening the tension on the belt
W1-axis
W2-axis
Exit conveyor