TS5624DMP-User-Guide.pdf - 第6页
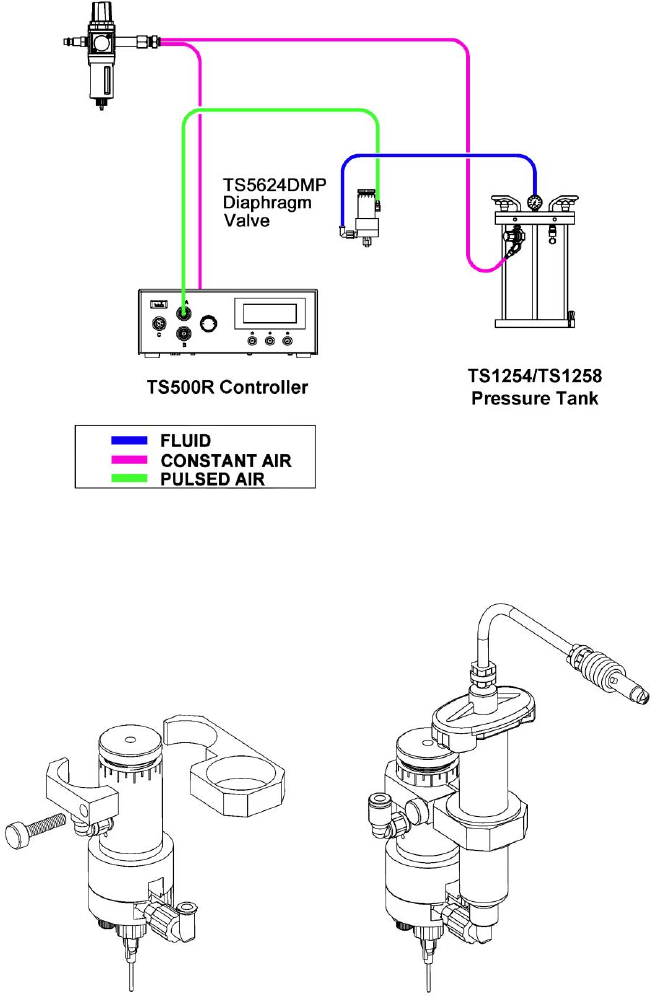
6 6. TYPICAL SYSTEM SET- UP Figure 4 .0 Figure 5 .0 Optional Syringe Feeding 1. Attach 7509-9100 syringe bracket as shown below . 2. Use insert rings for syringe sizes 3cc – 10cc. 3. Ensure syringe is under constant air …
5
5. SETUP INSTRUCTIONS
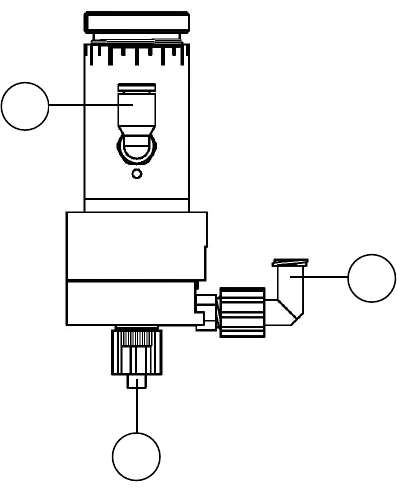
Refer to Figure 3.0
Note: This installation uses Luer lock adapters shipped with the valve.
1. Connect the fluid feed tube or syringe to the fluid inlet port (1).
2. Connect the valve airline to the valve controller or other pneumatic device
that is used to control the valve.
3. Connect the opposite end of the airline to valve air inlet (2).
4. Connect appropriate dispensing tip or nozzle to the fluid outlet port (3).
5. Set the valve controller pressure at 70 psi (4.8bar).
6. Set the fluid pressure. Do not exceed 60 psi (4.1bar).
7. Make sure all connections are tight.
8. Place container under the outlet and activate the valve until the fluid flows
steady.
The amount of fluid that flows through the valve is determined by:
Valve open time
Fluid reservoir pressure
Dispensing tip size
Stroke adjustment knob position
Figure 3.0
1
3
2
6
6. TYPICAL SYSTEM SET-UP
Figure 4.0
Figure 5.0
Optional Syringe Feeding
1. Attach 7509-9100 syringe bracket as shown below.
2. Use insert rings for syringe sizes 3cc – 10cc.
3. Ensure syringe is under constant air pressure.
7
7. DISPOSABLE MATERIAL PATH REMOVAL/REPLACEMENT:
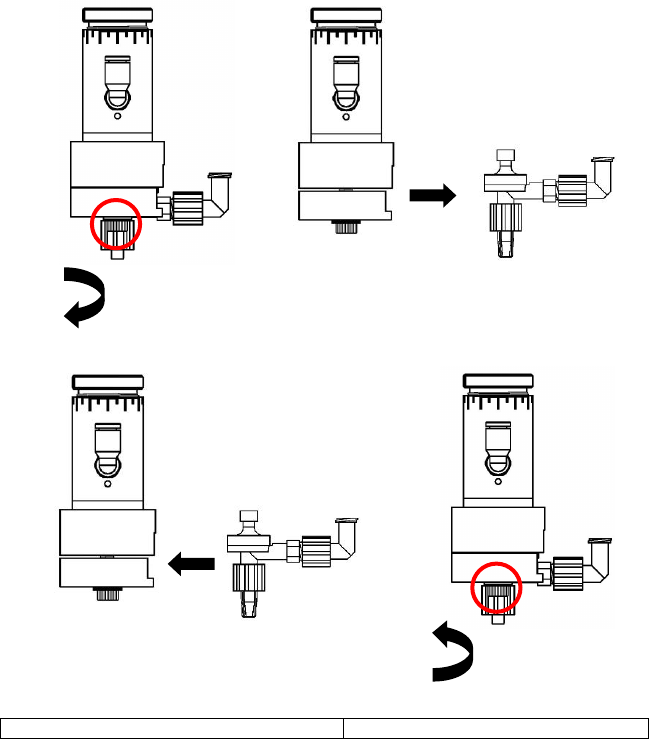
Removal of a feed path assembly: Refer to figure 6.0
1. Release fluid pressure.
2. Remove syringe barrel or fluid line from the valve.
3. Loosen the lower receiver screws (4 - 5 turns) and pull out disposable material
path.
4. Dispose of the used feed path assembly in an appropriate waste container.
Installation of a new feed path assembly: Refer to figure 6.0
1. Insert a new feed path assembly into the valve housing. Ensure correct fitment
into the actuator.
2. Tighten lower receiver screws to torque setting specified below.
Torque Specifications
14 in lb. (1.58 N-m)
Figure 6.0
1. Loosen screws
4 - 5 turns.
2. Remove DMP
insert.
3. Insert new
DMP insert.
4. Tighten screws
evenly to torque
setting.