TS555R-UserGuide.pdf - 第11页
11 2. Press the “BAR” icon to change pressure unit to BAR 3. To uch the X icon to save and ex it 5.2.3 Manual/Purge Dispense Cycle Setting: 1. To uch the Purge icon to select the purge cycle. The Purge icon will turn to …

10
5.2 DISPENSING
5.2.1 Pressure Adjustment
Note: Pressure in Port A is not regulated. It has the same pressure as the
supplied pressure. Port A is used for valve activation pressure. Make sure
the supplied pressure is set at least 70 psi (4.8 bar). Pressure in Port B is
regulated. It provides constant pressure to feed fluid to the valve.
To adjust pressure in port B:
1. Touch the “Pressure B” icon to enter the pressure setup screen
2. Touch the Up and Down arrows to set desired fluid feed pressure
3. Touch the Check Mark icon to save and exit
5.2.2 To Change Pressure Unit Display
Note: The default pressure unit is PSI. To change pressure unit to BAR,
follow the instructions below.
1. Touch the Setup icon to enter the setup screen
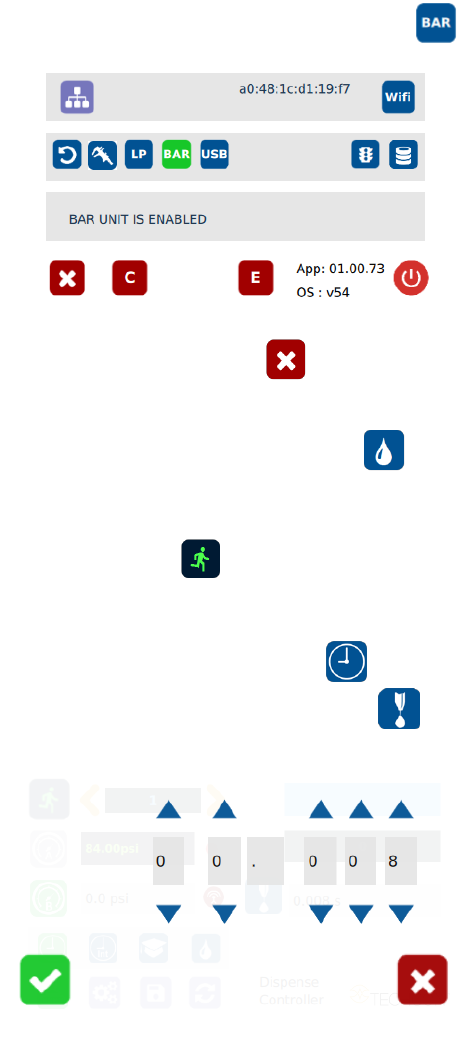
11
2. Press the “BAR” icon to change pressure unit to BAR
3. Touch the X icon to save and exit
5.2.3 Manual/Purge Dispense Cycle Setting:
1. Touch the Purge icon to select the purge cycle.
The Purge icon will turn to green color.
2. Press and hold down the foot switch to activate the purge dispense cycle.
Alternately, touch and hold the Run icon on the display to activate the
purge dispense cycle.
5.2.4 Automatic Dispense Cycle Setting
1. Touch the “Timed” mode icon to set the dispense cycle in pre-set dispense
time. The icon should turn to green color.
2. Touch the Dispense icon to enter the setup screen
3. Touch the Up and Down arrows to set the desired dispense time.
Note: The minimum activation time is 0.008 second

12
4. Touch the Check Mark icon to save and exit
5. Press the foot switch to activate the “Timed” dispense cycle.
Alternately, touch the run icon on the display to activate the “Timed”
dispense cycle.
Note: The unit has an “Interrupt” mode feature. In this mode, the
“Timed” dispense cycle can be disrupted if the foot switch is released and
resumed when the Foot Switch is depressed again.
6. Touch the “Interrupt” icon to activate “Interrupt” mode. The icon should
turn to green color.
5.2.5 Teach Mode Setting
In the teach mode, the dispense time will be accumulated as long as the
foot switch is depressed. This is helpful in determining the required
dispense time when the dispense output is known.
1. Touch the “Teach” icon to enter the teach mode
2. Touch the “Time Reset” icon to set timer to zero
3. Press and hold down the foot switch, the dispense time will be accumulated
4. Release the foot switch when the desired amount of fluid has dispensed
5. Touch the “Timed” icon to transfer the accumulated dispense time to
“Timed” mode
6. The unit is now set to repeat this “Timed” cycle
5.3 Stored Program in Memory cell
The unit has 50 memory cells to store all dispense parameters. The controller can
activate all memory cells in sequence mode.
5.3.1 To store dispense parameters
1. Touch the forward or backward arrow to select the desired memory cell.
2. Enter all the desired dispense parameters then touch the “Save” icon to save
the data