IT Feeder Manual-SM320(English V2.0)Ver1.pdf - 第32页
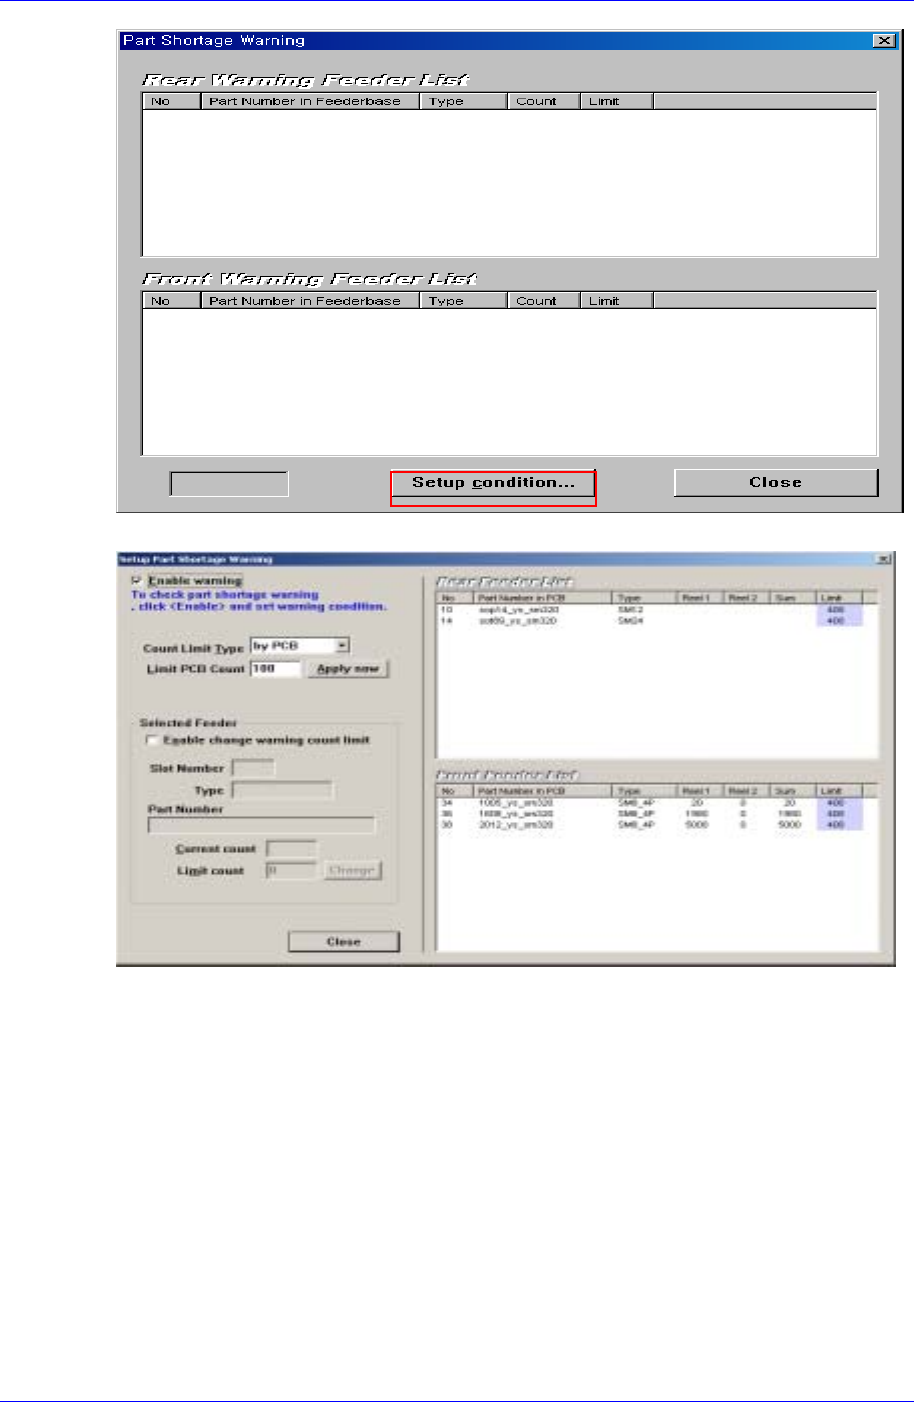
Samsung Intelligent Feeder System Figur e 1-21. Part Shortage W arning ① ② ③ ④ Figur e 1-22. Setup Part Sho rtage W arni ng Shortage W arning Setup ① Check the <Enable W arning> check box to indicate whet…
IT Feeder System
1-19
displayed. Barcodes can be read wrongly due to damages to barcodes or wrong key in
during direct input. In the former case, reissue barcodes in the Part Station or enter them
manually.
A barcode that is not generated by the Part Station can not be read. In this case, register
the reel in the Part Station first and use it.
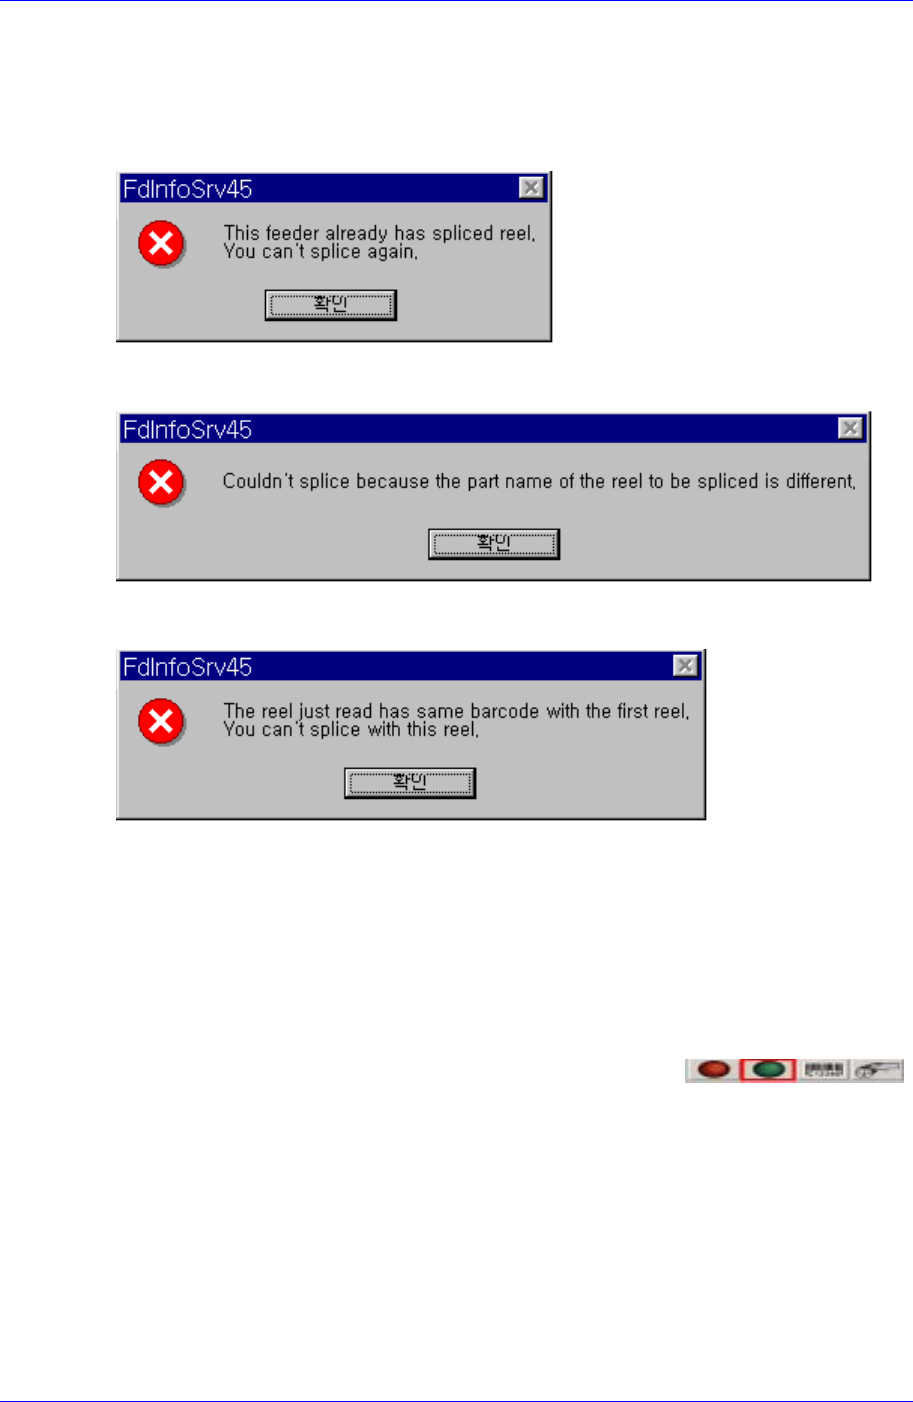
When splicing the selected feeder, if it has been already spliced, the message as above is
displayed.
When performing splicing in the Splicing Screen Configuration, it appears if the 2
nd
reel
code is not identical.
When performing splicing in the Splicing Screen Configuration, it appears if the 2
nd
reel
code is identical.
1.4.8. Shortage Warning
1.4.8.1. Setup Part Shortage Warning
In order to use the ITFS Shortage Warning function, the quantity at which the remaining
quantity is warned must be set up in the IT Feeder Manager.
Click the IT Feeder Manager 의 Shortage Warning icons (
)
in the IT Feeder Manager to display the Shortage Warning window.
Click the <Setup Condition…> button in Figure. 1-21 to display the Shortage
Warning dialog box.
Samsung Intelligent Feeder System
Figure 1-21. Part Shortage Warning
①
②
③
④
Figure 1-22. Setup Part Shortage Warning
Shortage Warning Setup
① Check the <Enable Warning> check box to indicate whether to use the
remaining quantity warning function. If it is checked, the shortage warning
occurs.
② Select the <Count Limit Type>
All by One: This type is applied to all feeders downloaded in the program. If
the Apply Now button is pressed after entering the Limit Part Count, the
count limit is setup for all feeders.
By PCB: Checks the remaining quantity by multiplying the part quantity
with the PCB quantity. The set limit count varies according to the number of
parts used per PCB.
For setting up a separate limit count for each feeder, refer to the following
1-20
IT Feeder System
1-21
Selected Feeder.
③ Set up a separate limit count in the <Selected Feeder>.
First, select the feeder for which the limit count is to be set.
Check if the selected feeder and part information are correct.
Select the <Enable Change warning count limit> check box.
The checked setup corresponds only to the corresponding feeder slot.
Therefore, it does not vary for other feeder slots.
Confirm the current count and enter the desired quantity in the Limit count.
The procedure to restore the Mismatch Error is as follows.
Once the Limit count input is completed, press the <Change> button to set
the count.
Reference
The Limit Count that is set up in the Selected Feeder is not changed by the setup through
‘All by One’ and ‘by PCB’. Therefore the user should be careful of this. If it is desired to
make the contents set up in the Selected Feeder identical to those of other feeders, click
the corresponding slot and press the Reset button.
Now, the Shortage Warning setup is completed. In case the remaining part
quantity becomes equal to or less than the Shortage Limit count during operation,
the machine indicates warning via the lamp and screen.
1.4.8.2. Generation of Part Shortage Warning
If the Part Count becomes less than the Shortage Limit, the ITFS generates a warning.
Then the green lamp flickers and the green icon of the displayed machine icons
(
) flickers. The IT Feeder Manager yellow mark is indicated
in the slot where the Shortage Warning has occurred.