80S-2080F480F4-680F5 User’s Manual.pdf - 第286页
SIPLACE 80S-20/F4/F4-6/F5 User’s Manual 5 Vision Functi on s Edition 03/98 from S oftware Version SR.404.xx 5.5 Teach Fiducial Line engi neer 5 - 65 5.5.6 Test Fiducial Menu In the Test fiducial menu th e follow ing opti…

5 Vision Functions SIPLACE 80S-20/F4/F4-6/F5 User’s Manual
5.5 Teach Fiducial Edition 03/98 from Software Version SR.404.xx
5 - 64 Line engineer
Buttons
– Accept
Click on the Accept button to save the settings. The option box will then close.
– Cancel
With Cancel you can discard the settings. The option box will then close.
– Help
With the Help button you can access explanatory material regarding the on-screen presentation.
– Standard values
Click on the Standard values button if programming the transformation table fails. When you select this
option the transformation table will be preassigned default values. After this you can start over with pro-
gramming table 5.
– Number input field
You can choose the number of sections
by entering the numerical value directly into the display field, or
by moving the scroll field in the scroll bar to the right or left using the mouse. In this way you can run
back and forth through the values range (1 - 5), or
by clicking on the left-hand or right-hand arrow on the scroll bar. In this way you can increase or
decrease the number of selections.
Programming the transformation table
– Specifying the output values
Position the mouse pointer over the ends of the transformation lines of each section. The ends are marked
with small horizontal lines. A vertical double arrow will then appear on the screen. Click on the left-hand
mouse key and move the arrow upwards or downwards. This will move the selected end of the transforma-
tion line and the numerical value will be displayed at OUT Begin or OUT End.
– Selecting the section limits
The graphical representation in Fig. 5.5.15, Page 5 - 63 shows equidistant section limits with the ranges
0 - 50, 51 - 100 and so on. You can change these section limits if you wish. However limits 0 and 255 are
permanently allocated and cannot therefore be moved.
Position the mouse pointer on a section limit (but not 0 and 255). A horizontal double arrow will appear on
the screen. Hold down the lefthand mouse pointer and use it to drag the section limit in the direction you
want. The corresponding numerical value will be displayed at IN:.
– Once you have programmed your transformation table you can quit the option box by clicking on Accept
or Cancel. If you have not managed to obtain a satisfactory result, click on Default.
SIPLACE 80S-20/F4/F4-6/F5 User’s Manual 5 Vision Functions
Edition 03/98 from Software Version SR.404.xx 5.5 Teach Fiducial
Line engineer 5 - 65
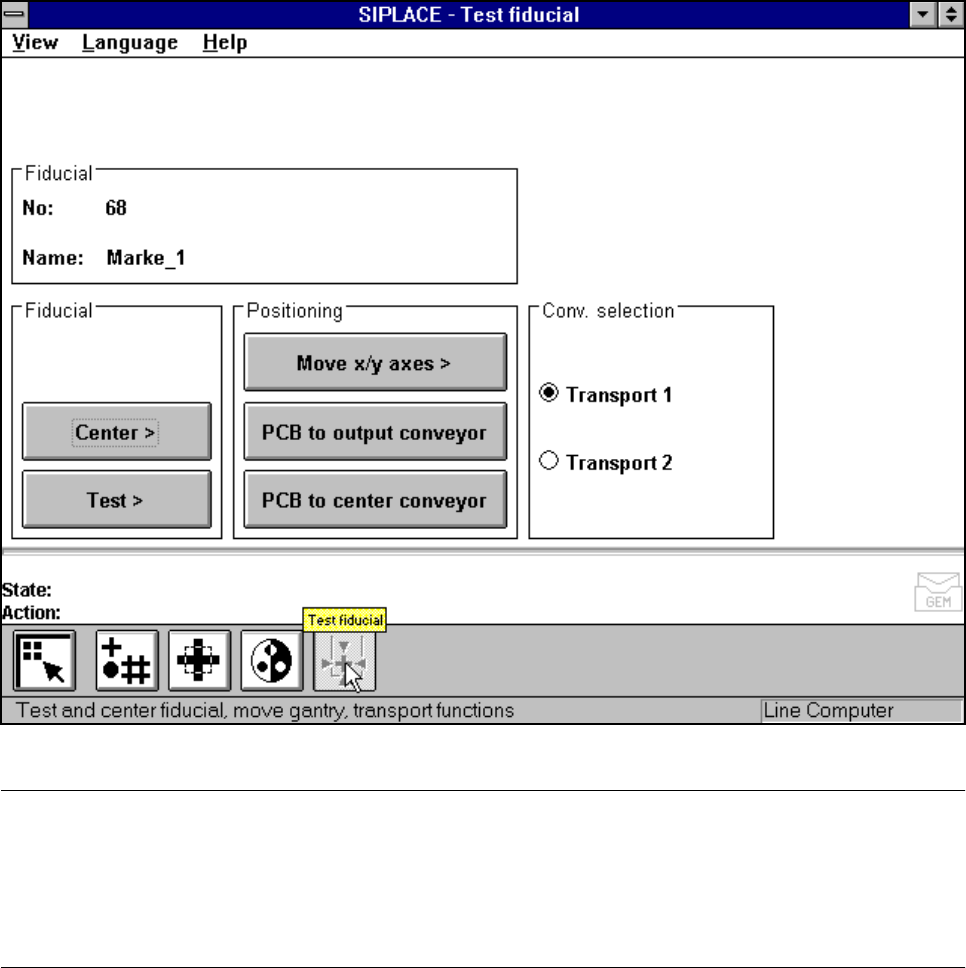
5.5.6
Test Fiducial
Menu
In the Test fiducial menu the following options are available:
– Centering the fiducial (Center)
– Testing the fiducial (Test)
– Positioning the teaching gantry (x/y movement) (move X/Y axes)
– Transporting the board onto the output conveyor (PCB to output conveyor)
– Transporting the board onto the center conveyor (PCB to center conveyor)
Fig. 5.5.16 Test fiducial menu, options
NOTE
Buttons are active when the text on the button is black (rather than gray). This means that you can launch the
associated function by clicking on the button with the mouse.
The Center and Test options will only be available if you have already loaded a fiducial and a model already
exists for this fiducial.
If you have selected a fiducial the fiducial number and the fiducial name will appear in the display field.
5 Vision Functions SIPLACE 80S-20/F4/F4-6/F5 User’s Manual
5.5 Teach Fiducial Edition 03/98 from Software Version SR.404.xx
5 - 66 Line engineer
5.5.6.1
Center
Option
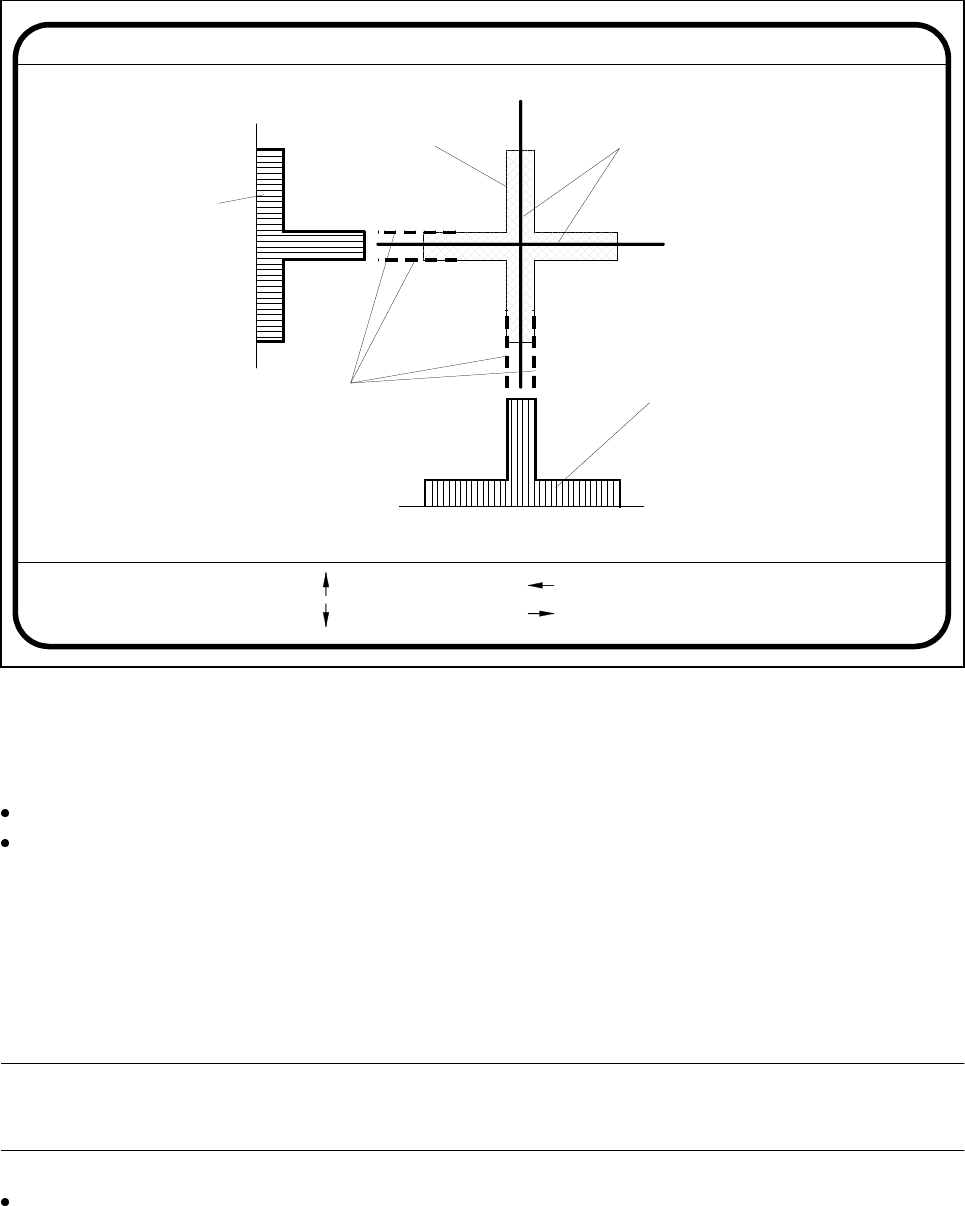
If you click on the Center button the Test fiducial menu will close and the video image be shown on the
screen. The picture shows the 2D fiducial structure and the rows and columns profiles of the 1D structure
used for determining precisely the center of the fiducial. Header and footer will be shown as well.
Fig. 5.5.17 Test fiducial menu, Center video image
The Center function determines via software the center of the fiducial. The parameters for the function - these
are the edges of the fiducial structure - you can select via a dialog. The system draws edge line markings as
suggestions at possible edge positions.
With the arrow keys shift the current edge line marking designated in the header.
With Return you can accept the position of the suggested edge line marking or the one whose position
you changed. The system will then show you the next edge line marking. The sequence in which interroga-
tion takes place is ’Fiducial edge left’, ’Fiducial edge right’, ’Fiducial edge top’ and lastly ’Fiducial edge bot-
tom’. This notation appears in the header.
The results of fiducial centering are indicated by a cross. The x and y offset values of the fiducial center will be
entered in the fiducial data field.
PLEASE NOTE:
An incorrectly centered fiducial will cause a placement offset.
Press the Esc key to quit the option and return to the Test fiducial menu.
Edge ok
Fiducial No. = 8 Edge = left
Ret :
Center fiducial
: up
: dn
: right
: left
Fiducial
Result: Centering crosshair
Edge line markings to be shifted
via cursor keys
Row profile of fiducial
Column profile
of fiducial