Autosite_Users_Manual.pdf - 第61页
Operation AutoSite User Manual 3-3 Changing a Pro gramming Module on a ProMaster 2000 Safety Information This informa tion is provided as a supplement to the Sa fety Summary at the beginning of this manua l. The circuitr…

Operation
3-2 AutoSite User Manual
Starting AutoSite
To prepare AutoSite for a session, follow the procedure below.
Note: If you have not used AutoSite for a while, or if you suspect AutoSite might
have been moved from one area to another, follow the procedure below
before you use AutoSite.
1. Ensure that AutoSite is set up as described in Chapter 2, “Setup and
Installation.”
2. Select and insert a programming module (or Base) into the pin driver
head. Make sure the programming module (or Base) is locked in
place.
3. Connect the pin driver head to the handler.
4. Power up AutoSite. (The powerup operation is described in detail on
page 2-28.)
5. Verify that AutoSite and the controlling software are communicating.
You are now ready to begin a session on AutoSite.
Changing a Programming Module: Overview
The procedure for changing a programming module depends on the
manufacturer of the handler you are using with AutoSite. See the
documentation supplied with your handler for information on changing
a programming module.
To prevent damage to AutoSite and to make changing programming
modules easier, we suggest that you keep the following items in mind
while changing a programming module:
• Make sure the handler is idle
• Wear a properly grounded antistatic wrist strap while working with
the programming module and the pin driver head
• Do not touch the gold pins exposed when you remove a
programming module from the pin driver head
• Do not block the fan on the side of the pin driver head
• If necessary, disconnect the 50-pin and 68-pin cables from the pin
driver head to gain better access to the pin driver head
• Do not use the device socket or connectors on the programming
module as a leverage point
• Store programming modules in a static safe area when not in use or
when removed from the pin driver head
Note: You may need to change hardware on your handler when you change
programming modules on AutoSite. See your handler manual for more
information.

Operation
AutoSite User Manual 3-3
Changing a Programming Module on a ProMaster 2000
Safety Information
This information is provided as a supplement to the Safety Summary at
the beginning of this manual.
The circuitry housed inside the pin driver head and the control unit, and
the devices AutoSite programs are static sensitive and can be damaged by
electrostatic discharge (ESD). To help minimize the effects of ESD, we
suggest you wear an antistatic wrist strap while you follow the
procedures described in this section.
For best performance, the antistatic wrist strap should be connected to a
properly grounded antistatic workstation and the wrist strap should
contain a 1 M
Ω
(minimum) to 10 M
Ω
(maximum) isolating resistor.
Follow the steps below to change the programming module on a
ProMaster 2000.
1. Make sure the handler is idle.
2. Clear all devices from the handler.
3. Loosen the thumbscrews that hold the pin driver head to the pin
driver head mounting plate and carefully remove the pin driver head
from the pin driver head mounting plate. The thumbscrews are
located at each end of the pin driver head mounting plate.
4. Slide the clamp ring off the pin driver head. Set the clamp ring aside;
you will need it later.
5. Remove the old programming module. Set the old programming
module aside.
CAUTION: Do not touch the pins that are exposed when you remove the
programming module.
Operation
3-4 AutoSite User Manual
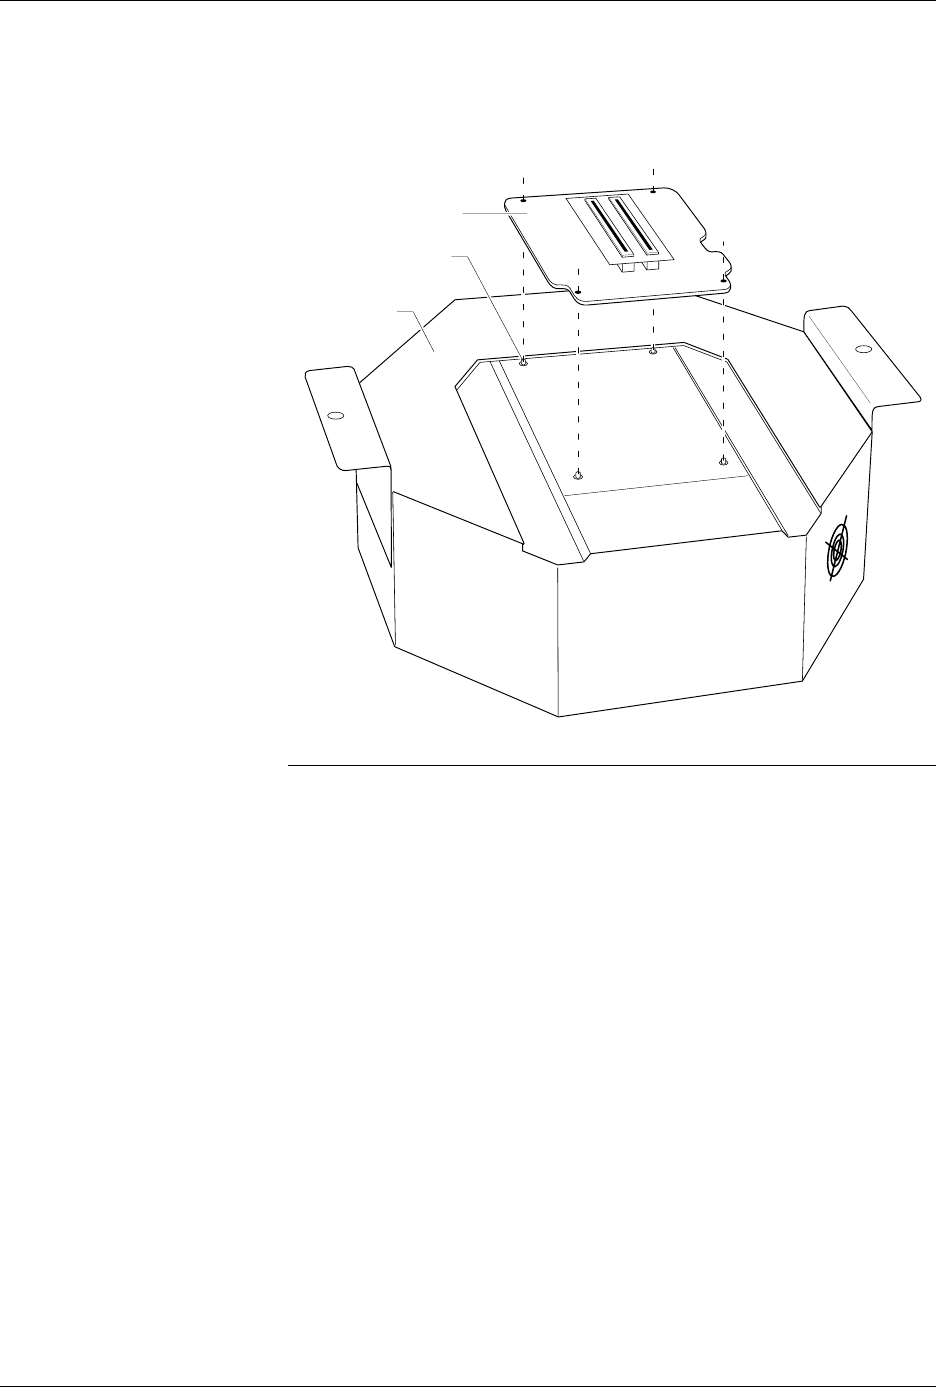
6. As shown in Figure 3-1, set the new programming module onto the
pin driver head, making sure the guide pins on the pin driver head
line up with the guide holes in the programming module.
Note: If you are using a programming module for the first time, and you
purchased the programming module after you purchased your AutoSite,
(i.e., you didn’t order the programming module and the AutoSite at the
same time) you must perform a one-time procedure to unlock the
programming module before you can use it.
Continue with the installation. At the appropriate time, a note in this
manual will tell you when to unlock the new programming module.
Figure 3-1
Aligning the Programming Module
on the Pin Driver Head
1350-1
PROGRAMMING
MODULE
PIN DRIVER
HEAD
GUIDE PIN (1 of 4)