MR-Conveyor-Maintenance-Guide.pdf - 第17页
EN - 0034 Rev. F MR Conveyor Maintenance G uide 17 3/12/2024 P assiv e S ide Timing Belt Replacement Procedure for Belt Driv e Models: 1) Unplug po wer to the Convey or. 2) Rem ove the Passive Side Cover and Product Guid…
EN-0034 Rev. F MR Conveyor Maintenance Guide 16
3/12/2024
Direct Drive Motor Replacement
Procedure For Direct Drive Models:
1) Unplug power to the Conveyor.
2) Remove the Motor Cover.
3) Unplug the Motor Cable from the Motor.
4) Remove the four 8-32 Screws that secure the Motor to the Motor Bracket.
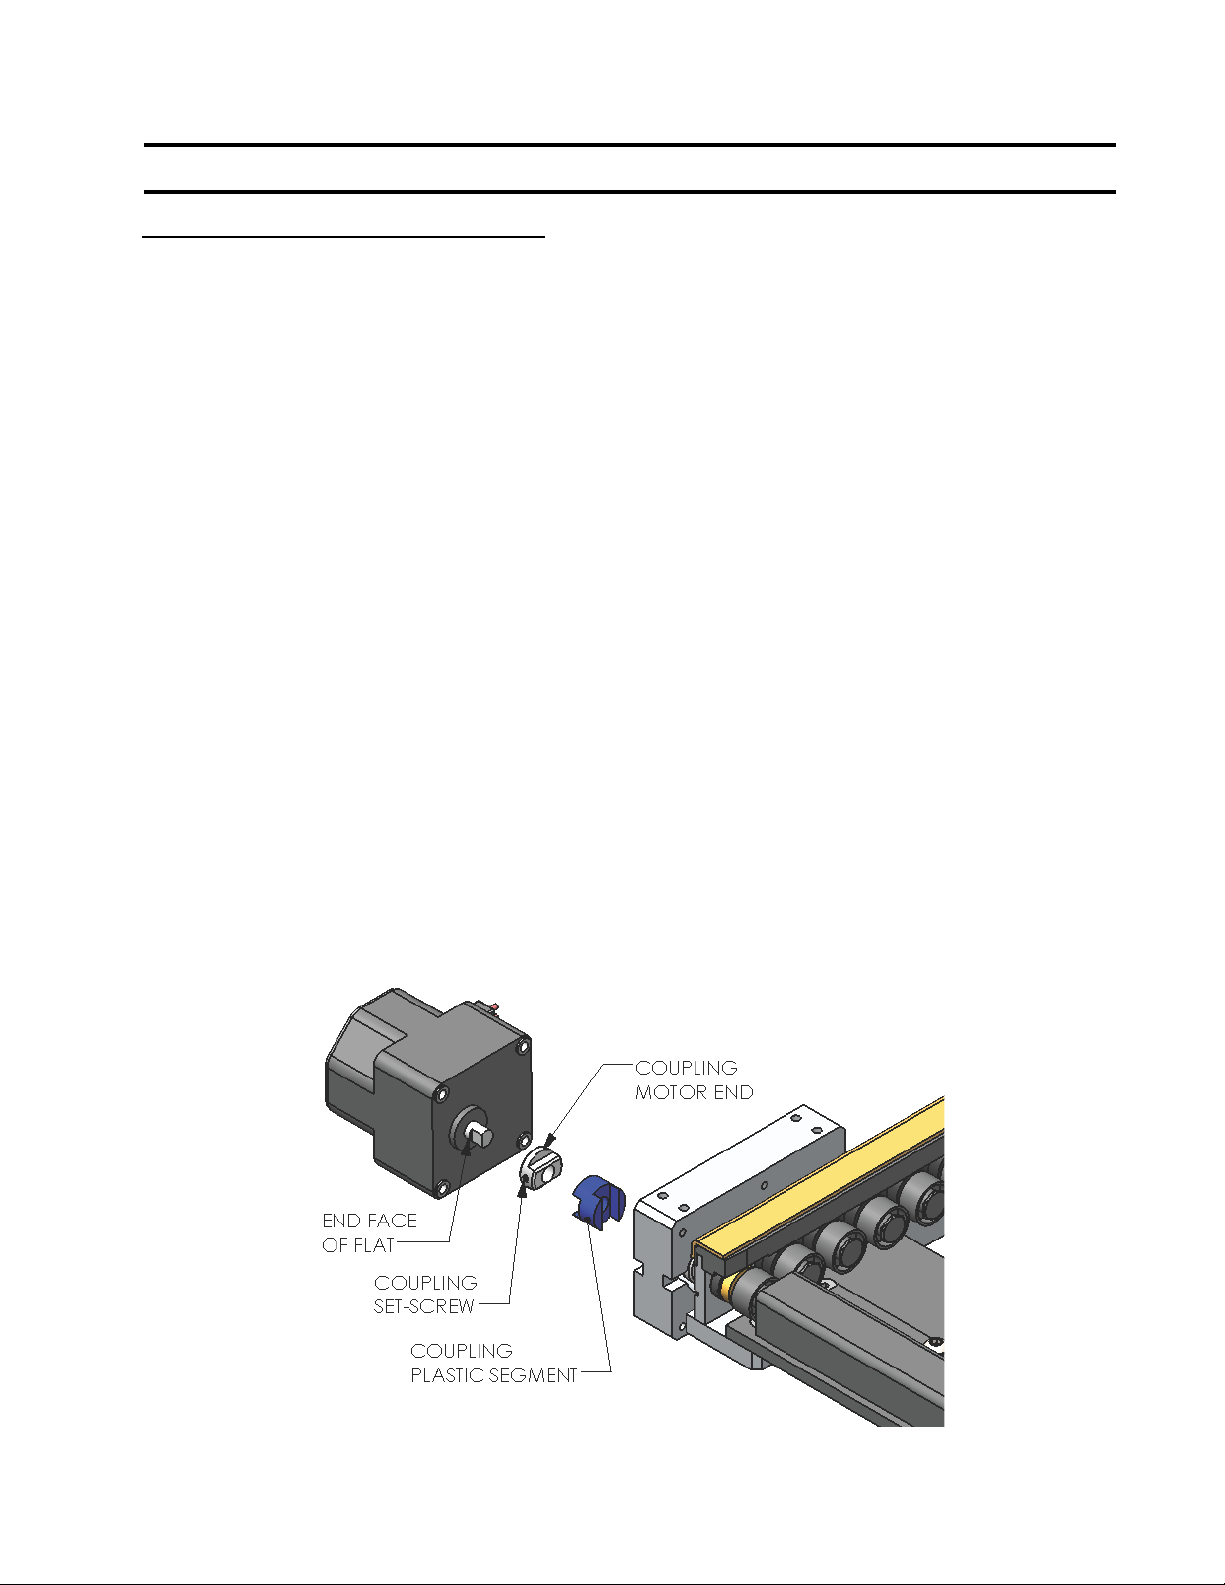
5) Remove the Motor. The Motor separates from the Conveyor at the Coupling.
6) Loosen the setscrew and remove the part of the Coupling still attached to
the Motor shaft. Also, keep the plastic segment (center part of Coupling) with
it if it came off too.
7) Slide the part of the Coupling from Step 6, above, onto the new Motor shaft.
Line up the setscrew with the flat on the Motor shaft. Turn the setscrew down
until it just contacts the flat and then slide the Coupling part until it is .025”
away from the end face of the flat (use a feeler guage). Tighten it here. This
sets the Coupling to the factory position on the Motor Shaft.
8) Align the Coupling parts by rotating either the Motor or the Conveyor. Install
the new Motor with the four 8-32 Screws.
9) Plug the Motor Cable into the Motor.
10) Reattach the Motor Cover.
11) Hand power the Conveyor (See Page 8).
12) Turn on the Conveyor.

EN-0034 Rev. F MR Conveyor Maintenance Guide 17
3/12/2024
Passive Side Timing Belt Replacement
Procedure for Belt Drive Models:
1) Unplug power to the Conveyor.
2) Remove the Passive Side Cover and Product Guide.
3) Remove the Collar Clamp (See Page 11).
4) Loosen the Belt Tensioner, if necessary.
5) Slide the Passive Side Pulley off of the Drive Post.
6) Remove the old Timing Belt.
7) Check the Drive Post.
8) Check the Passive Side Pulley for wear.
9) Place the new Timing Belt over the far end pulley. * Make sure that the belt is
on the teeth of the Pulley.
10) Pull the Belt toward the Motor end. Put the belt on the teeth of the Passive
Side Pulley.
11) Check the Timing Belt to ensure that it is not twisted or caught on the Rail.
*Turning the Passive Side Pulley with your fingers and a visual check can do
this.
12) Tighten the Belt Tensioner, if necessary.
13) Reattach the Collar Clamp (See Page 11).
14) Replace the Product Guide.
15) Hand-Power the Conveyor (See Page 8).
16) Reattach the Cover.
17) Hand-Power the Conveyor.
18) Turn on the Conveyor.

EN-0034 Rev. F MR Conveyor Maintenance Guide 18
3/12/2024
Drive Side Timing Belt Replacement
Procedure For Belt Drive Models:
1) Unplug power to the Conveyor.
2) Remove the Drive Side Cover and Product Guide.
3) Remove the Motor Cover.
4) Remove the Collar Clamp (See Page 11).
5) Loosen but do not remove the two upper Motor mounting screws.
6) Slide the Motor up and remove the Drive Belt from the Motor Pulley.
7) Pull the Drive Side Pulley away from the Rail and off of the Drive Post.
8) Loosen the Belt Tensioner, if necessary.
9) Remove the old Timing Belt.
10) Check the Drive Post.
11) Check the Drive Side Pulley for wear.
12) Check the Motor Bracket to insure that it is securely tightened to the Spacer
Plate.
13) Place the new Timing Belt over the far end Pulley. * Be sure that the belt is
on the teeth of the Pulley.
14) Pull the Timing Belt towards the Motor end. Put the Belt on the teeth of the
Drive Side Pulley.
15) Check the Timing Belt to ensure that it is not twisted or caught on the Rail. *
Turning the Drive Side Pulley with your fingers and a visual check can do
this.
16) Reattach the Drive Belt.
17) Reattach the Collar Clamp (See Page 11).
18) Tighten the Belt Tensioner, if necessary.
19) Replace the Product Guide.
20) Hand-Power the Conveyor (See Page 8).
21) Reattach the Cover.
22) Hand-Power the Conveyor.
23) Reattach the Motor Cover.
24) Turn on the Conveyor.