MR-Conveyor-Maintenance-Guide.pdf - 第18页
EN - 0034 Rev. F MR Conveyor Maintenance G uide 18 3/12/2024 Driv e Side Timin g Belt Replacement Procedure For Belt Drive Models: 1) Unplug power to the Conveyor. 2) Remove the Drive Side Cover and Product Guide. 3) Rem…

EN-0034 Rev. F MR Conveyor Maintenance Guide 17
3/12/2024
Passive Side Timing Belt Replacement
Procedure for Belt Drive Models:
1) Unplug power to the Conveyor.
2) Remove the Passive Side Cover and Product Guide.
3) Remove the Collar Clamp (See Page 11).
4) Loosen the Belt Tensioner, if necessary.
5) Slide the Passive Side Pulley off of the Drive Post.
6) Remove the old Timing Belt.
7) Check the Drive Post.
8) Check the Passive Side Pulley for wear.
9) Place the new Timing Belt over the far end pulley. * Make sure that the belt is
on the teeth of the Pulley.
10) Pull the Belt toward the Motor end. Put the belt on the teeth of the Passive
Side Pulley.
11) Check the Timing Belt to ensure that it is not twisted or caught on the Rail.
*Turning the Passive Side Pulley with your fingers and a visual check can do
this.
12) Tighten the Belt Tensioner, if necessary.
13) Reattach the Collar Clamp (See Page 11).
14) Replace the Product Guide.
15) Hand-Power the Conveyor (See Page 8).
16) Reattach the Cover.
17) Hand-Power the Conveyor.
18) Turn on the Conveyor.

EN-0034 Rev. F MR Conveyor Maintenance Guide 18
3/12/2024
Drive Side Timing Belt Replacement
Procedure For Belt Drive Models:
1) Unplug power to the Conveyor.
2) Remove the Drive Side Cover and Product Guide.
3) Remove the Motor Cover.
4) Remove the Collar Clamp (See Page 11).
5) Loosen but do not remove the two upper Motor mounting screws.
6) Slide the Motor up and remove the Drive Belt from the Motor Pulley.
7) Pull the Drive Side Pulley away from the Rail and off of the Drive Post.
8) Loosen the Belt Tensioner, if necessary.
9) Remove the old Timing Belt.
10) Check the Drive Post.
11) Check the Drive Side Pulley for wear.
12) Check the Motor Bracket to insure that it is securely tightened to the Spacer
Plate.
13) Place the new Timing Belt over the far end Pulley. * Be sure that the belt is
on the teeth of the Pulley.
14) Pull the Timing Belt towards the Motor end. Put the Belt on the teeth of the
Drive Side Pulley.
15) Check the Timing Belt to ensure that it is not twisted or caught on the Rail. *
Turning the Drive Side Pulley with your fingers and a visual check can do
this.
16) Reattach the Drive Belt.
17) Reattach the Collar Clamp (See Page 11).
18) Tighten the Belt Tensioner, if necessary.
19) Replace the Product Guide.
20) Hand-Power the Conveyor (See Page 8).
21) Reattach the Cover.
22) Hand-Power the Conveyor.
23) Reattach the Motor Cover.
24) Turn on the Conveyor.
EN-0034 Rev. F MR Conveyor Maintenance Guide 19
3/12/2024
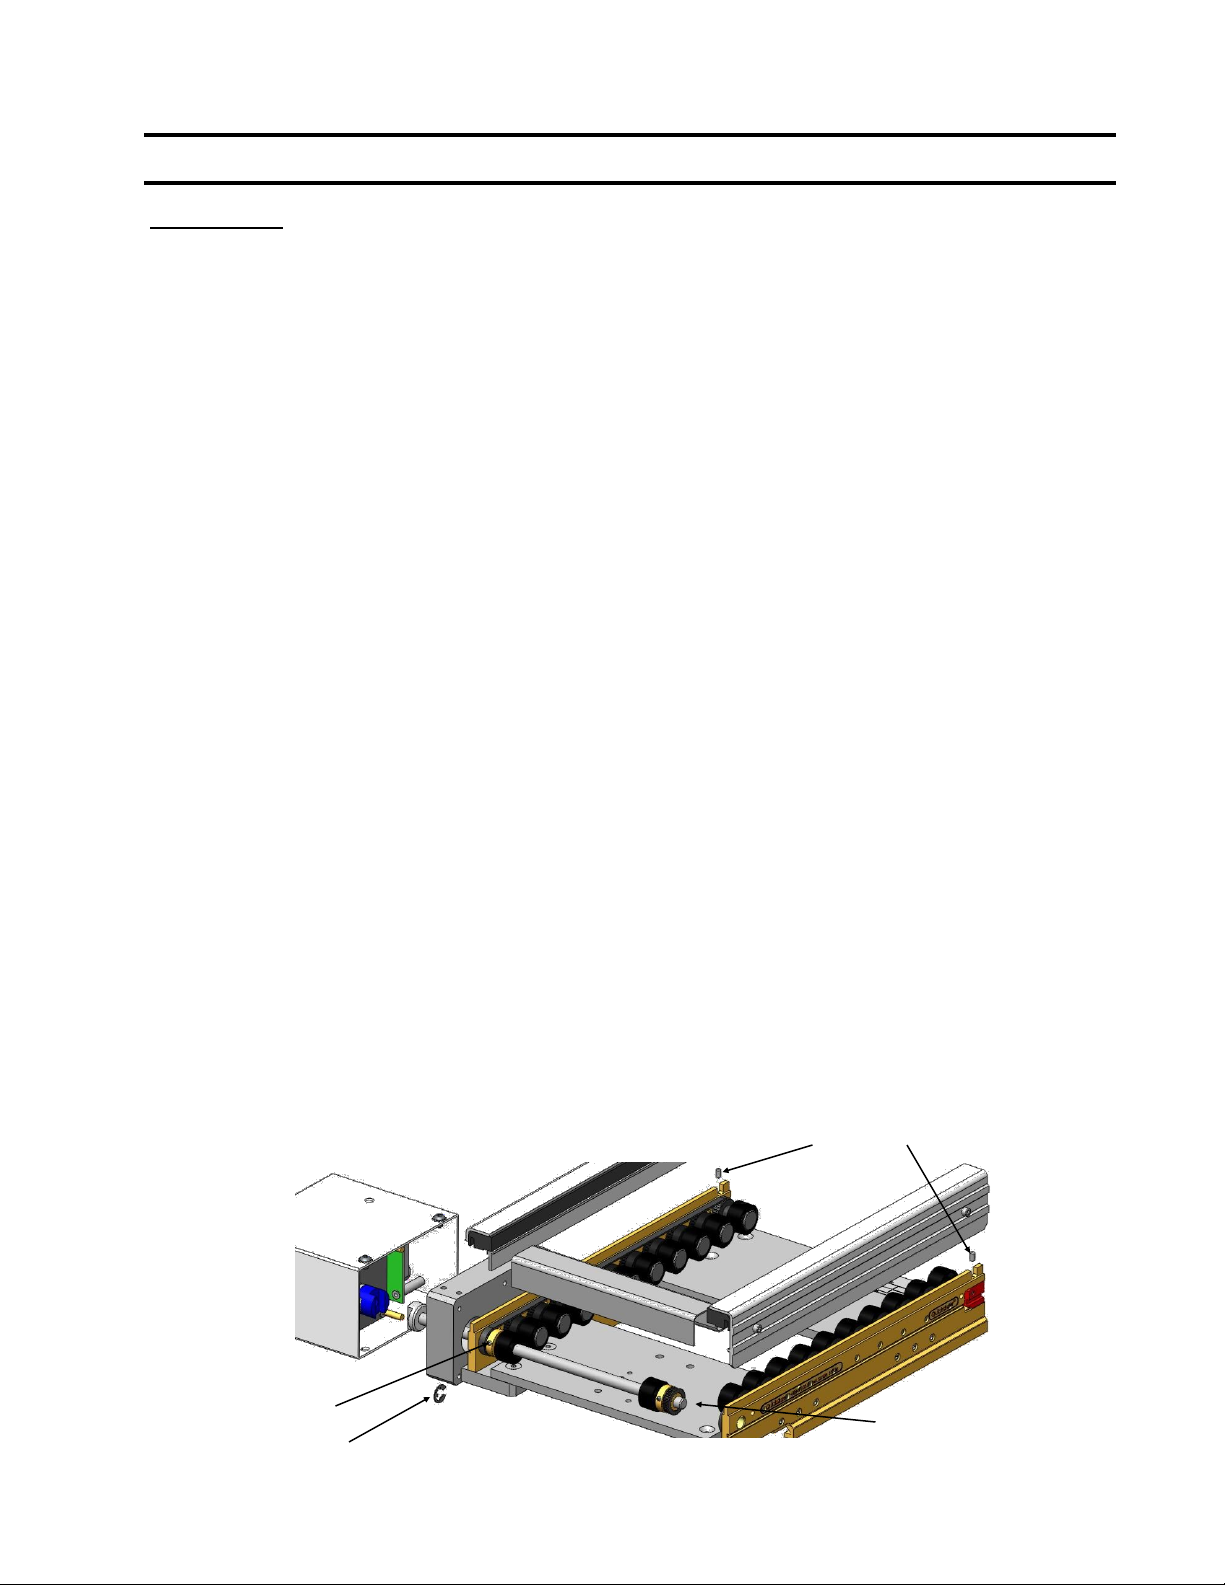
Direct Drive Timing Belt Replacement - Either Side
Procedure :
1) Unplug power to the Conveyor.
2) Remove both of the Side Covers and Product Guides.
3) Remove the Motor and Cover (See Page 16).
4) Remove the Collar Clamp Guard.
5) Loosen both setscrews at the Belt Tensioners to relax the Timing Belts.
6) Remove the drive side E-Ring on the Drive Shaft.
7) Loosen the setscrew that locks the drive side Pulley to the Drive Shaft.
8) Slide the Drive Shaft out the Motor side of the Conveyor just enough to slip the
Timing Belt past the passive end Pulley and Shaft end. You may now remove
either Timing Belt.
9) Check the Pulleys for wear.
10) Slip the replacement Timing Belt over the Drive shaft and reinstall the Drive
Shaft into the Passive Pulley and passive side Bearing.
11) Position the Drive Shaft end flush with the passive side outside Rail face.
12) Slide the Drive Pulley back in to position in line with all Pulleys and tighten the
setscrew onto the flat on the Drive Shaft.
13) Reinstall the drive side E-Ring.
14) Make sure the Belt teeth are fully engaged in the Pulley teeth and then set the
Timing Belt Tension and tighten those setscrews (See Page 14).Rotate the
Drive Shaft by hand to confirm full tooth engagement.
15) Reinstall the Motor and Cover (See Page 16).
16) Reinstall the Product Guides and Rail Covers. Rotate the Drive Shaft to
maintain Belt tooth engagement as these parts are installed.
17) Reinstall the Collar Clamp Guard.
18) Rotate the Conveyor by hand (See Page 8).
19) Turn on the Conveyor.
E-Ring
Setscrews
Setscrew
Slip Belt around
this end.