WaferTransportSolutionManual.pdf - 第64页
PRECIS ION WAFE R PALLET REPLACEMENT PROCEDURES 2.6 Wafer Transport Solution Chapter Issue 1 Aug 11 REPLACEMENT PROCEDURES Lif t Pin Replacement The lift me chanism has three lift pins which, when worn o r damaged, may b…

PRECISION WAFER PALLET
MECHANICAL DETAIL
Chapter Issue 1 Aug 11 Wafer Transport Solution 2.5
Vacuum Vacuum is used to:
• Secure the shim
• Supply the porous elements, which hold the wafer
• Supply the vacuum cups on the lift pins
The vacuum supplied to the shim is constant, this keeps it in place for the
complete print run whereas, that supplied to both the lift mechanism and the
wafer are switchable. Vacuum switching is provided externally by the downline
system. The downline system automatically switches the vacuum off, when
the wafer is to be released, after printing, and it switches it back on again when
a wafer is ready for transfer to the DEK printer.
PRECISION WAFER PALLET
REPLACEMENT PROCEDURES
2.6 Wafer Transport Solution Chapter Issue 1 Aug 11
REPLACEMENT PROCEDURES
Lift Pin
Replacement
The lift mechanism has three lift pins which, when worn or damaged, may be
replaced. The lift pins are connected directly to the vacuum system.
1. Isolate the downline system from the pneumatic air input.
2. Open the transfer station’s front cover to access the pallet on the conveyor.
3. Turn the pallet face side down on the conveyor to access the two pneumatic
lines connected to the base of the pallet.
4. Remove the three pneumatic input lines by depressing the fitting end collar
and removing the push fit tubing.
5. Remove the pallet from the machine and place it face side down on a
protective cloth.
6. Disconnect the vacuum tubing on the lift pin vacuum connector.
7. Loosen the clamp locking screw.
8. Remove the lift pin from the clamp.
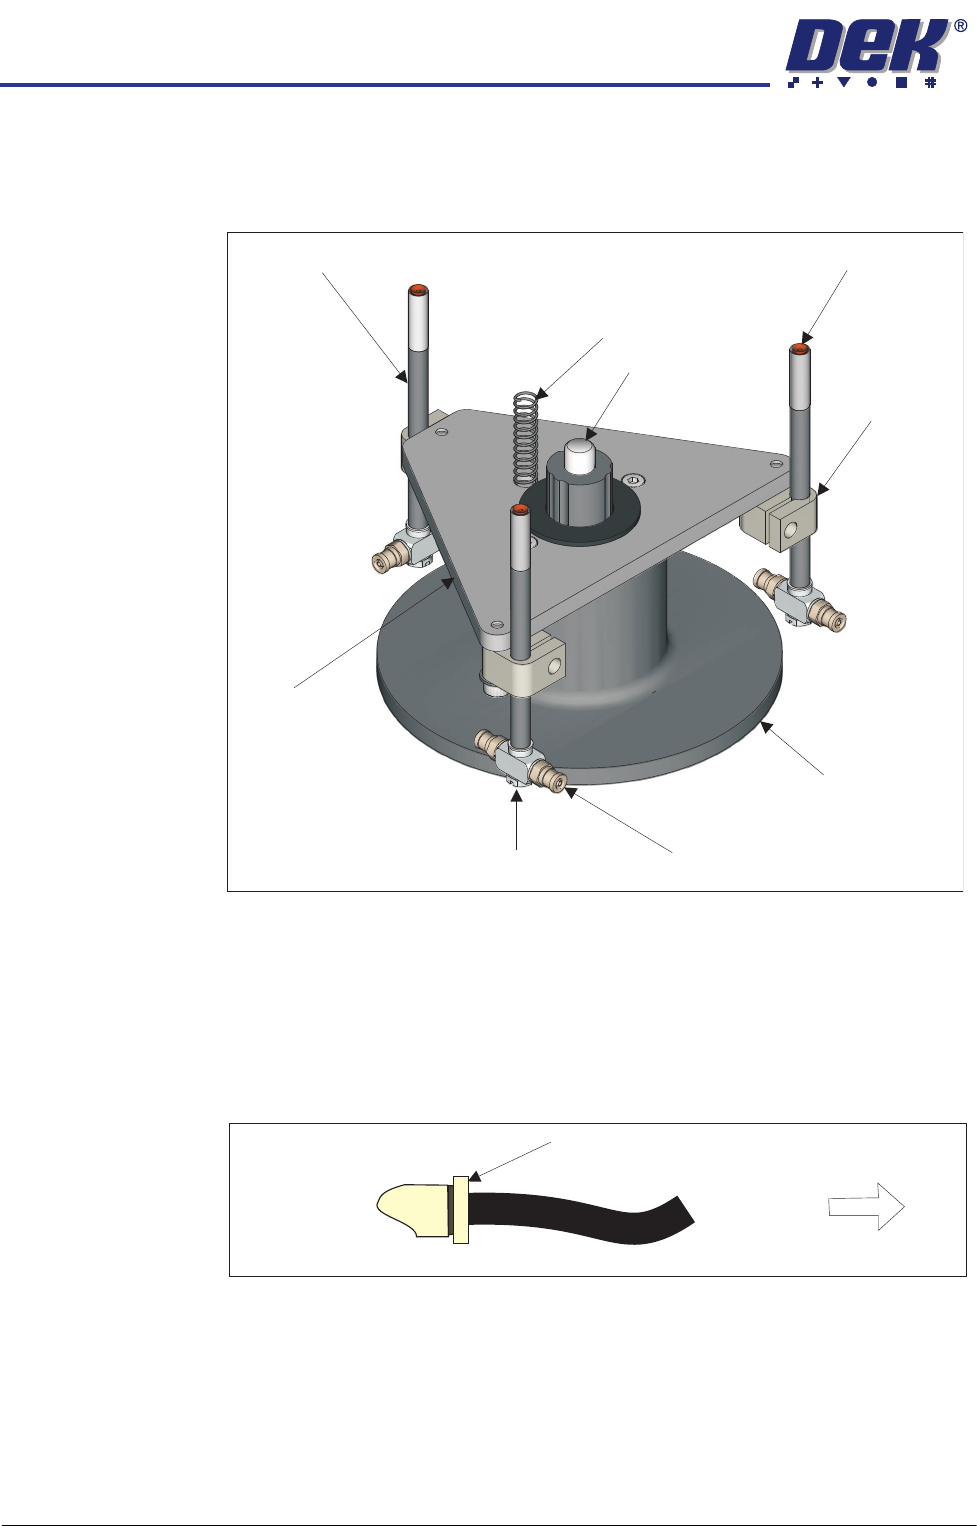
Ball Spline Shaft
Clamp
Vacuum Connector
Flat Bladed Screwdriver Here
(See Text)
Lift
Mechanism
Housing
Pin
Lift
Plate
Vacuum Cup
Return Spring
Lift Pin
Depress End Collar
Remove Tubing
Pneumatic Fitting

PRECISION WAFER PALLET
REPLACEMENT PROCEDURES
Chapter Issue 1 Aug 11 Wafer Transport Solution 2.7
9. Unscrew the vacuum connector, using a flat bladed screwdriver, from the
pin.
10. Fit the vacuum connector to a new lift pin assembly.
11. Connect the vacuum tubing on the lift pin vacuum connector.
12. Fit the pin assembly into the clamp and tighten it up, sufficiently enough to
grip the pin loosely.
13. Turn the pallet over so that it sits on the base of the lift mechanism housing.
14. Fit a heavy pallet or block on top of the pallet so that the lift pin hole is
covered.
15. Lift the lift pin until it pushes against the shim (or block).
16. Tighten the clamp sufficiently enough to grip the pin without movement. Do
not overtighten the clamp as this may damage the pin wall.
17. Remove the shim or block.
18. Place the pallet face down on the conveyor rails. Re-attach the two
pneumatic input lines.
19. Turn the pallet over and sit it in the correct orientation, on the conveyor, for
left to right or right to left feed.
20. Close the transfer station’s front cover.
21. Switch on the pneumatic air input to the downline system.
22. Run the product with a wafer to check that the wafer is loaded and secure.