a2-100-en(v3_0).pdf - 第10页
A2 Automatic Dispenser V3 .0 8 and press the piston rod for 2- 3 times. Repeat the foregoin g steps till there i s no colorant drops out . ● Rotate the turnt able and e mpty the canist ers in turns wit h the same method.…

A2 Automatic Dispenser V3.0 7
suddenly, the software shows E18 “No paint can, colorant could not be spouted out”
Test the top cover: the machine could not be operated when the top cover is opened.
Press the emergency stop button under any suddenness.
Pressing the emergency stop button also can stop stirring.
6
6
.
.
3
3
A
A
d
d
d
d
C
C
o
o
l
l
o
o
r
r
a
a
n
n
t
t
Before colorant is added in to canister, it must be fully mixed by stirring ruler, it is not recommended to mix
the colorant by shaker; in that case, too many bubbles are produced and they will affect the accuracy
The maximum capacity of canister is 1.8/3.8Lnotice that the colorant must not be filled above the
uppermost mark of stirring device.
The machine has good distribution before leaving factory. See Service.exe in the bin file of the installation
catalog; with the instruction of Software Manual, and please assign the colorants to respective canisters if it
is necessary to change.
The left side of the machine is default side for adding the colorant.
Open maintenance, choose the colorant code, click “add colorant” to add corresponding colorant, please
ensure the colorant names in the software match the colorant of the canisters.
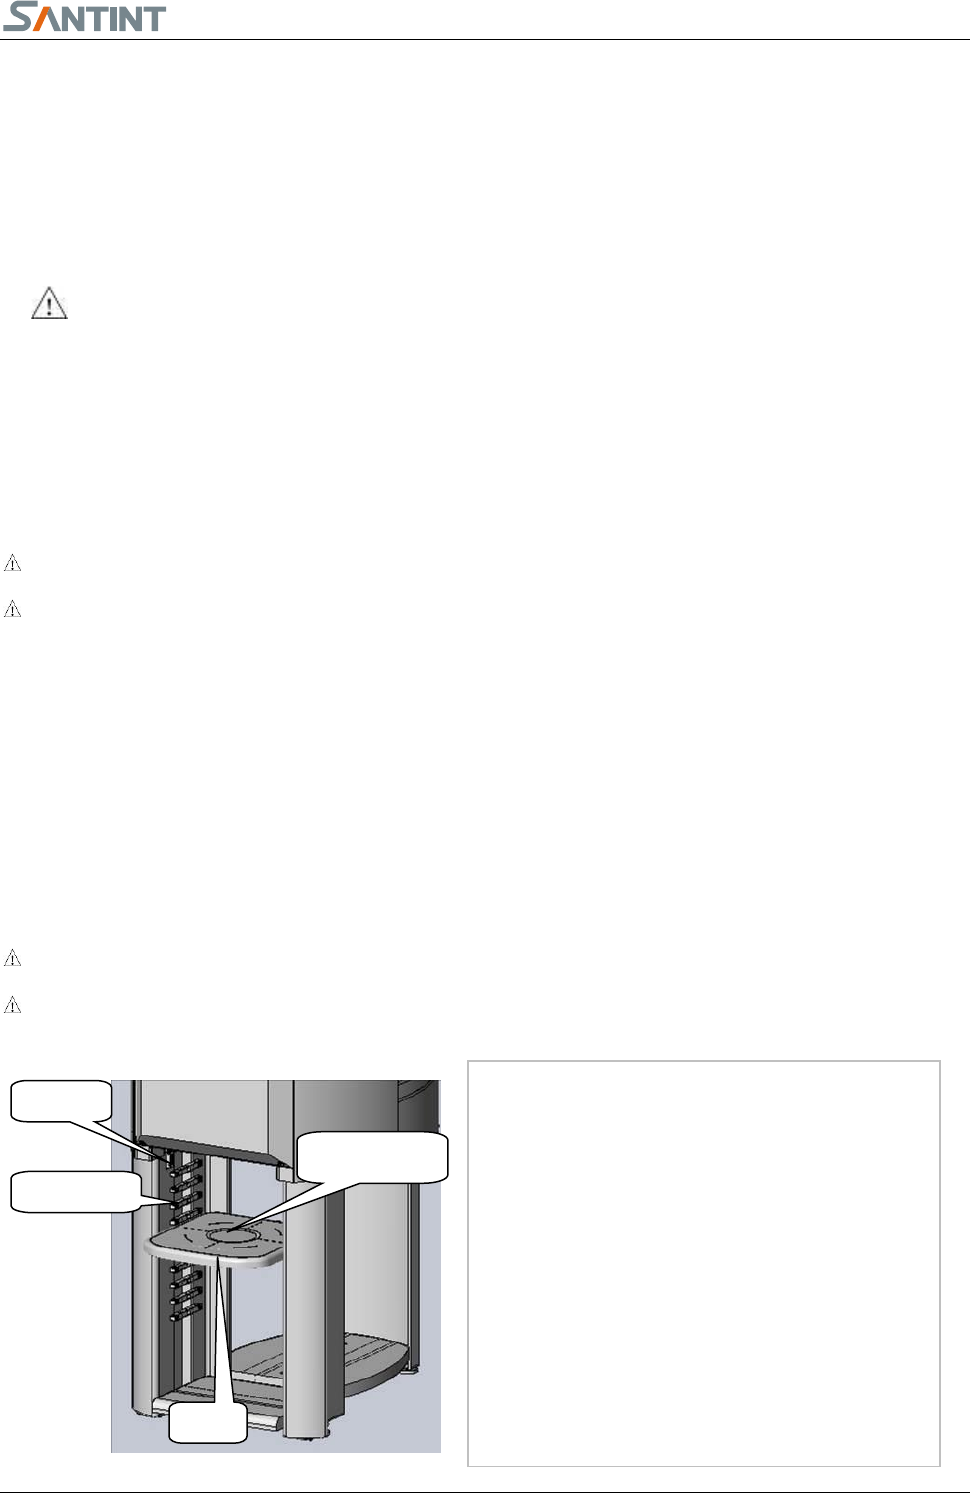
Open the top cover. The canisters are pasted with sequential labels corresponding to the colorants.
Open the cover of the canister and insert the stirring ruler, and then the colorant can be poured into canister
along the stirring ruler. Be careful not to pour the colorant out of the canister. Cover the canister cover when
you finish adding the colorant. When the top cover is opened, machine will not rotate.
Add the actual corresponding colorant quantity
in the adding colorant interface, and click “add”.
Rotate the canisters and add the corresponding
colorant in the other canisters.
Click the stir to stir the colorant
6
6
.
.
4
4
E
E
m
m
p
p
t
t
y
y
i
i
n
n
g
g
P
P
u
u
m
m
p
p
● Air in the pump affect the accuracy, so emptying the air in pumps is a must
● Lift the piston pole and then press it to the bottom and repeat for 4-5 times. Turn the valve rod from horizontal
to vertical position. If there is no colorant dropping from the valve rod, it means the pump is emptied. Then
turn the valve rod to horizontal position. If any colorant drops, turn the valve rod to horizontal position. Lift
A2 Automatic Dispenser V3.0 8
and press the piston rod for 2-3 times. Repeat the foregoing steps till there is no colorant drops out.
● Rotate the turntable and empty the canisters in turns with the same method.
● The machine will lift and press the piston rod for recirculation and exhausting the air automatically in every
24 hours.
● Do not lift the piston rod if not necessary
● Please cover the lids promptly to avoid evaporation of colorant.
6
6
.
.
5
5
C
C
a
a
l
l
i
i
b
b
r
r
a
a
t
t
i
i
o
o
n
n
o
o
f
f
C
C
o
o
l
l
o
o
r
r
a
a
n
n
t
t
s
s
The machine had been calibrated in the factory. Customers can also recalibrate in 4-7 hours after colorants have
been filled if they need. A scale with minimum accuracy of 0.001g and the colorant density are a must for
recalibration.
Stir for 30 minutes after adding colorants, to remove bubbles.
When no continuous dispensing of colorants, please re-empty air or check if nozzle is blocked.
All the preparation steps are followed, the colorants could be dispensed after 4 hours.
7. Operation
The operations of how to search, dispense and modify the formula are explained in the software using manual.
The operator can operate the machine according to the user manual. But normally, the operator should be got well
trained to operate the dispenser better
The machine should be powered on all the time, there will be no action when emergency button is pressed.
The colorant volume in canister should not be lower than 0.5L.
7
7
.
.
1
1
P
P
u
u
t
t
t
t
h
h
e
e
b
b
a
a
s
s
e
e
p
p
a
a
i
i
n
n
t
t
c
c
a
a
n
n
1) Select a lead rail with proper height for the tray.
(The upper rim of the paint can shall be higher
than the sensor.) Insert the tray inside the rail
till the bottom.
2) Open the lid of the base paint can.
3) Locate the base paint can in the center of the
tray.
4) Start dispensing
1、如图所示,将左侧立板用
两个六角螺栓 M8×20、两个垫圈
8 通过底板固定到底梁上。
2、如图所示,区分小桶架板
总成、大桶架板总成、顶层架板总
成。
Fig.7.1.
1
Tray
Lead Rail
Sensor
Tray Center
A2 Automatic Dispenser V3.0 9
7
7
.
.
2
2
T
T
h
h
r
r
e
e
e
e
t
t
y
y
p
p
e
e
s
s
o
o
f
f
b
b
u
u
i
i
l
l
t
t
-
-
i
i
n
n
c
c
l
l
e
e
a
a
n
n
g
g
i
i
n
n
g
g
b
b
o
o
x
x
f
f
o
o
r
r
c
c
l
l
i
i
e
e
n
n
t
t
s
s
’
’
c
c
h
h
o
o
i
i
c
c
e
e
A.Cleaning of the type A built-in cleaning box
The cleaning box is build-in. The daily maintenance and periodically maintenance shall be implemented
by following the reminders from the dispensing software.
The hairbrush shall be used in the following manners to ensure the cleaning effects;
Detailed steps as below:
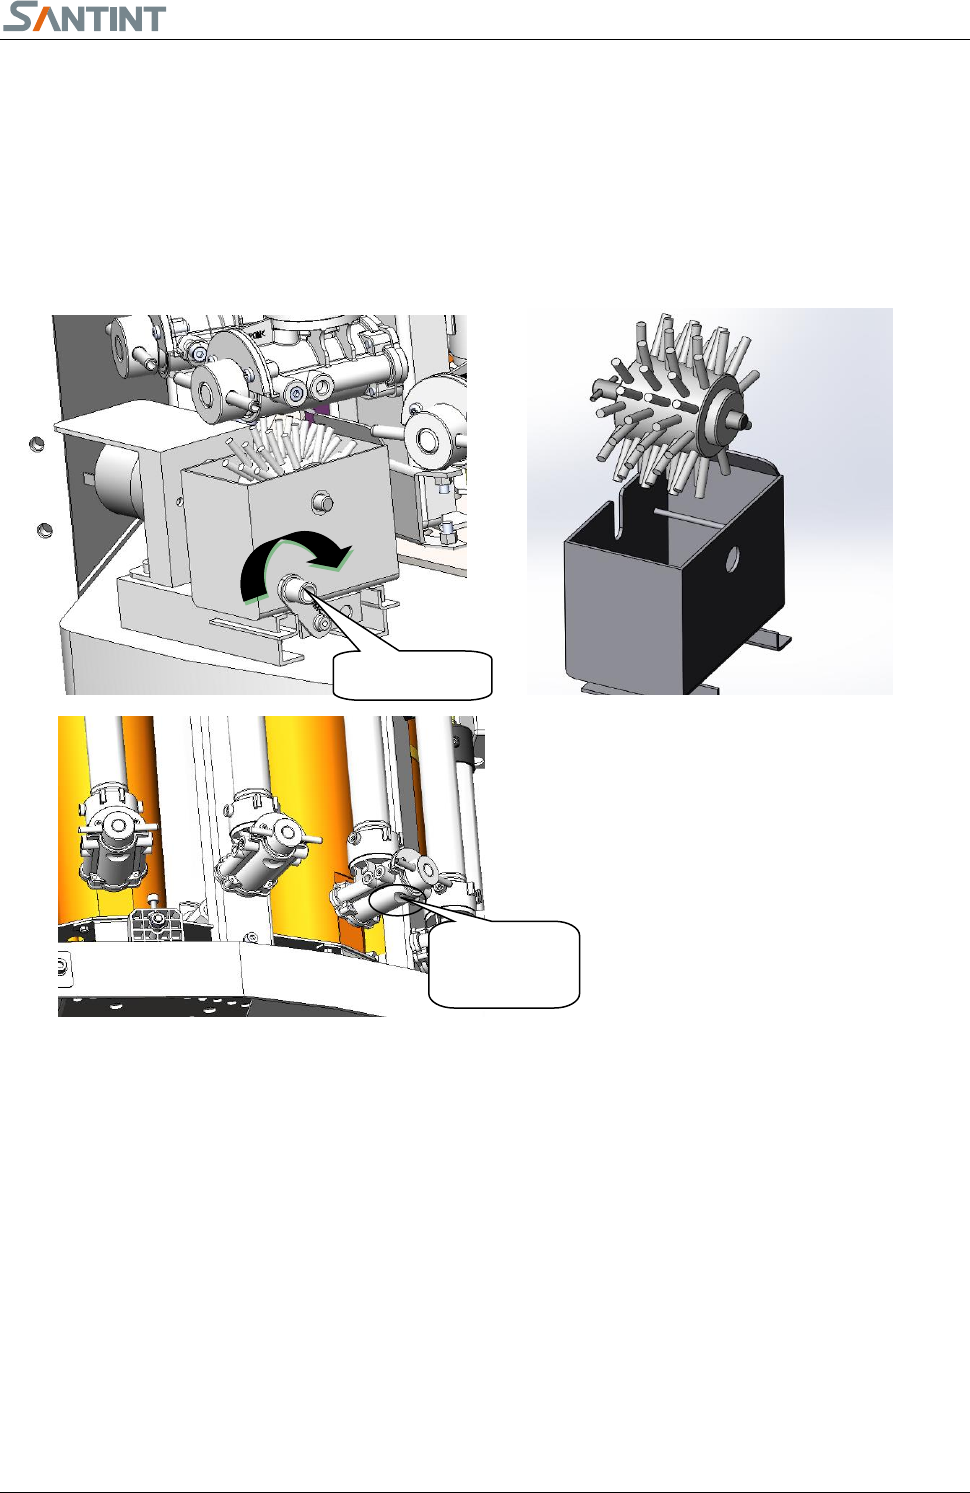
1) Lift the locking handle to loose the cleaning box.
2) Hold the box handle, take it out.;
3) You may clean the brush wheel and the cleaning box separately. Clean each valve bottom thoroughly.
4) Put the cleaning box back, please make sure it is in bottom position, and push down lock handle
B. Cleaning of the type B built-in cleaning box.
1. Cleaning of the cleaning box
The cleaning box is built-in. The daily maintenance and periodically maintenance shall be implemented
according to the dispensing software reminders.
Please follow these steps to clean the cleaning box to ensure the cleaning effects.
Lock Handle
Clean each
valve bottom