ET8383-說明書(英文).pdf - 第25页
21 1. I nspect if the power supply i s standard requi rements or n ot. 2. Inspect if the device is grounding s tandard or not. 3. Make sure there i s no person or obstacle in the robots working area . 4. Inspect if the m…

20
Nozzle 3
Once the nozzle 3 comes to run the program, the output is in
conducting state, or else not.
Nozzle
4
Once the nozzle 4 comes to run the program, the output is in
conducting state, or else not.
Ready
flag
When the unit comes into the normal ready state, the output is in
conducting state, namely, once receiving the “START” signal, it
comes to run. And it closes the output after running.
Alarm
flag
When set the mode as alarming, once it detects the abnormal state,
the output is in conducting state, or else not.
Working flag
When the unit comes into the working state, the output is in
conducting state, or else not.
Work End flag
After t finishing the process, the output is keeping in conducting
state 200ms, or else not.
Cylinder
Once the unit comes to run the cylinder process, the output is in
conducting state, control cylinder motion, or else not.
Clean o
utput
Once the unit comes to run the clean process, the output is in
conducting state, do the clean (blowing or revolving brush), or else
not.
P
ause output The condition of pause BTN
L
eft LED The condition of left light on key box
Right LED The condition of right light on key box
Emer Output
The co
ndition of emergency stop
Reset
Output
The co
ndition of reset
EnN
ozzleAdj
Enabl
e nozzle calibration signal
Note:
The
function settings of input & output cannot be accessed by the operator. It can only be
operated by the manufacturer.
Will not give advanced information if some functions are changed.
3
.6 Debugging steps
3.6.1 Security check before operation
I
nspect the line and do NOT power on if line was damaged or wet. Please invite the professional when
the device needs maintenance.
Atte
ntion high voltage, prevent electric shock.
User must inspect current and pneumatic station after installment or before first time using.

21
1. I
nspect if the power supply is standard requirements or n
ot.
2. Inspect if the device is grounding standard or not.
3. Make sure there is no person or obstacle in the robots working area.
4. Inspect if the moving parts was fixed.
5. Inspect if the emergency stop switch was pushed or not.
6. Inspect if the power switch was OFF or not.
7. Attach and detach the moving parts to make sure it is smooth.
8. Inspect if the socket and pipe is well-connected, make sure there is no leak.
3.6.2 Operation of First Time
I
f using the unit for the first time, user should test the basic functionalities at first.
Step1: Install and Test
Before us
ing, user should properly install and connect the system.
At first, user should test the basic functionalities of the system with the ‘Test’ function of the teaching pendant.
Test including: Check if there is any problem with the axes movements towards positive or negative direction
Step2: Parameters Setting
P
roperly set the global parameters and other parameters using in the processing.
Remark: Failure to properly set the parameters will cause difficulties in using the system.
Step3: Teaching Program
P
rogram a graphic with teaching pendant. Refer to the instruction manual of the teaching pendant.
Step4: Origin Calibration & Set the Parameters of the Teaching Pendant
1. Origi
n calibration: User should adjust the start point when a teaching file is created for the first time.
2. Set file parameters.
Step5: Download & Process
1. Dow
nload: please refer to instruction manual of the teaching pendant “Teaching File Download”.
2. Process: please refer to instruction manual of the teaching pendant “File Processing”.
3.6.3 Debugging steps (take a point for example)
Do
NOT touch or put your hands on the moving parts when the device is working!
1. Connect all the sockets, power cord and the main air input pipe.
2. Turn the pressure regulating valve for appropriate air pressure.
3. Turn off the Dispensing controller.
4. Entering File Edit interface, insert a POINT and moving the nozzles to the place you need dispensing by
teach pendant. Details are as follow:
22
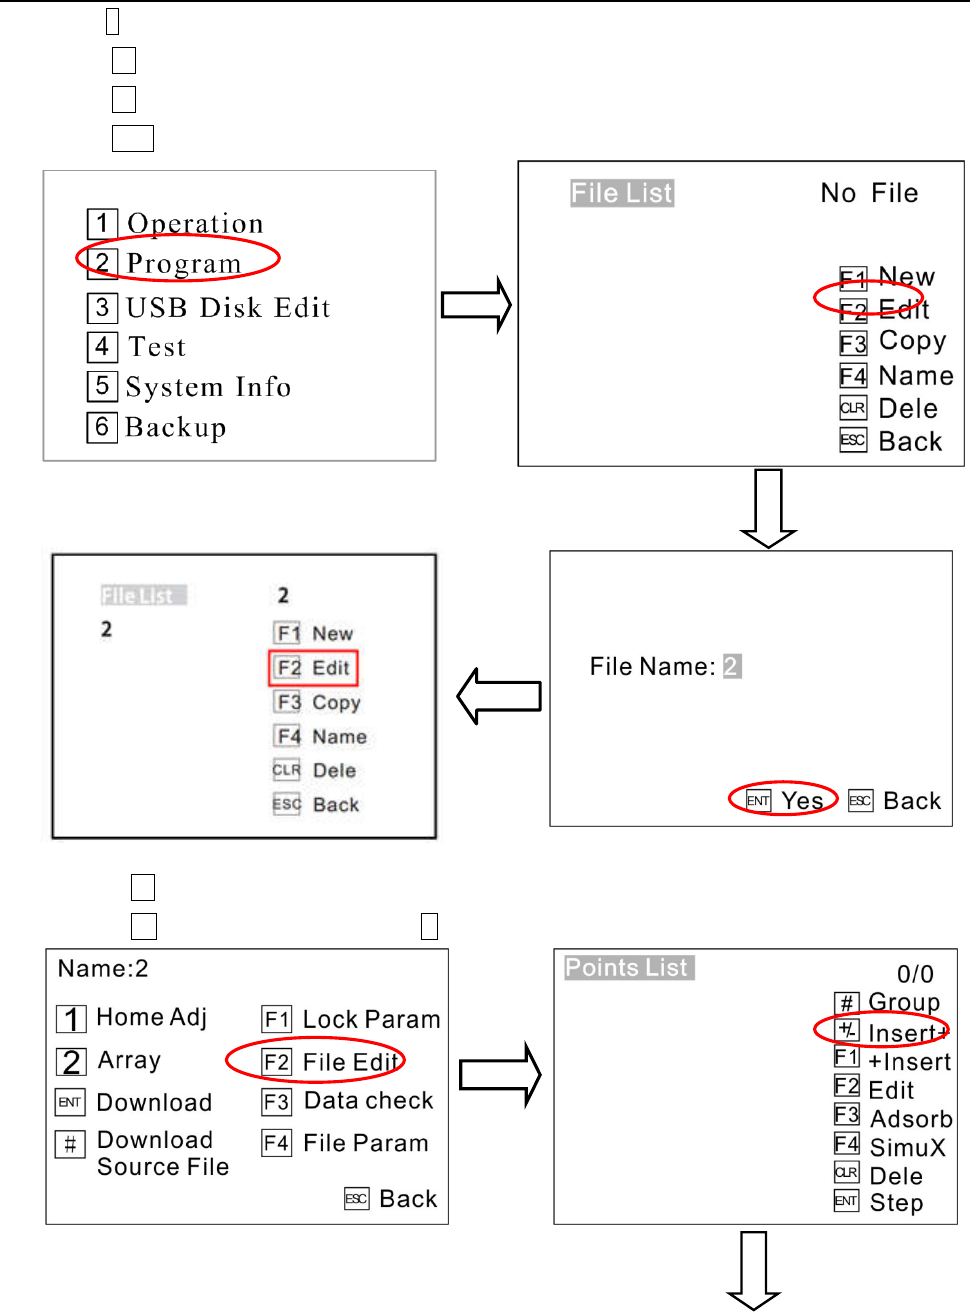
1) P
ress2to enter File List menu
.
2) Press F1to create a new file.
3) Pres
s F2 to edit the new file,
4)
Press ENT to save it, see picture.
5) Pres
s F2 to enter Points List menu.
6) Press +/- to e
nter Insert menu and press 1 to enter Point menu.