00198574-01_Process_Foundation_DEK_Micron_EN.pdf - 第35页
5 Product File and Machine Setup 5.5 Achieve best Alignment Using Print Offsets Process Foundation DEK Micron-Series 12/2017 35 Random Offsets ● Transport rails too wide ● Board clamps damaged ● Missing, damaged or mispl…
5 Product File and Machine Setup
5.5 Achieve best Alignment Using Print Offsets
34 Process Foundation DEK Micron-Series 12/2017
5.5 Achieve best Alignment Using Print Offsets
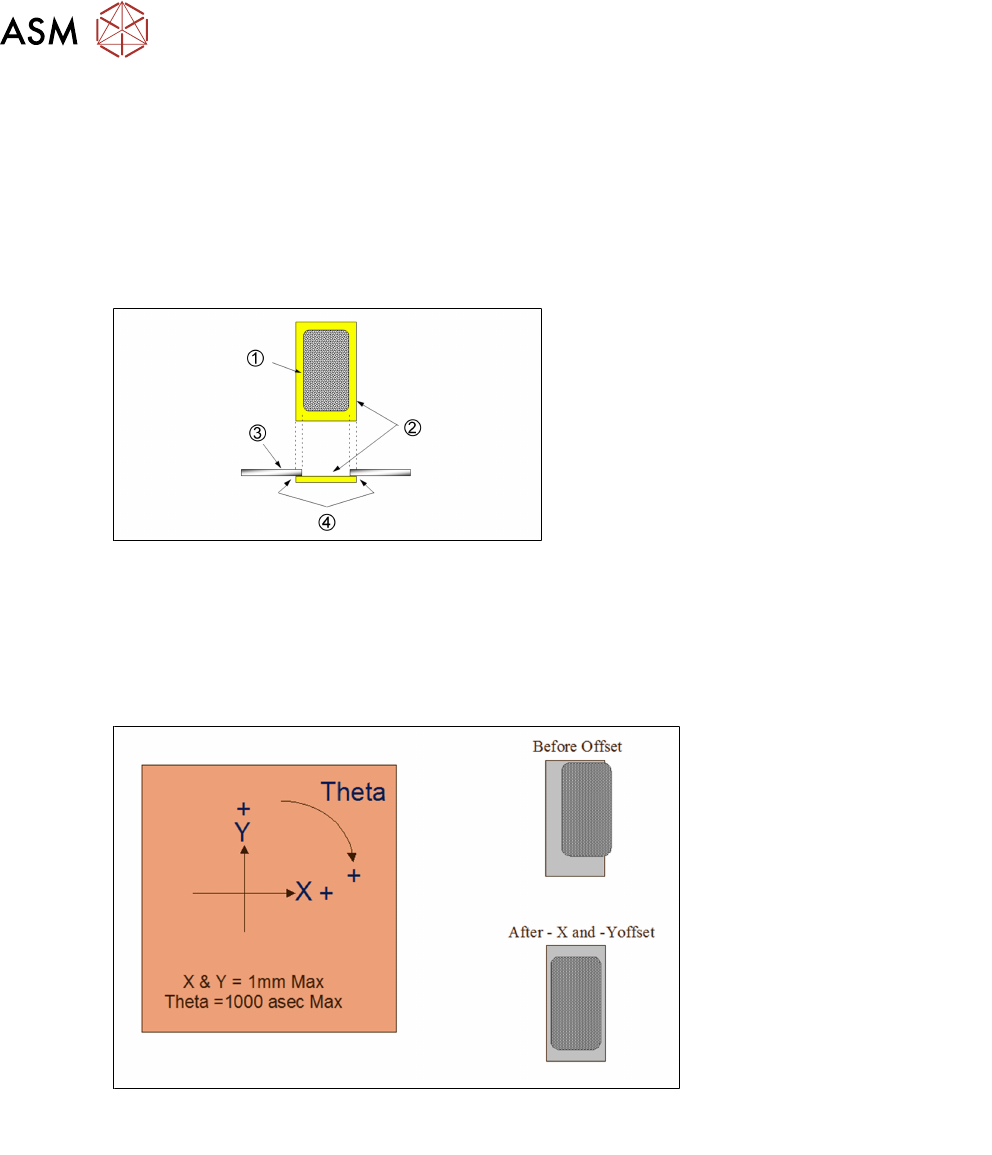
Importance of Good Alignment
The most robust process will be maintained if the print deposit is centered within the pad. The
correct alignment of the pad and stencil aperture is essential to ensure a good gasket seal between
board and stencil.
With a good gasket the danger of bridging is reduced and the under stencil cleaning frequency will
be kept to a minimum.
1. Paste deposit
2. Land
3. Stencil
4. Gasket seal
Applying Offsets
If the first print of a new product reveals a print misalignment there are two immediate checks to
make. One is to ensure that offsets have not been copied over from a previous product file; another
is to check the fiducial set-up. If these are correct then it is possible that there is an inherent
mismatch between stencil and board. Small compensations can be made with print offsets. Align
the most critical components where practical – otherwise average out the errors across the board.
It is good practive to cure any theta offset fist before attempting to adjust X and Y.
Note: Offsets greater than 0.5mm or 500asec should be treated with suspicion.
Fixed Offsets
●
Stencil to board mismatch
●
Poor fiducial set-up, or video models being used
●
Print gap (i.e. wrong board thickness, stencil adhesive strip)
●
Machine needs calibration – escalate to trained maintenance technician
5 Product File and Machine Setup
5.5 Achieve best Alignment Using Print Offsets
Process Foundation DEK Micron-Series 12/2017 35
Random Offsets
●
Transport rails too wide
●
Board clamps damaged
●
Missing, damaged or misplaced tooling
●
Stencil damaged or stretched
●
Machine broken or needs calibration – escalate to trained maintenance technician
●
Board to board variations, particularly on thin, routed boards on second side after reflow
●
Boards with resist-defined pads (be sure it is a print offset, not a resist offset!)
●
Fiducials that have poor repeatability
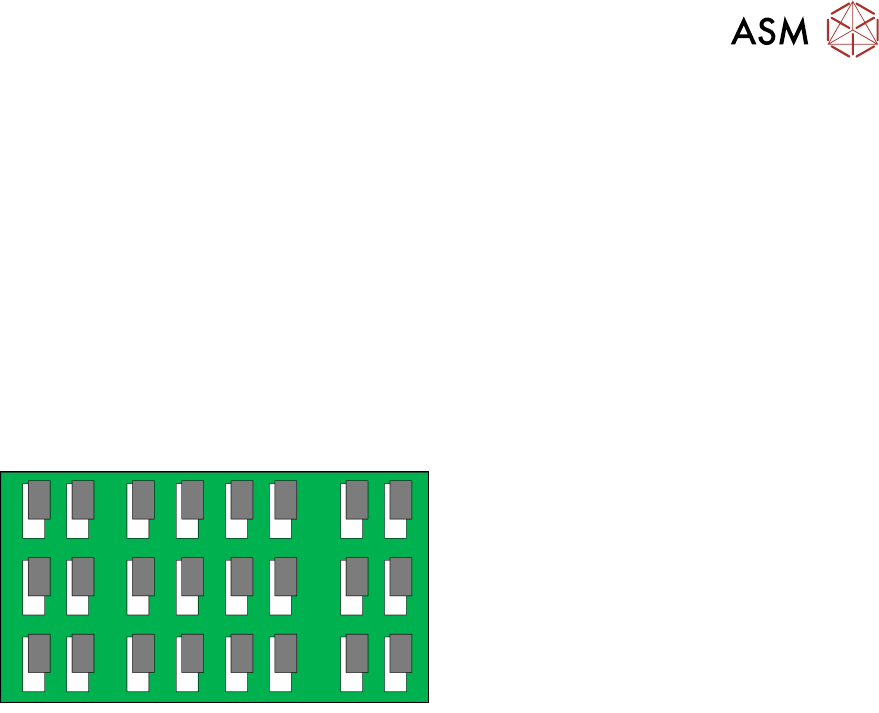
Exercise
For the deposit shown here indicate by circling, which offset(s) would be required to
achieve perfect alignment:
X+ X-
Y+ Y-
ɵ+ ɵ-
Exercise
Modify one of the video model fiducial reference points to create a print offset. Then adjust it back
again using the offset parameters.
5 Product File and Machine Setup
5.6 Set up Basic Process Parameters to Ensure Acceptable Quality Prints
36 Process Foundation DEK Micron-Series 12/2017
5.6 Set up Basic Process Parameters to Ensure Acceptable
Quality Prints
Print Speed and Pressure
Print speed and print pressure are directly related…
1. As speed
2. Pressure should go
Increasing speed requires a corresponding increase in pressure in order to maintain the same print
results. This leads to accelerated squeegee and stencil wear.
Print Speed
Print speed should be selected according to the material manufacturer’s guidelines. The printer
output must keep up with the demands of the line, which in turn should be ‘balanced’ to match the
slowest stage. There is often no benefit in running the printer at high speeds if the boards are to
wait on the conveyor for a long time. If cycle time is not critical then generally the lowest print
speed is selected as this normally creates the least problems. On the other hand print speed may
be increased to create time for other functions, i.e. under-screen cleaner, vision inspection.
●
Squeegees, start slow, around 20mm/s (typical: 20-50mm/s*)
●
Match the line beat rate
●
Balance with print pressure
●
Consult material manufactures data sheet
*If high speed pastes are used, refer to manufactures guidelines.
Squeegee Print Pressure
The general rule is to select the lowest pressure that just cleans the stencil surface. Print speed
and pressure are closely related so the pressure value should be adjusted to compensate for any
speed change. For instance, if speed goes up the pressure must also go up to ensure a clean sten-
cil.
Pressure above that necessary to clean the stencil should be avoided since it does little to improve
print quality or aperture fill, and will accelerate wear and tear of squeegee and stencil. With metal
blades, it can change the attack angle leading to process variation; with polyurethane blades it can
lead to scavenging of paste from the apertures.
If the boards to be printed suffer from warp then pressure may need to be increased to ensure a
flat surface and good gasket. Choosing stiffer squeegee blades can also help this.
As low as possible to clean stencil
Too low: Too high:
●
Excess print height
●
Scavenging
●
Incomplete print
●
Bridging
●
Excess stencil/ squeegee
Separation Speed
With most pastes there will be little difference to the print quality between slow and high separation
speeds. In most cases the maximum speed of 20mm/s is fine. If, however, deposits appear conical
or "dog eared" this may indicate that the speed needs to be adjusted. Paste viscosity, aperture size
and stencil manufacturing method are all factors that may determine the best separation speed. It
is difficult to predict what effect changing the separation speed will have on the print so experiment-
ation is vital. It should be noted that separation speed could have a large effect on the print cycle
time.