YSM40 Mainte_E.pdf - 第107页
3-39 3 Periodic maintenance items 4.1.3 Side-view camera (multi-camera installed type) T hecleaningprocedurefortheside-viewcamera'slightingunit(multi-camerainstalledtype)isgivenbelo w . 1 Clean the mir…
3-38
3
Periodic maintenance items
4.1.2 Multi-camera
Thecleaningprocedureforthemulti-cameralightingunitisgivenbelow.
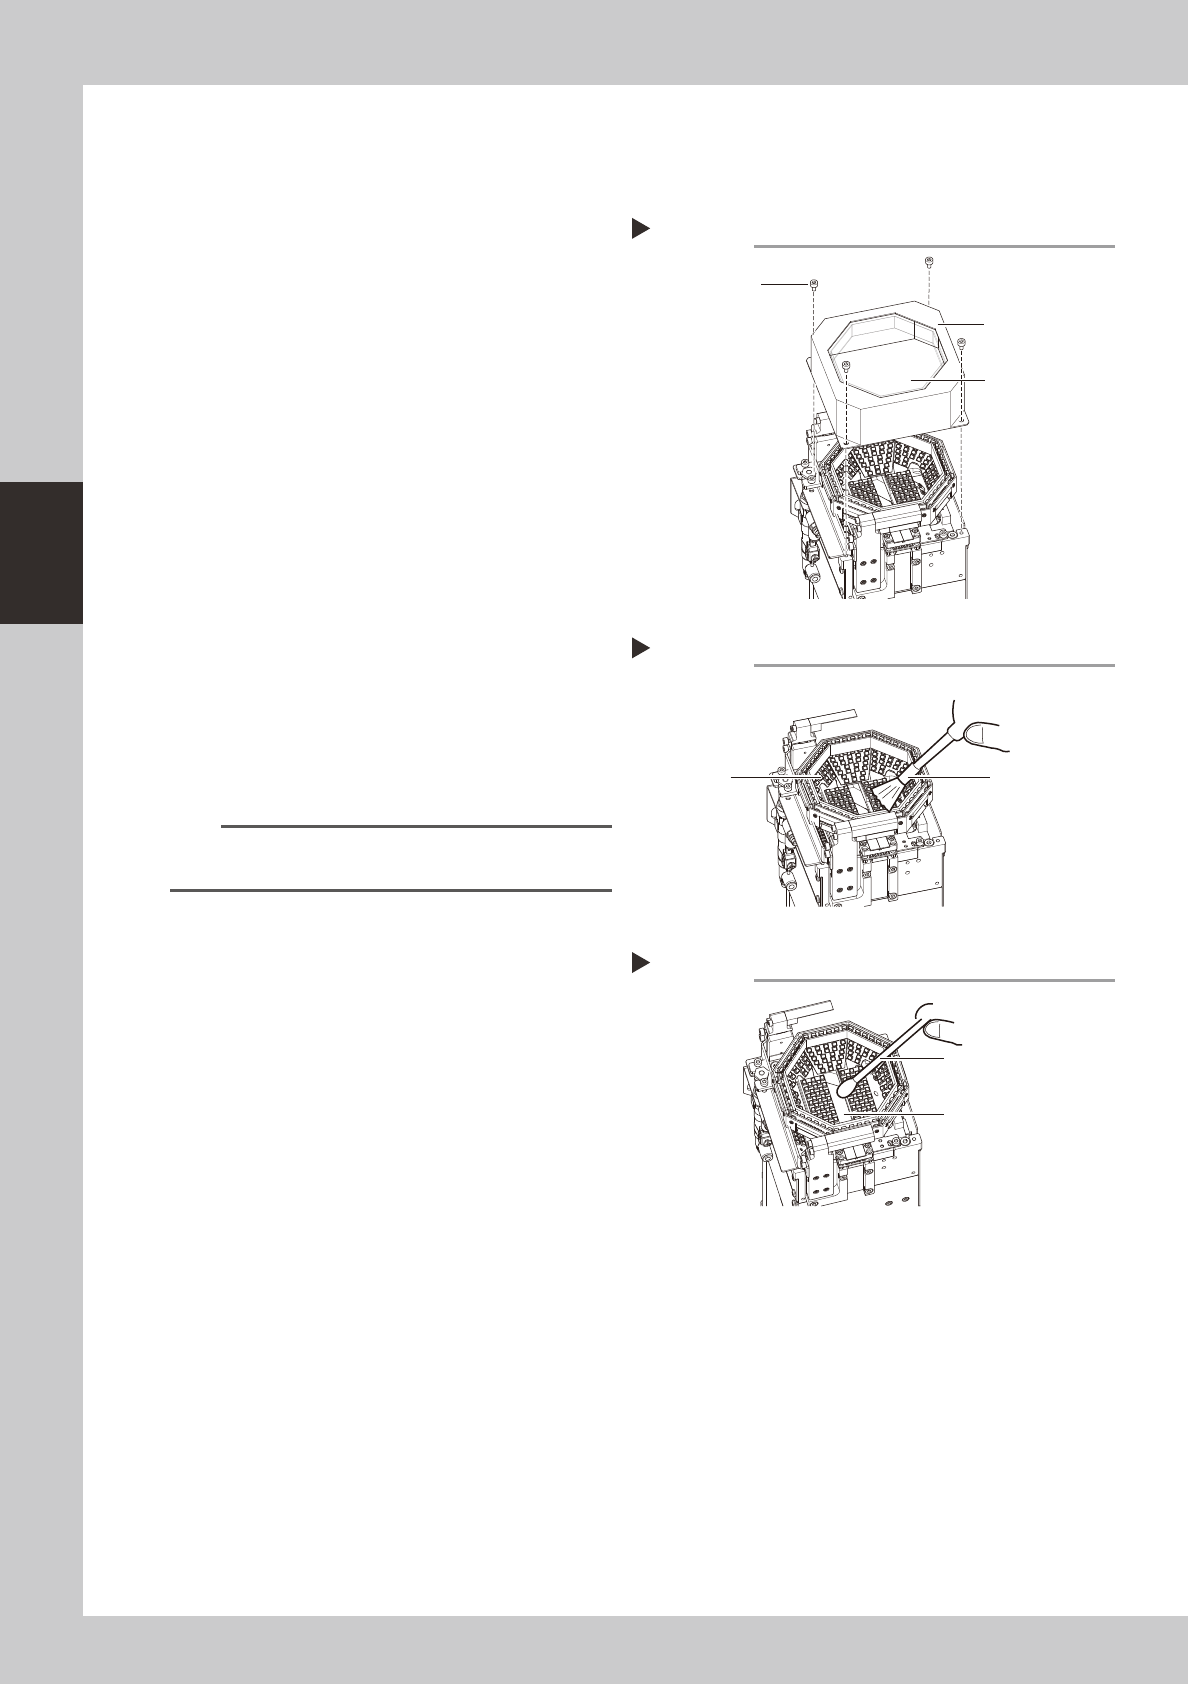
1
Detach the lighting cover.
Use a hexagon wrench (2.5) to remove the
cover's 4 securing bolts, then detach the
lighting's protective cover.
53342-N5-00
2
Wipe the transparent glass with a
cloth.
Wipe the front and back sides of the lighting
cover's transparent glass with a cloth
damped by several drops of lens cleaner.
53343-N5-00
3
Clean the lighting.
Use an optical brush to remove the dust
from the lighting.
4
Clean the half-mirror.
Use a cotton swab dampened with a small
amount of lens cleaner to clean the half-
mirror.
53344-N5-00
5
Reattach the cover.
Place the lighting cover back in its original
position, then secure it with the 4 bolts.
TIP
The optical brush and lens cleaner are optional
purchase items.
Removing the lighting cover
Step 1
Lighting cover
Transparent glass
Securing bolt
Cleaning the lighting
Step 3
Lighting
Optical brush
Cleaning the half-mirror
Step 4
Half-mirror
Cotton swab dampened
with lens cleaner
3-39
3
Periodic maintenance items
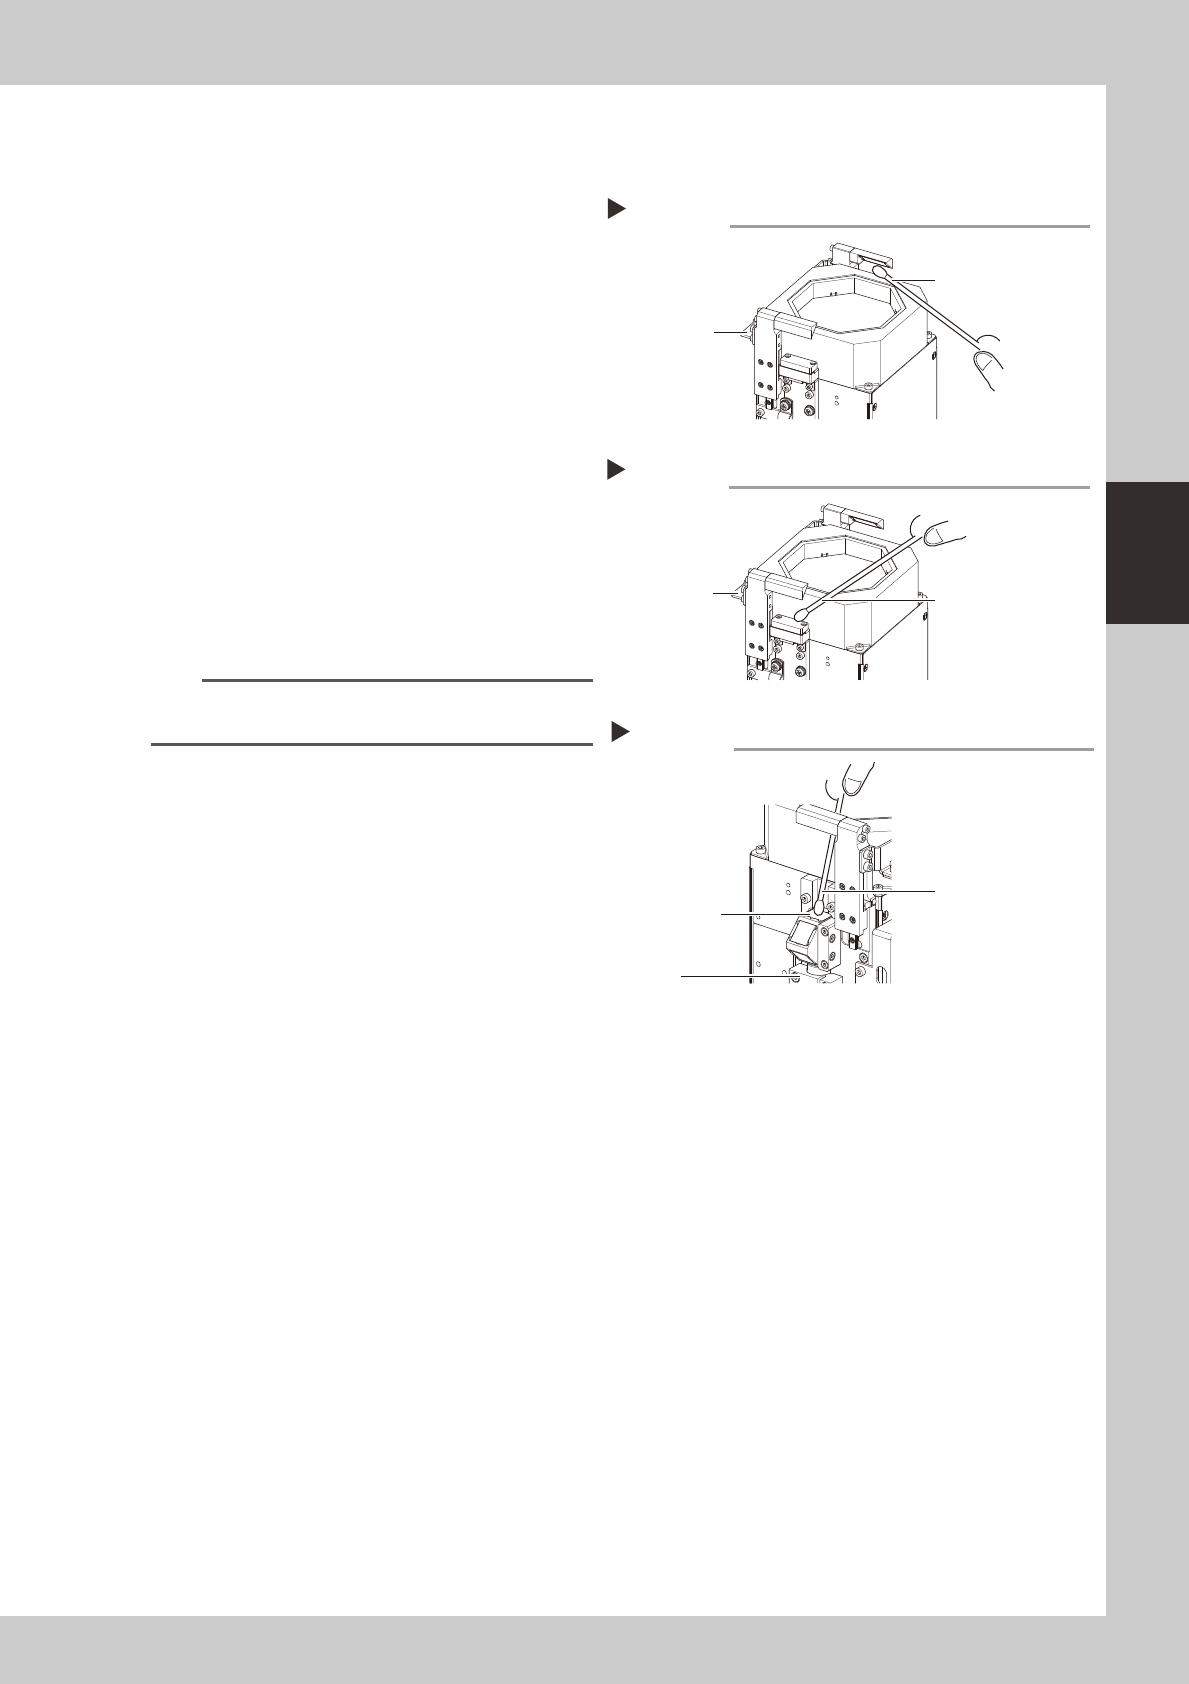
4.1.3 Side-view camera (multi-camera installed type)
Thecleaningprocedurefortheside-viewcamera'slightingunit(multi-camerainstalledtype)isgivenbelow.
1
Clean the mirrors at both sides.
1. Turn the machine air OFF.
2. Grasp the lighting UP/DOWN area and lift
it up, then clean the mirrors using a cloth
or cotton swab dampened with a small
amount of lens cleaner.
53345-N5-00
2
Clean the lighting side.
As shown in the figure at right, wipe the
lighting with a cotton swab dampened with
a small amount of lens cleaner.
53346-N5-00
3
Clean the camera side.
As shown in the figure at right, wipe the
cover with a cotton swab dampened with a
small amount of lens cleaner.
53347-N5-00
TIP
The optical brush and lens cleaner are optional
purchase items.
Cleaning the mirrors
Step 1
Grasp here and
lift upward
Cotton swab dampened
with lens cleaner
Cleaning the lighting
Step 2
Grasp here and
lift upward
Cotton swab dampened
with lens cleaner
Cleaning the camera side
Step 3
Clean this area
(top side)
Camera
Cotton swab dampened
with lens cleaner
3-40
3
Periodic maintenance items
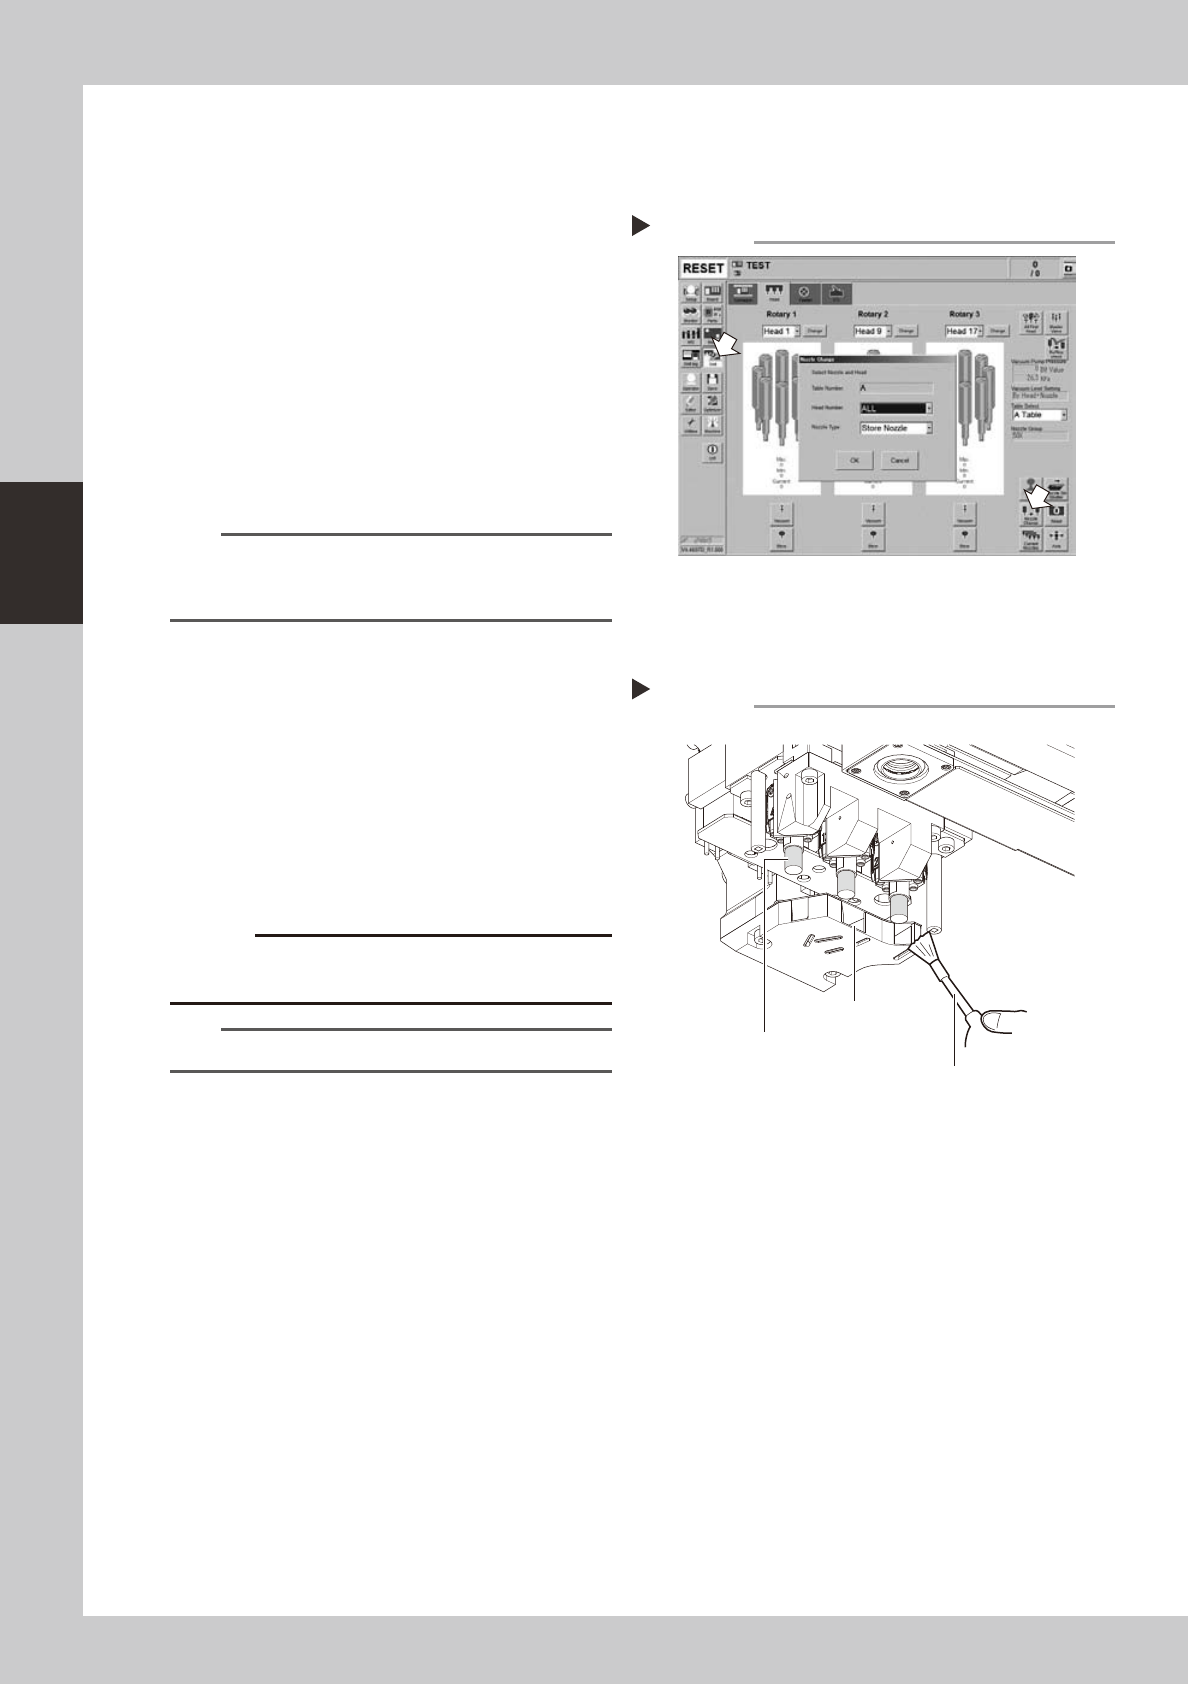
4.1.4 Side-view camera (HS head)
Thelightdiffuserplate(springholder)andmirroroftheside-viewcameraareattachedtothehead.Sincethelightdiffuser
plateormirroroftheside-viewcameramaybecontaminatedbydust,itisrecommendedtocleanthemperiodically.
1
Store all nozzles.
1. Press the [Unit] button to open the [Head]
tab screen. Press the [Nozzle Change]
button.
2. In the “Nozzle Change” dialog box,
select “ALL” in the “Head Number” field
and “Store nozzle” in the ”Nozzle Type”
field.
3. Press the [OK] button to store the nozzles
of all heads.
54313-N2-00
n
NOTE
When the machine is not equipped with a nozzle
station, press the [Emergency Stop] button and remove
the nozzles by hand.
e
2
Move the head.
Press the [Emergency Stop] button and
move the head unit to an easy work position
by hand.
3
Clean the opening and spring
holder.
Use an optical brush to remove the dust
from the opening and spring holder.
533G1-N2-00
c
surface of the diffuser plate to be discolored.
TIP
The optical brush is an optional purchase product.
Storing the nozzles
Step 1
Cleaning the opening and spring holder
Step 3
Opening
Spring holder (diffuser plate)
Optical brush