YSM40 Mainte_E.pdf - 第125页
Chapter 4 Long-term inspection and other maintenance Contents 1 1 2 2.1 Replacing th…

3-56
3
Periodic maintenance items
5.8 Air / mist filter
5.8.1 Cleaning the filter and cup
Airfiltersandoilmistfiltersareinstalledtopreventoil,water,andimpurities,etc.,frombeingintroducedinto
themachinefromtheaircompressor.Theproceduresforinspecting,cleaning,andreplacingthesefiltersare
givenbelow.
c
decoupled.
1
Check the inside of the filer cup.
Check for oil or water deposits in the filter
cup through the window. If the window is
dirty, follow the steps below to clean the
filter cup.
TIP
The drain cock at the bottom of the filter cup is an
auto-drain type. It automatically drains the oil or water
when deposited in the cup. We recommend
connecting a hose to this drain cock.
2
Remove the filter cup.
While pressing the cup's button, rotate the
cup in the direction shown at right, then pull
downward to remove the cup. The removed
cup has a double construction. Only the
transparent inner cup requires cleaning.
53372-N5-00
3
Clean the inside of the filter cup.
1. Lightly clean the filter cup with water.
2. Then, pour water-diluted neutral
detergent into the filter cup and clean
the inside while shaking it.
3. Air blow the filter cup and wipe away
any moisture with clean cloth or paper.
53373-N5-00
4
Check the filter media status.
Rotate the media to remove it, and check it
for soiling and clogging. If soiled, replace it
with a new media indicated in the
Consumable Parts List.
5
Install the media and cup.
Install the media and cup by reversing the
removal procedure given above.
6
Reconnect the air hose to the air
coupler.
After connecting the air hose, check that no
air is leaking.
Removing the cup
Step 2
Filter cup (inner)
Air filter
Oil mist filter
Button
Removing and checking the filter media
Step 4
Mist filter
Air filter

Chapter 4 Long-term inspection and other
maintenance
Contents
1
1
2
2.1 Replacing the blow station filter 4-2
2.2 UPS battery 4-3
3.
4-4
5
3.1.1 AZ axis 4-5
3.1.2 Both sides of cATS 4-5
3.2 6-month inspection 4-6
3.2.1 AH axis 4-6
3.2.2 Magazine shaft 4-6
3.2.3 Pickup station (pallet clamp) 4-7
3.2.4 Pickup station (vertical guide) 4-7
8
4.1 Removing the pumps and making preparations 4-9
0
4.2.1 Removing the head cover and cylinder 4-10
4.2.2 Removing the pressing plate and cup packing 4-12
4.2.3 Removing the cylinder parts 4-12
4.3 Reinstalling the replacement parts 4-13
4.3.1 Reinstalling the cup packing and pressing plate 4-13
4.3.2 Reinstalling the cylinder parts 4-13
4.3.3 Reassembling the head cover 4-14
4-1
4
Long-term inspection and other maintenance
1. Every 2 years (recommended)
1.1 Replacing the ionizer discharge needle (electrode)
Overlongperiodsofuse,thedischargeneedlecanbecomewornanditslengthshortened,resultinginan
insufficientneutralizingcapacityandreducedbalancecontrolperformance.Insuchcases,thedischarge
needleunitmustbereplacedwithanewone.Thereplacementprocedureisgivenbelow.
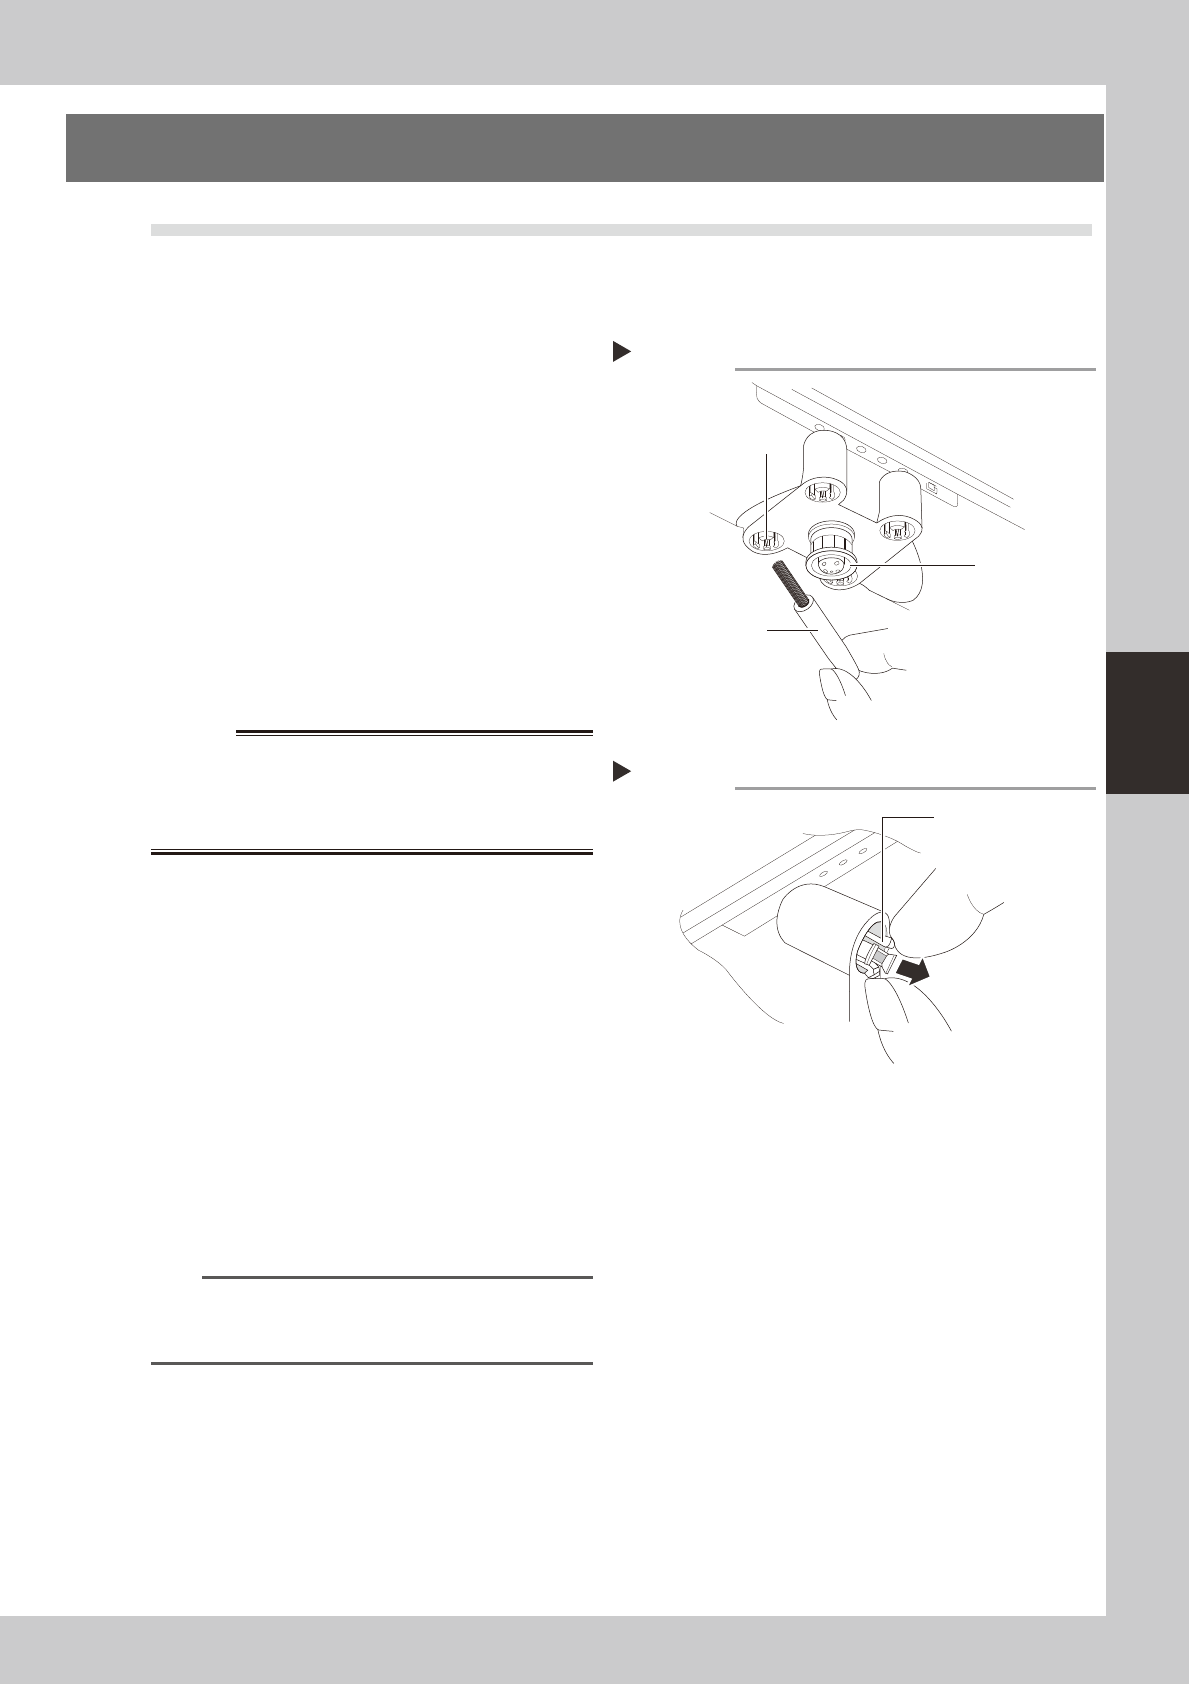
n
Cleaning the discharge needle
•Asoileddischargeneedle(electrode)canreducethe
ionoutputandthebalancecontrolperformance.
Therefore,thedischargeneedleshouldbecleaned
periodicallywiththeaccessorybrush.
•Thesensorshouldbecleanedoncepermonthusing
asoftclothoracottonswab.Ifthisfailsto
adequatelycleanthesensor,cleanitwithacotton
swabdampenedwithasmallamountofIPA.
53401-N5-00
n
Discharge needle replacement procedure
1
Turn the machine power OFF.
Turn the machine's main power OFF.
w
WARNING
2
Remove the discharge needle unit.
As shown at right, grasp and squeeze the
holder's opposing claws at two points and
squeeze them toward each other, then
extract discharge needle.
53402-N5-00
3
Replace the discharge needle.
When installing the new discharge needle,
the notched area on the mounting side must
be aligned with the discharge needle unit's
protruding part. When correctly aligned,
press it in.
4
Check the ion balance and the
neutralizing time.
n
NOTE
For details regarding how to check the ion balance
and the neutralizing time, refer to the manufacturer's
operation manual.
Cleaning the discharge needle
Accessory brush
Sensor
Discharge needle
Removing the discharge needle unit
Step 2
Holder claws