SIPLACE S-23 HM.pdf - 第112页
3 Introduction and Ba sic Concepts User M anual SIPLACE S -23 HM 3.3 User Interface - Views and Menus Software Version SR.406.xx 02/00 US E dition 112 3 Processing PCB 3 Assembl y of th e PCBs i s started or con tinued i…
User Manual SIPLACE S-23 HM 3 Introduction and Basic Concepts
Software Version SR.406.xx 02/00 US Edition 3.3 User Interface - Views and Menus
111
3.3 User Interface - Views and Menus
3.3.1 Views
To perform a particular operation at a particular moment via the user interface, you may need to
switch this to a different view. You can do this by clicking the appropriate toolbar button (see
section 3.2.2.2) or by selecting the corresponding menu item in the "View" menu (see section
3.3.2.2). 3
NOTE
For a description of the functions available in the various views, refer to the chapters which explain
the procedures applicable to the operations to be performed (e.g. "Refilling Empty Tracks",
Chapter 4). 3
3.3.2 Menus
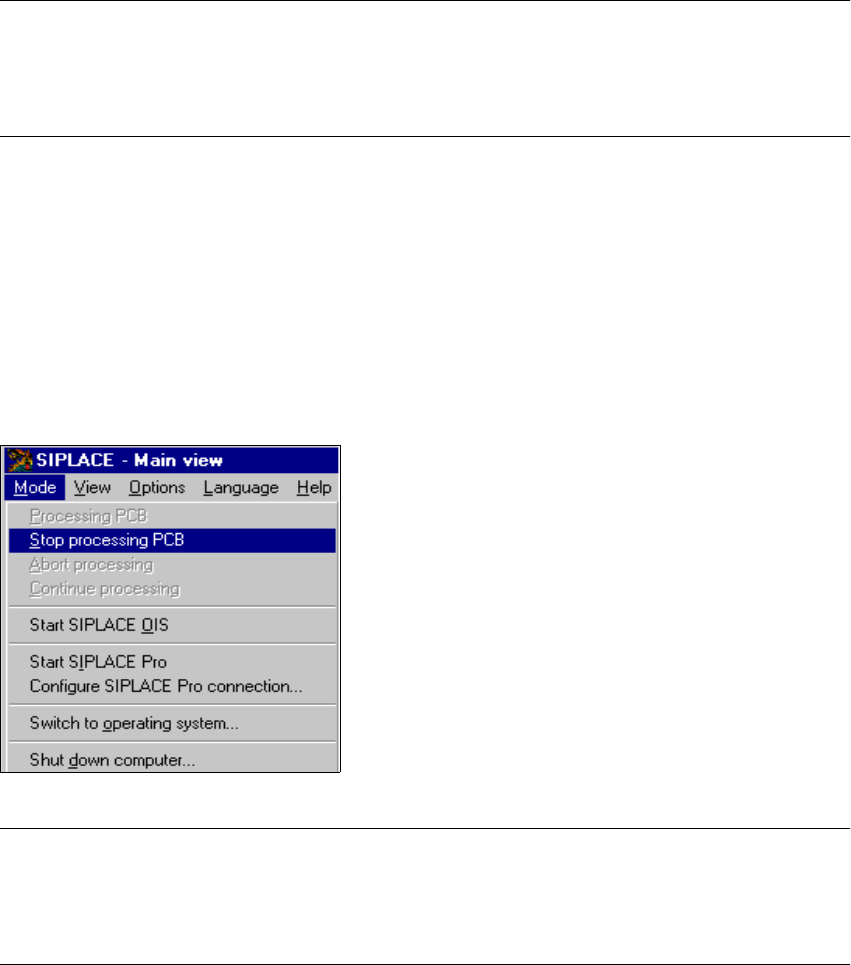
3.3.2.1 "Mode" Menu
The complete set of functions present in the "Mode" menu is only available in the main view.
In the views "Setup ...", "Errors..." and "Feeders" and their sub-views, only the menu items "Stop
processing PCB" and "Processing PCB" are available. In the other views, the "Mode" menu is not
displayed. 3
3
NOTE
For a detailed description of the menu items "Stop processing PCB", "Processing PCB" and
"Continue processing", refer to section 3.2.2.1 since these functions are usually activated via the
corresponding icons in the working area. 3

3 Introduction and Basic Concepts User Manual SIPLACE S-23 HM
3.3 User Interface - Views and Menus Software Version SR.406.xx 02/00 US Edition
112
3
Processing PCB 3
Assembly of the PCBs is started or continued if previously interrupted. 3
Å Click the menu item Processing PCB (or the corresponding icon).
3
Stop processing PCB 3
The current PCB assembly process is stopped. 3
Å Click the menu item Stop processing PCB (or the corresponding icon)
3
Abort processing 3
This function allows you to abort certain operating steps such as feeder position recognition or
nozzle changes in the event of a machine stoppage (fatal error, Stop button pressed) 3
Å Click the menu item Abort processing.
The current operation is aborted when you confirm the action in the displayed dialog box.
3
Continue processing 3
The preceding assembly process, interrupted for example because of an error, is continued once
the fault has been eliminated. 3
Å Click the menu item Continue processing (or the corresponding icon).
Start SIPLACE OIS 3
This menu command starts the operating data acquisition system SIPLACE OIS (Operator Infor-
mation System), provided the software has been installed and configured. 3
The SIPLACE OIS user interface allows you to obtain information on the operation of an entire line
or individual machines at any time during production. 3
Start SIPLACE Pro 3
This menu command starts the SIPLACE Pro programming system. 3
SIPLACE Pro allows you to program and optimize SIPLACE placement machines and lines. 3
User Manual SIPLACE S-23 HM 3 Introduction and Basic Concepts
Software Version SR.406.xx 02/00 US Edition 3.3 User Interface - Views and Menus
113
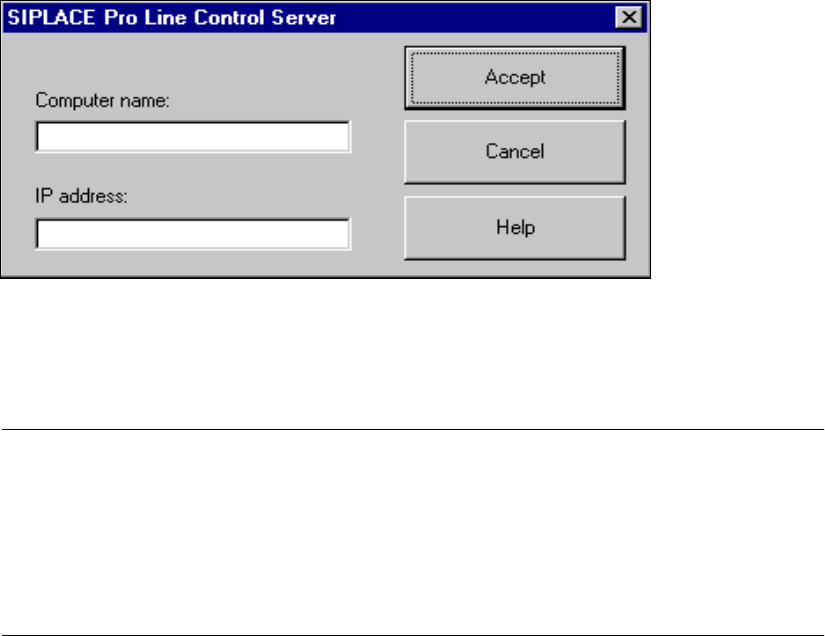
Configure SIPLACE connection... 3
This menu command displays a dialog box in which you can specify which computer is to supply
the current station computer with data. If you do not make an entry, the station computer accepts
the first computer to establish a connection. 3
Å Click the Configure SIPLACE Pro connection... menu command.
The following dialog box appears.
3
Å In the "Computer name" text box, enter the name of the computer on which the relevant SI-
PLACE Pro line control server is installed.
Å In the "IP address" text box, enter the IP address of this computer.
NOTE
To obtain the information you require in order to make these entries, open the "Network" dia-
log box on the computer on which the relevant SIPLACE Pro line control server is installed
(Start -> Settings -> Control Panel -> Network). The computer name is displayed on the
"Identification" tab. You can obtain the IP address on the "Protocols" tab by double-clicking
the TCP/IP protocol in the list of network protocols in order to select it.
Å Click the Accept button.
The entries are accepted, and configuration of the SIPLACE Pro connection is thus completed.
3
3