00197288-02_AI_TBO_SX12_V2_DE_EN.pdf - 第45页
3 Installation 3.1 Overview of Conveyor for SX1/SX2 V2 Assembly Instructions / Montageanleitung SIPLACE SX1/SX2 V2 Thick Board Option Option Dicke Leiterplatte 02/2019 45 3 Installation CAUTION Do not loosen or remove th…

2 Brief Description
2.5 Tools and Equipment Required
44 Assembly Instructions / Montageanleitung SIPLACE SX1/SX2 V2 Thick Board Option Option Dicke Leiterplatte
02/2019
2.5 Tools and Equipment Required
T Standard tooling
T 03079617-xx Depth measuring gauge 300mm
Service manual for your machine
2.6 Required Working Time
●
The complete installation for the single conveyor will take approx. 1.5 hours.
●
The complete installation for the dual conveyor will take approx. 2.5 hours.
●
Programming work on the SIPLACE Pro computer may also be needed.
3 Installation
3.1 Overview of Conveyor for SX1/SX2 V2
Assembly Instructions / Montageanleitung SIPLACE SX1/SX2 V2 Thick Board Option Option Dicke Leiterplatte
02/2019
45
3 Installation
CAUTION
Do not loosen or remove the wrong screws
The following applies to all work performed on the conveyor:
► Make sure that you do not loosen or remove any other screws except those ones ex-
plicitly mentioned. Loosening or removing other screws could lead to irreparable mis-
alignment or damage to the conveyor rail.
NOTICE
Single and dual conveyor
The installation is described using the example of the dual conveyor. Installation on a single
conveyor follows the same procedure. Any relevant differences will be mentioned explicitly.
3.1 Overview of Conveyor for SX1/SX2 V2
Your placement machine is either fitted with the single or dual conveyor, depending on the config-
uration.
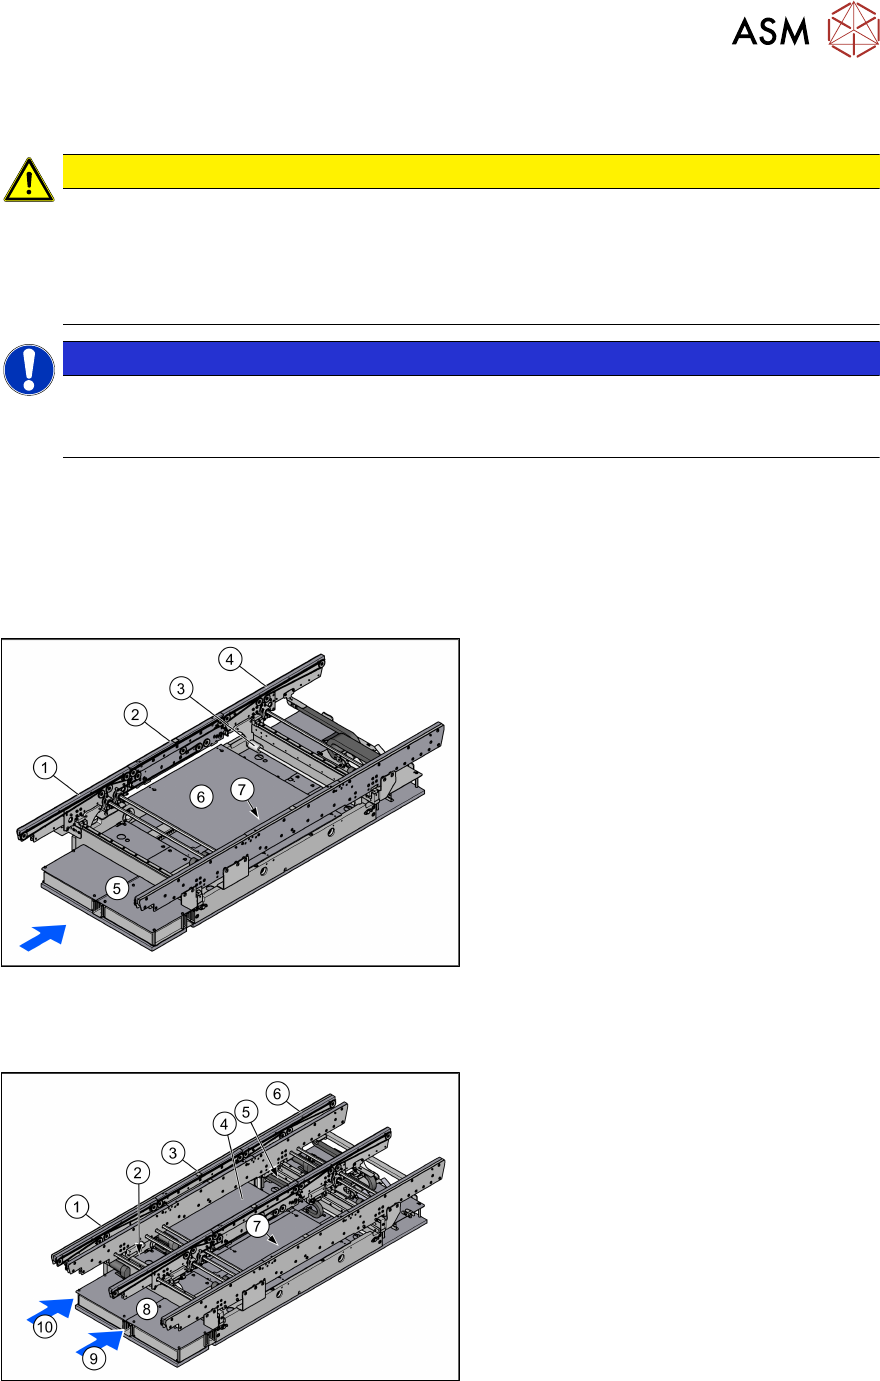
3.1.1 Single Conveyor
Fig.5: Single conveyor
1. Input area
2. Placement area
3. Width Adjustment
4. Output area
5. Conveyor control TSP420 (under the
cover)
6. Lifting table
7. Sensor rail (on the conveyor rail)
3.1.2 Dual Conveyor
Fig.6: Dual conveyor
1. Input area
2. Width adjustment in the input area
3. Placement area
4. Lifting table
5. Width adjustment in the output area
6. Output area
7. Sensor rail (on the conveyor rail)
8. 2x conveyor control TSP420 (under the
covers)
9. Conveyor lane 1
10. Conveyer lane 2
The dual conveyor has two conveyor lanes. In the standard version, the fixed conveyor rail of each
conveyor lane is on the right-hand side.
3 Installation
3.2 Preparatory Steps
46 Assembly Instructions / Montageanleitung SIPLACE SX1/SX2 V2 Thick Board Option Option Dicke Leiterplatte
02/2019
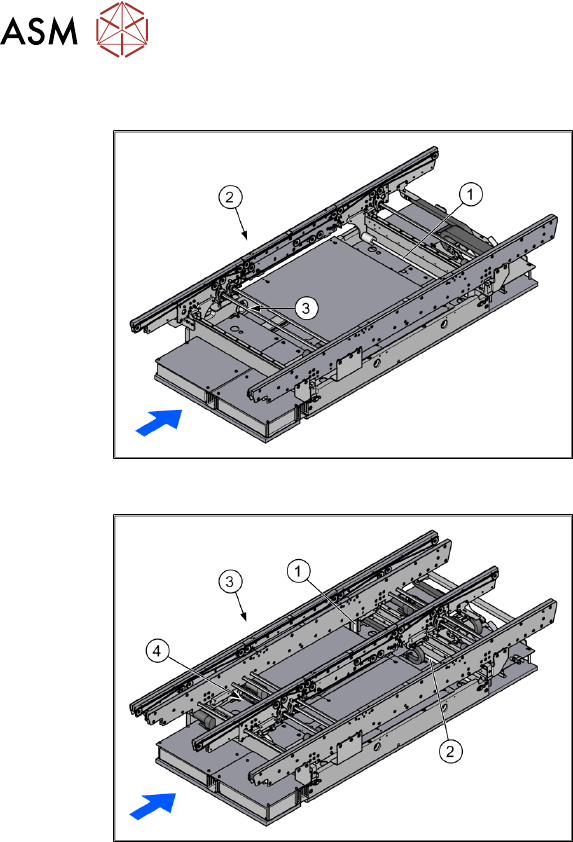
3.1.3 Width Adjustment
Fig.7: Width adjustment for single conveyor
1. Recirculating spindle
2. Toothed belt of width adjustment
3. Drive unit of width adjustment
Fig.8: Width adjustment for dual conveyor
1. Adjustment unit
2. Recirculating spindle
3. Toothed belt of width adjustment
4. Drive unit of width adjustment
Function description
The width is adjusted by means of a motor as programmed. For dual conveyor systems, differing
widths can be set for the two conveyor lanes. The width adjustment uses a motor with its own
measuring system, meaning that the PCB width can be set independently of other machine com-
ponents (e.g. the Y gantry).
The PCB width is adjusted using two width adjustment units, which are fitted in the input and output
areas. These adjustment units are moved synchronously back and forth by the drive motor, with
the help of recirculating spindles and a toothed belt.
In the dual conveyor, the fixing pins are moved out to release the clamp of the side rail. At the
same time, the side rail is fixed to the adjustment unit. After reaching the new PCB width, both fix-
ing pins move back in. The side rail is then clamped again.
In the single conveyor, the flexible rail is moved directly by the two recirculating spindles of the
adjustment units.
3.2 Preparatory Steps
► Use the software to move the conveyor sides into the position which allows you best access.
We recommend the following setting for this:
Set the two outer sides to their outermost positions at 281mm (dual) and the lane width to
160mm. The conveyor sides are then distributed as equally as possible across the conveyor
for best accessibility.
Alternatively, you can also loosen the conveyor side clamps on the dual conveyor. Read the
service manual for your machine first.
► Move the component trolley out of the machine.