00197288-02_AI_TBO_SX12_V2_DE_EN.pdf - 第51页
3 Installation 3.6 Final Work Assembly Instructions / Montageanleitung SIPLACE SX1/SX2 V2 Thick Board Option Option Dicke Leiterplatte 02/2019 51 3.6 Final Work Fig.16: Checking the conveyor height ► Check the height of…
3 Installation
3.5 Converting the Clamping Rail
50 Assembly Instructions / Montageanleitung SIPLACE SX1/SX2 V2 Thick Board Option Option Dicke Leiterplatte
02/2019
► Some conveyors do not have the "Thick Board" option already prepared on the clamping
plate. In these cases, you need to insert the screw (3) with the sliding disk behind it onto the
clamping plate. As the sliding disk is located between the clamping plate and the conveyor
rail, you need to dismantle the clamping plate for this. Read the relevant section of the service
manual for your machine.
You also need to observe the following steps when fitting the clamping plate.
The following steps must be performed in each case. If you have removed the clamping plate,
observe these steps while fitting the clamping plate again.
► Remove the top retaining screw on the spring. Make sure that you do not lose the spring and
the bushing on the screw. When you refit them, check the bushing for correct orientation. Re-
peat this step for the second clamping plate spring.
The screws(3) and(4) each have a sliding disk between the conveyor rail and the clamping plate.
To prevent these sliding disks from slipping, press the clamping plate slightly against the conveyor
rail during the following replacement work.
► Exchange the position of the screws(3) and(4) (incl. bushing).
NOTICE
Travel range
When using boards with standard thickness, the clamping plate is pressed against the
clamping rail by the lifting table when operated while empty i.e without a board. This is the
highest position which can be reached. However, since neither the lifting table nor the
clamping plate can reach the maximum of 8.5 mm required for the thick board, this travel
range needs to be limited with the screws(4). These screws define the top stopper in case
a board which is too thin (<2mm) is moved in.
► Repeat these steps for all conveyor rails.
3.5 Converting the Clamping Rail
► Remove the old clamping rail and fit the new "clamping rail for thick board SX1a assem-
bly" [03099567‑xx]. Read the relevant section of the service manual for your machine.
NOTICE
Converting the clamping rail
► The procedure is identical for removal and installation of the old and new clamping
rails.
► The new clamping rail protrudes slightly above the conveyor side.
► Repeat these steps for all conveyor sides.
3 Installation
3.6 Final Work
Assembly Instructions / Montageanleitung SIPLACE SX1/SX2 V2 Thick Board Option Option Dicke Leiterplatte
02/2019
51
3.6 Final Work
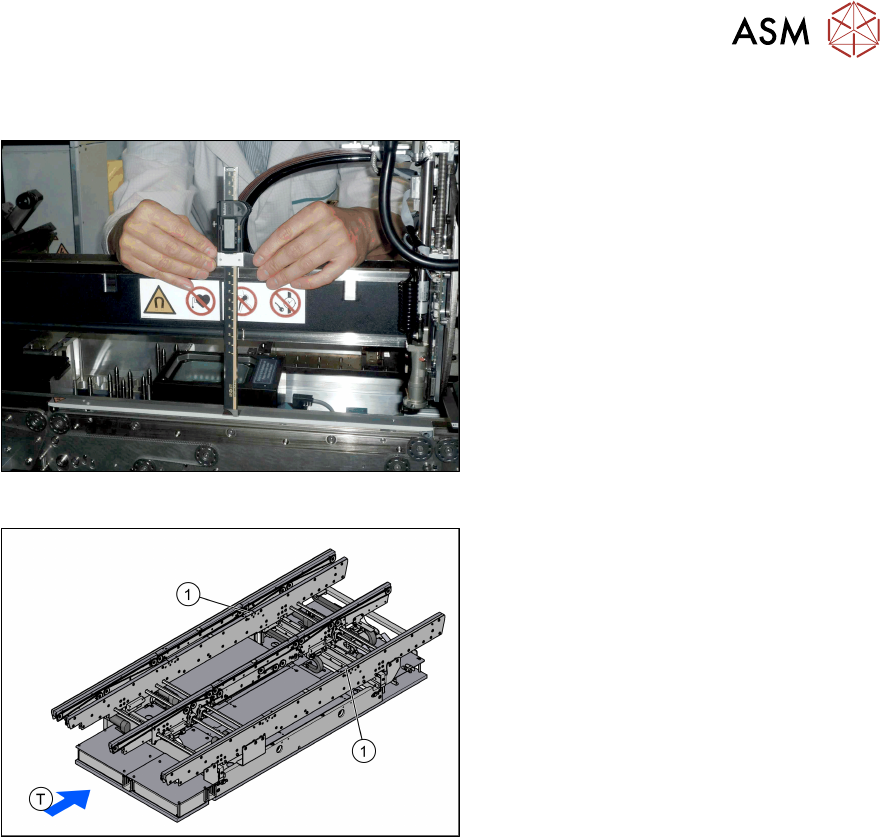
Fig.16: Checking the conveyor height
► Check the height of the conveyor:
Use a thickness gauge to measure the
distance from the upper edge of the
gantry to the clamping rails and adjust
the distance, if necessary.
Measure the left, right and center of the
clamping rails each.
In SX1/SX2 V2 machines with the
"Thick Board" option, this distance will
be 176+/‑0.2mm with the clamping
rails.
Enter the measurements in the meas-
urement log and place this in the
machine log book after you have com-
pleted the work (see 4.1 "Measurement
Log" [}53]).
Fig.17: Laser warning label
► Reinsert the four screws fastening the
conveyor and tighten these. After tight-
ening these screws, perform the meas-
urement check again as the height may
change slightly during tightening.
► Replace the laser warning signs(1) on
the clamping rails which were removed
with the old clamping rails (SC:1piece,
DC:2pieces).
3 Installation
3.7 Software Settings
52 Assembly Instructions / Montageanleitung SIPLACE SX1/SX2 V2 Thick Board Option Option Dicke Leiterplatte
02/2019
3.7 Software Settings
3.7.1 Heavy Boards
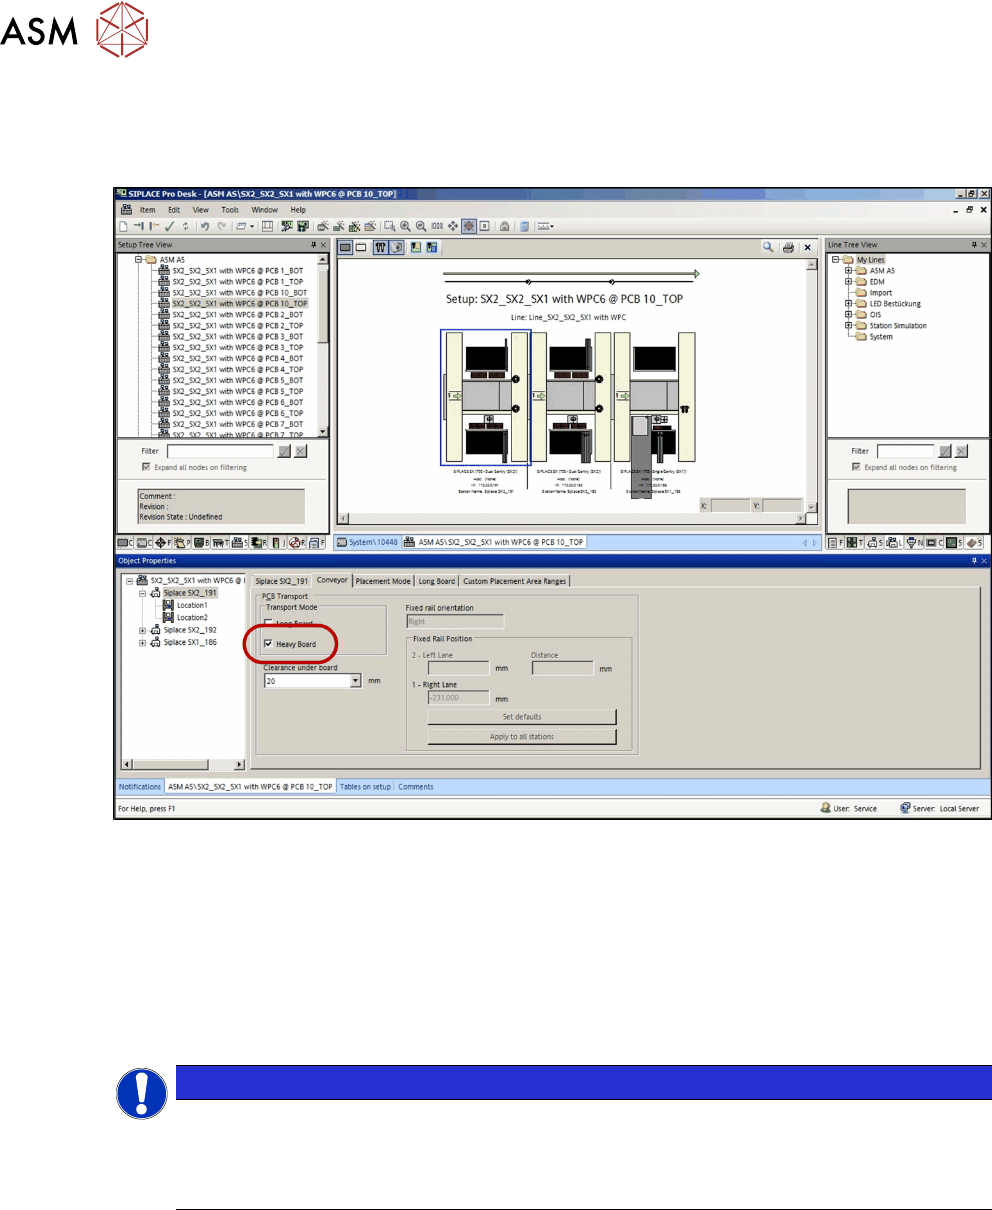
Fig.18: Heavy board function in SiplacePro Desk
Boards which are over a certain weight must be defined as heavy boards.
●
In single conveyors, enable the heavy board function for any boards weighing more than 2kg
(up to max. of 5kg).
●
In dual conveyors, enable the heavy board function for any boards weighing more than 1kg
(up to max. of 2kg).
The weight of the board must be determined with fully configured components and entered at
Setup – Conveyor.
NOTICE
Heavy boards
The conveyor speed is reduced for heavy boards.
When using heavy boards, be aware that the wear to the conveyor belt can be higher (=
product life is reduced).