i3070_Software_Installation.pdf.pdf - 第7页
i3070 Software Installation 7 Installing the i3070 Software • All softwar e must be installed to drive C, which must also be the drive wher e the operating system is install ed. • Disable anti-virus softwar e befor e sta…

6 i3070 Software Installation
Critical folders and files
If you are upgrading a system, you can use the following shell command to capture
most of the computer’s networking information:
ipconfig /all > mynetwork.txt
This saves the networking data to mynetwork.txt, which you can refer to when
restoring the network settings.
Back up the critical files if you are unable to make a complete system backup.
1. The default installation folder may be I3070_ICT or Agilent_ICT.
2. These files are not on a test development workstation.
3. This file is updated by BOOTP Turbo, which is required for network configuration only if the
i3070 system has ControlXTPA module control cards.
Table 2 Critical folders and files
Folders/files
1
Description
\windows\system32\drivers\etc\hosts Local hostname resolution and networking information
\windows\system32\drivers\etc\bootptab Hardware addresses for the testhead
2
3
\<installation folder>\autofile Fixtures ID auto numbers
\<installation folder>\boards Board test programs. If your board files are in a different folder,
back up that folder.
\<installation folder>\diagnostics\th1\ASRU_Reference System Calibration file (system dependent)
\<installation folder>\diagnostics\th1\config Testhead hardware configuration
2
\<installation folder>\home User’s home folder
\<installation folder>\standard\config Testhead resources configuration
2
\<installation folder>\dev Back up any ps (DUT power supply) files that were customized.
Any other custom folders and files containing important
data.
Any other user data
i3070 Software Installation 7
Installing the i3070 Software
• All software must be installed to drive C, which must also be the drive where
the operating system is installed.
• Disable anti-virus software before starting the installation. Otherwise, some of
the components might not install properly. Remember to reactivate the anti-
virus software after the i3070 software is installed.
• Unless directed otherwise, always accept the default selections. Otherwise,
errors could occur when using the software.
Before installation
Task
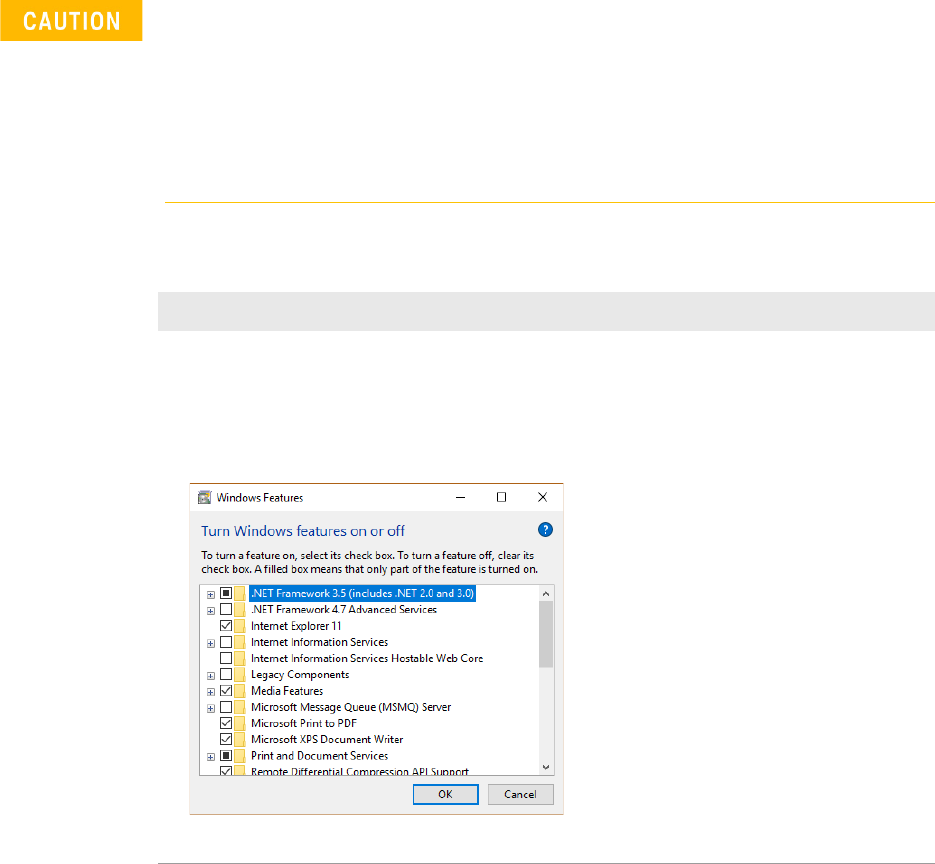
Turn on .NET Framework:
a Use Search on the taskbar to find Control Panel and click Programs and Features > Turn
Windows features on or off.
b In the Windows Features dialog box, select .NET Framework 3.5 (includes .NET 2.0 and 3.0)
and click OK.
c Reboot the computer if prompted.
You do not need to select any of the items
under .NET Framework 3.5, unless you are
a developer who requires WCF script and
handler mapping functionality.

8 i3070 Software Installation
Installing the software
Task Steps
1 Insert the Keysight installation
disk into the drive.
It should auto-start.
a If the User Account Control dialog box appears, click Yes to allow the installation
to continue.
b In the installation window, click Install Keysight i3070 Software.
If the installation does not auto-start after several seconds:
a Open Windows Explorer and browse to the disc.
b Double-click setup.exe in the W10\Software folder.
c If the User Account Control dialog box appears, click Yes to allow the installation
to continue.
2 Install required components, if
missing:
The installer checks that system requirements are met and that required
components are installed.
• If system requirements are not met, the installer may exit. See Table 1 for the
requirements.
• If any component is missing, a dialog box will be displayed.
a Click Install if you see any of these dialog boxes.
NOTE: This can happen at any time during the installation process.
b When installation is complete, click Next to continue.
3 Accept license agreement: a Accept the license agreement and click Next to proceed.
4 In the Destination Folder
window:
a Accept the default folder for installing the software, unless you have a specific
need to change it.
NOTE: Spaces are not allowed in the path of the destination folder, which must
be on drive C.
b Click Next.