00195044-10_UM_VisionTeachStation_DE EN.pdf - 第157页
Vision Teach Station User Manual 8 Starting the vision teach station 12/2012 Edition 8.3 Error messages when starting the application 157 8.3 Error messages when starting the application The following error messages may …

8 Starting the vision teach station Vision Teach Station User Manual
8.1 Switching on the vision teach station 12/2012 Edition
156
8 Starting the vision teach station
Check the power cable connections before you switch on the vision teach station.
– Base module and PC see section 4, from page 113.
– Cameras see section 5, from page 116.
WARNING 8
NEVER remove the 26-pin ribbon cable from the Collect&Place head camera while the base
module is switched on as this could damage the LED driver board for the camera.
8.1 Switching on the vision teach station
Switch the base module on at the power switch.
The three LEDs on the back of the base module light up.
Switch the PC on.
Log in as Administrator (see section 7.2, page 140) or as a user.
8.2 Starting the vision teach station application
Double-click on the "Teach Station" icon to start the application. The application will detect any
cameras that are connected. The live image of the first camera is displayed on the application's
starting screen. If there are two cameras connected, you can toggle between the two.

Vision Teach Station User Manual 8 Starting the vision teach station
12/2012 Edition 8.3 Error messages when starting the application
157
8.3 Error messages when starting the application
The following error messages may appear when you start the application:
8.3.1 No camera was detected
Check that the base module is switched on and that all 3 LEDs light up.
If the three LEDs light up, then the + 24 V- (red), + 15 V- (yellow) and + 42 V- (green) supply
voltages are present (see section 4.2, page 114). 8
If one of the LEDs does not light up, contact SIPLACE Service. 8
If all 3 LEDs do not light up, check the 2.5 A fuse (item 1 in Fig. 8
4.2 - 1, page 114). 8
Check whether the CAN bus cable between the PC and the base module or between the base
module and the stationary camera is connected correctly.
Exit and restart the vision teach station application.
8.3.2 Camera not responding
If a stationary camera is concerned (type 33/type 25):
Check that the orange camera bus cable is connected between camera and PC.
If a head camera is concerned:
Check that the orange camera bus cable is connected on the back of the basic module
(connection (5) in Fig. 4.2 - 1, page 114) and to the PC.
Check whether there are bent connection pins on the plugs of the "adapter for head camera"
(Fig. 5.2 - 9, Seite 128) .
If the camera still is not detected, contact SIPLACE Service.
8.3.3 There is a vision teach station application running already
Exit the application and then start it again.
8.3.4 Error: LED self-test failed. Not all LEDs are working properly
One or more LEDs for the camera illumination has failed.
Replace the defective camera.
8 Starting the vision teach station Vision Teach Station User Manual
8.3 Error messages when starting the application 12/2012 Edition
158
8.3.5 No CAN card installed
The fault correction depends on the installed CAN card:
For the PowerCAN-PCI CAN card
This card can be identified by the green CAN3 plug from the outside. It was installed up to
04/2012 and only supports 32-bit operating systems.
Check whether a 64-bit operating system has been installed on this computer.
If yes:
Exchange the CAN card to a PowerCAN-PCI-II (COM168-PCI II) card with the item no.
03079973-xx.
OR
Perform a complete reinstallation with a 32-bit operating system.
If no:
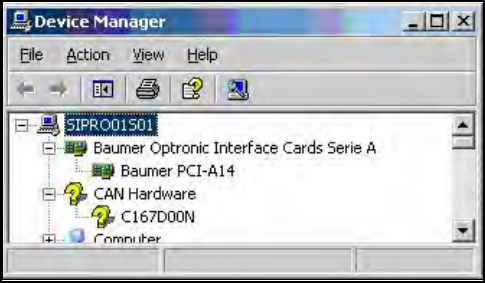
In the Device Manager (Control Panel System Hardware Device Manager), check
whether the driver for the CAN card has been installed correctly. There must be a "C167D00N"
entry under "CAN Hardware". The yellow question mark does not indicate an error. Errors are
indicated by an exclamation mark.
8
Fig. 8.3 - 1Device manager
If you cannot find this entry, look for the "Intelligent I/O (I2O) Controller" entry. In this case, you
will have to reinstall the driver:
Under Properties Drivers tab, select the "Update drivers" button.