773564-01_861-862-865_mounting_instructions_en_ge_ch.pdf - 第14页
1) 2) 3) 4) 10 mm 8 mm 100 mm 14 6 Electrical mounting Elektrische Montage 电气安装 电气安装

13
5.1 Check that the dimensions of the mating shaft
match the specifications in the encoder’s data
sheet. Fix the encoder with an M5 or M6 screw
(ISO 4762) with minimum 9 mm thread in use.
5.2 Fix the encoder with an insulated torque arm.
It must be fitted at 90 degrees angle to the direc-
tion of the bracket, for optimum accuracy of
measurement.
5.3 Check the encoder’s radial runout with slow
rotation of complete assembly. The runout
should not exceed 0.1 mm, as this may shorten
the encoder’s service life or influence the system
accuracy.
5.4 Dismounting; Use M8 screw, if necessary, to
detach the encoder.
5.1 Sicherstellen, dass die Abmessungen der Gegen-
welle den Angaben im Drehgeber-Datenblatt
entsprechen. Drehgeber mit einer M5- bzw. M6-
Schraube (ISO 4762) mit mindestens 9-mm-
Gewinde befestigen.
5.2 Drehgeber mit einer isolierten Drehmoment-
stütze befestigen. Um eine optimale Messgenau-
igkeit erzielen zu können, muss die Drehmo-
mentstütze im 90-Grad-Winkel zur Befestigung
montiert werden.
5.3 Radialversatz des Drehgebers bei langsamer
Rotation und fertiger Montage überprüfen. Der
Versatz darf 0,1 mm nicht überschreiten, da
sonst die Lebensdauer des Drehgebers verkürzt
bzw. die Systemgenauigkeit beeinträchtigt
werden kann.
5.4 Demontage: Bei Bedarf beim Drehgeberwechsel
M8-Schraube zum Lösen verwenden.
5.1 检查连接轴的尺寸是否符合编码器数据表中的
规格。使用 M5 或 M6 螺丝 (ISO 4762) 配合最
小 9 mm 螺纹来固定编码器。
5.2 使用绝缘扭矩臂固定编码器。安装角度必须和
托架方向成 90 度,以确保最佳的测量精度。
5.3 通过完整组件的慢速旋转来检查编码器的径向
偏移。偏移不应超过 0.1 mm,否则将缩短编码
器的使用寿命或影响系统的精度。
5.4 如有需要,使用 M8 螺丝以在更换时拆卸编码
器。
1)
2)
3)
4)
10 mm
8 mm
100 mm
14
6
Electrical
mounting
Elektrische
Montage
电气安装电气安装

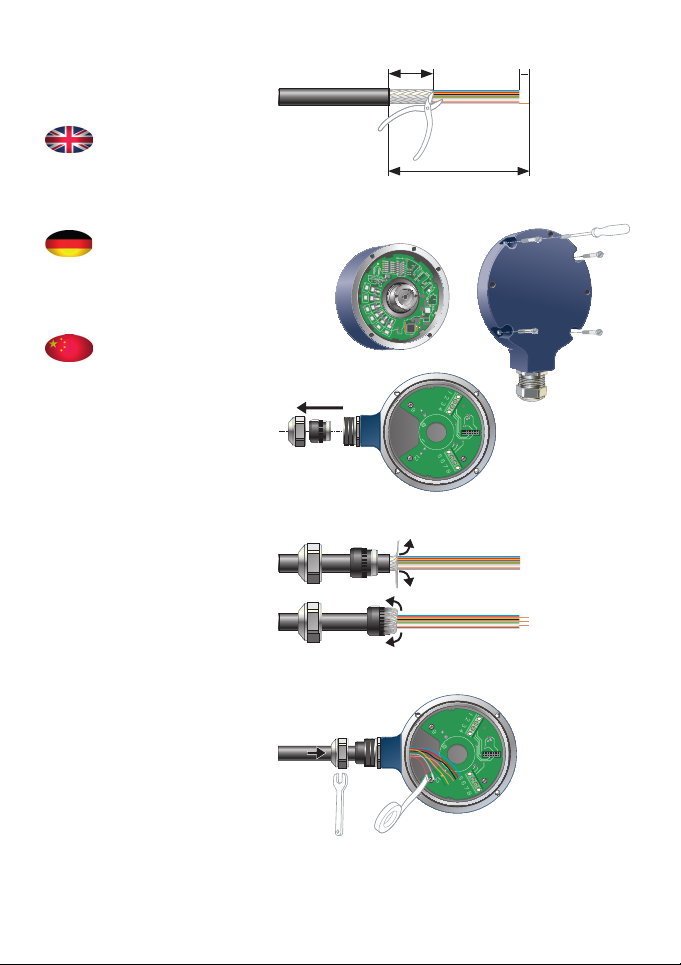
Fit cable*, using the following steps:
Step 1. Strip the cable according to the dimensions
in the illustration.
Step 2. Open the terminal cover and unscrew the
cable bushing.
Step 3. Fold the cable shield backwards over the
shell ring.
Step 4. Connect the wires according to the product
label.
Insulate any wire that is not being used.
Tighten all terminal screws (including any
unused ones).
* Does not apply to models with pre-installed cable
or connector.
Die elektrische Montage des Kabels*:
Schritt 1. Kabel gemäß den Maßangaben in der
Abbildung abisolieren.
Schritt 2. Klemmendeckel öffnen und Kabeldurch-
führungen aufschrauben.
Schritt 3. Kabelschirm über den Mantelring nach
hinten biegen.
Schritt 4. Leitung gemäß der Belegung wie auf dem
Etikett angegeben anschließen.
Nicht verwendete Leiter isolieren.
Sämtliche Klemmenschrauben anziehen
(auch die nicht verwendeten).
* Gilt nicht für Modelle mit vormontiertem Kabel
oder Anschlussstecker.
通过下列步骤安装电缆*:
第1步: 按照图示尺寸剥开电缆。
第2步: 打开接线盒外壳,拧下电缆套管。
第3步: 将电缆屏蔽层向后对折包在环箍上。
第4步: 按照产品标签所示意接线。
并对未使用导线进行绝缘处理。
拧紧所有接线盒螺丝 (包括所有未使用的
螺丝)。
* 不适用于预安装了电缆或连接器的型号。
15