manual-biron-nano-handle-b-soldering-tool-jbc-0036842_ID-262259_EN.pdf - 第5页
ø 1,5 ø 3,5 0,7 3,5 Ø2,5 Ø2,5 x 1 3 2 Retention Clamps Th e excha ng er i s sui ta ble fo r C1 1 5 and C21 0 car tri dge s. C1 1 5 Car tridges Th e hol di ng ar ea of C1 15 ca r tr idg es i s de lim ited by t he two r in…
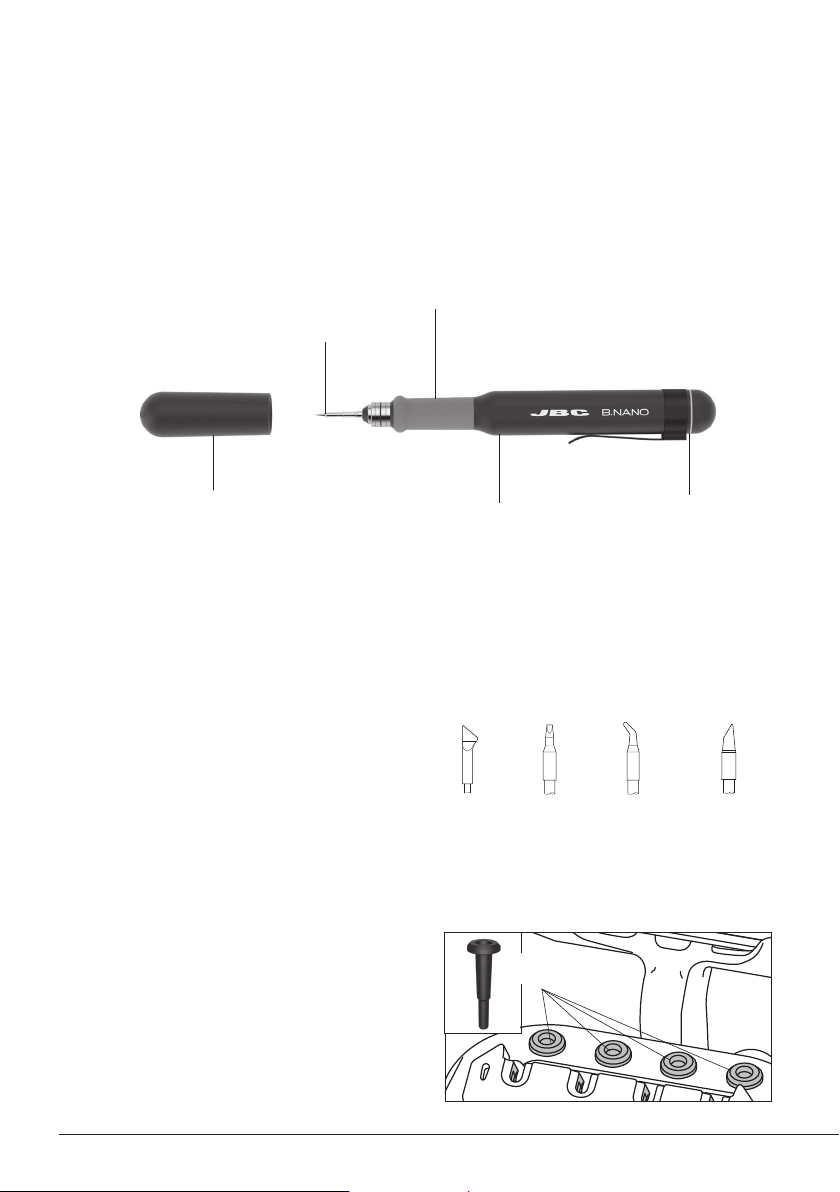
C115 Cartridge Adapters
(Ref. B0643 includes 4 adapters)
Since C115 cartridges have a smaller diameter
than C210 cartridges, adapters must be used to
store them in the cartridge holder.
These adapters must simply be inserted from
above into the slots of the cartridge holder.
Cartridge
Adapters
ø 1,5
ø 3,5
0,7
3,5
Ø2,5
Ø2,5
x
1
3
2
Retention
Clamps
The exchanger is suitable for
C115 and C210 cartridges.
C115 Cartridges
The holding area of C115
cartridges is delimited by the
two rings on the cartridge
shaft (x).
The cartridge exchanger allows
inserting / changing cartridges
safely without switching off
the tool. Cartridges are held in
place thanks to the retention
clamps (1).
Compatible Cartridges
B.XXX works with C115 cartridges. Find the
model that best suits your soldering needs at
www.jbctools.com.
Chisel Conical
Bent
Bevel
Cartridge
Exchanger
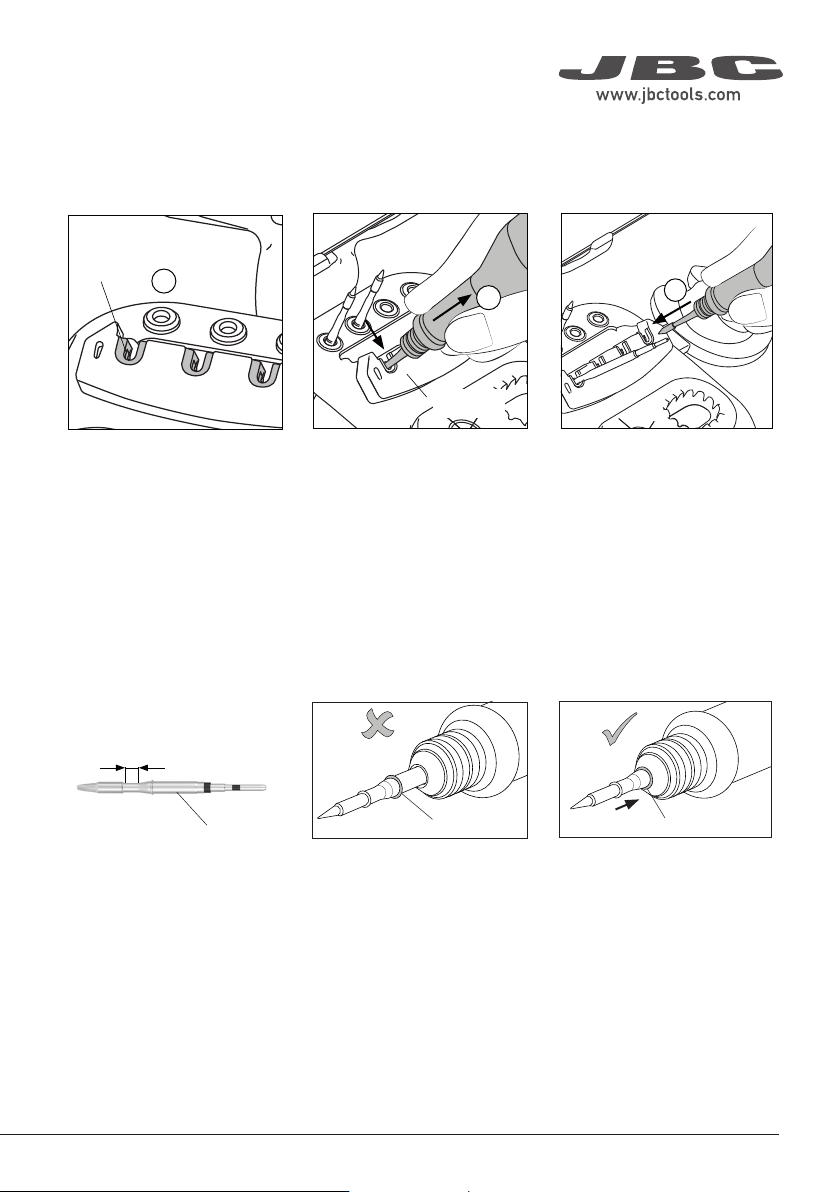
To insert a cartridge, carry out
the same steps in reverse order.
Note: Push the cartridges inside the tool until the reference ring is
aligned with the edge of the tool.
Gently press the tip against
the holes on the sides of the
cartridge exchanger (3) to
ensure that the cartridge is
appropriately inserted.
Place the tool with the cartridge
over the cartridge exchanger
slots and press down (1) until it
clicks. To remove the cartridge
pull out the tool (2).
Cartridge Replacement
Cartridge Extractor Cartridge Fixing
Reference Ring
Reference Ring
Cartridge Insertion and Replacement
Blade
C115
Cartridge
ø 1,5
ø 3,5
0,7
3,5
Ø2,5
Ø2,5
x
1
3
2
Retention
Clamps
The exchanger is suitable for
C115 and C210 cartridges.
C115 Cartridges
The holding area of C115
cartridges is delimited by the
two rings on the cartridge
shaft (x).
The cartridge exchanger allows
inserting / changing cartridges
safely without switching off
the tool. Cartridges are held in
place thanks to the retention
clamps (1).
Compatible Cartridges
B.XXX works with C115 cartridges. Find the
model that best suits your soldering needs at
www.jbctools.com.
Chisel Conical
Bent
Bevel
Cartridge
Exchanger
To insert a cartridge, carry out
the same steps in reverse order.
Note: Push the cartridges inside the tool until the reference ring is
aligned with the edge of the tool.
Gently press the tip against
the holes on the sides of the
cartridge exchanger (3) to
ensure that the cartridge is
appropriately inserted.
Place the tool with the cartridge
over the cartridge exchanger
slots and press down (1) until it
clicks. To remove the cartridge
pull out the tool (2).
Cartridge Replacement
Cartridge Extractor Cartridge Fixing
Reference Ring
Reference Ring
Cartridge Insertion and Replacement
Blade
C115
Cartridge
B.NANO works with C115 cartridges. Find the
model that best suits your soldering needs at
www.jbctools.com.
4
Features
C115*
Cartridge Range
Status Lightband
Tool
B1510
Grips for B.IRON
Tools
B1596
Safety Cap
for B.IRON Tools
* Not included, sold separately.
B.NANO performs up to 120 SMD soldering joints per charge and is the ideal tool for applications
in laboratories or performing individual soldering jobs that require the highest precision in hard-to
reach areas. Note: To charge the tool a B.IRON station is needed.
ø 1,5
ø 3,5
0,7
3,5
Ø2,5
Ø2,5
x
1
3
2
Retention
Clamps
The exchanger is suitable for
C115 and C210 cartridges.
C115 Cartridges
The holding area of C115
cartridges is delimited by the
two rings on the cartridge
shaft (x).
The cartridge exchanger allows
inserting / changing cartridges
safely without switching off
the tool. Cartridges are held in
place thanks to the retention
clamps (1).
Compatible Cartridges
B.XXX works with C115 cartridges. Find the
model that best suits your soldering needs at
www.jbctools.com.
Chisel Conical
Bent
Bevel
Cartridge
Exchanger
To insert a cartridge, carry out
the same steps in reverse order.
Note: Push the cartridges inside the tool until the reference ring is
aligned with the edge of the tool.
Gently press the tip against
the holes on the sides of the
cartridge exchanger (3) to
ensure that the cartridge is
appropriately inserted.
Place the tool with the cartridge
over the cartridge exchanger
slots and press down (1) until it
clicks. To remove the cartridge
pull out the tool (2).
Cartridge Replacement
Cartridge Extractor Cartridge Fixing
Reference Ring
Reference Ring
Cartridge Insertion and Replacement
Blade
C115
Cartridge
5
40 mm
50 mm
60 mm
80 mm
100 mm
130 mm
130 mm
para manuales - negro plano
200 mm
300 mm
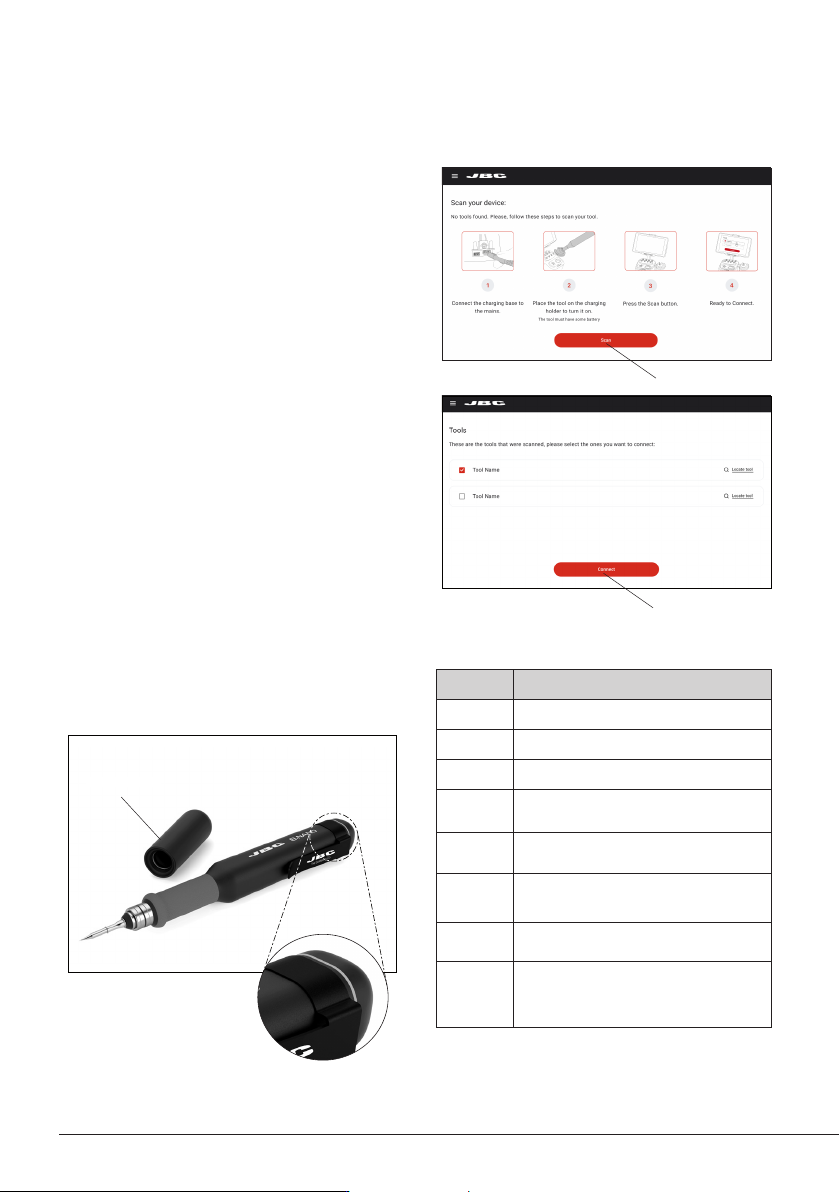
Safety Cap
Status Lightband Detail
Status Lightband
Color Tool Status
Green More than 50% charged
Orange Between 20% and 50% charged
Red Less than 20% charged
Flashing
green
Charging
(more than 50% charged)
Flashing
orange
Charging
(between 20% and 50% charged)
Flashing
red
Charging
(less than 20% charged)
No color
Safety cap on the tool
and/or power off
Flashing
blue
Locate Tool function activated
1. Make sure that the charging base is connected
to the mains.
2. Place the tool on the charging holder to turn
it on. Note: Charge the tool completely before
using it for the first time. A full charge takes:
-30min for B.100
-60min for B.500
-30min for B.NANO
-45 min for B.TWEEZERS
3. Press the Scan button. The tool must have
some battery to appear on the scan.
4. Select the tool or tools you want to connect to
the station and press the Connect button.
If your tool does not appear on the list, check that
it has some battery (see Status Lightband section)
and that it is on, and press the Scan button again.
The status lightband on the tool indicates its
status (see table on the right).
Tool Connection
Scan Button
Connect Button
6