sj6 uitra.pdf - 第12页
-9- The SJ6 Ultra's main screen is a touchscreen. Perform operations by tapping or sliding on the screen. T ouchscreen Operations Remaining Storage Capacity: Shows the remaining number of photos or recording time av…
-8-
Camera Home Screen
Press the power button while the camera is off to power on.
Press and hold the power button for 2 seconds while the camera is on to power off.
Basic Operations
1. Power On/Off
Press the recording button once while the camera is on to start recording/take a photo.
Press the recording button again to stop recording.
2. Start/Stop Recording
Press and hold the record button to switch between the front and rear screen displays.
(*Not available during recording.)
3. Screen Switching
8
1
2
3
4
7
6
5
-9-
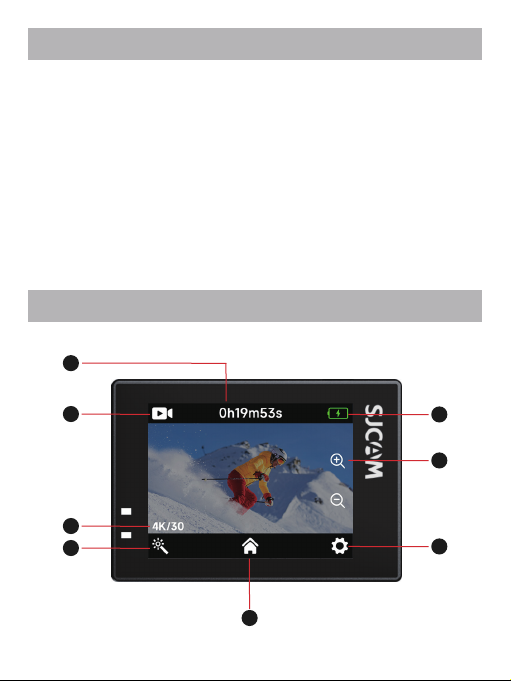
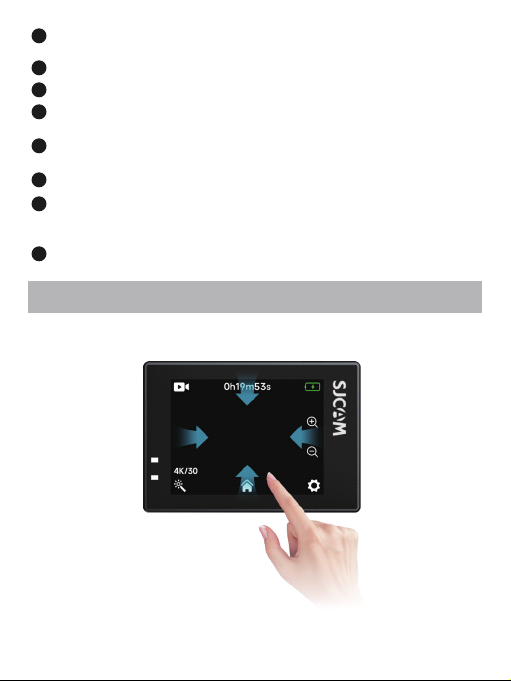
The SJ6 Ultra's main screen is a touchscreen. Perform operations by tapping or sliding
on the screen.
Touchscreen Operations
Remaining Storage Capacity: Shows the remaining number of photos or recording
time available on the microSD card.
1
2
Shooting Mode Info: Displays the current shooting mode.
3
Shooting Specification: Shows the current image/video resolution.
6
System Settings: Tap the icon to configure camera system parameters.
8
Battery Level: Displays the current remaining battery power.
Mode Parameter Settings: Tap the icon to set parameters for the current shooting
mode.
4
Shooting Mode: Tap the icon to select and switch between different shooting
modes.
5
Press and hold “+” to zoom in, and hold “−” to zoom out.
Note: For Digital Zoom to function, Image Stabilization (IS) and Distortion
Correction must be turned off, and the View Angle must be set to "Wide".
7
Swipe down from the top edge: Opens the Control Center.
Swipe inward from the left or right edge: Switches between Photo/Video mode.
Swipe up from the bottom edge: Selects shooting mode.
-10-
1
6
4
2
3
7
5
89
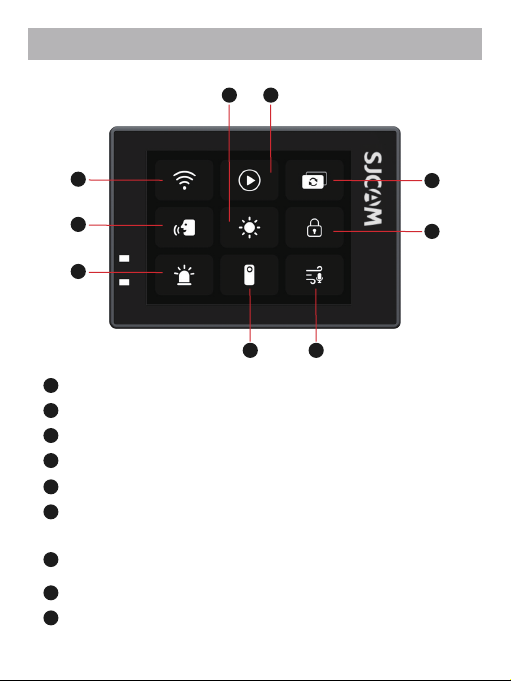
Control Center Overview
1
Wi-Fi Switch: Tap to turn Wi-Fi On / Off.
2
Voice Control Switch: Tap to turn the voice control function on or off.
3
Indicator Light Switch: Tap to turn indicator lights On / Off.
4
Image Stabilization (IS): Tap the icon to enter the IS mode selection page.
5
Audio Noise Reduction: Tap to enable audio noise reduction.
8
Playback: Tap to view recorded videos/photos.
7
Screen Switch: Tap to switch to the secondary screen display.(* To switch
back to the main screen, press and hold the Recording button.)
9
Brightness Adjustment: Tap to open the brightness adjustment module,
slide to adjust screen brightness.
6
Screen Saver: Tap to lock the screen.(*Tap the screen to wake it up after
locking.*Screen lock only turns off the display; the camera can still record
video or take photos normally.)