sj6 uitra.pdf - 第14页
-11- Shooting Modes 2 3 4 5 7 8 9 6 Video Time Lapse Photo Regular photography Driving Mode Time Lapse Video The camera will continuously take photos after a countdown when the record button is pressed. Press the button …
-10-
1
6
4
2
3
7
5
89
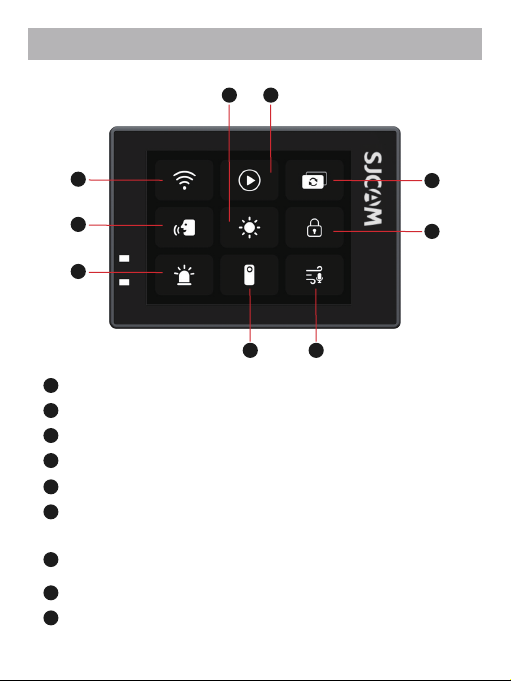
Control Center Overview
1
Wi-Fi Switch: Tap to turn Wi-Fi On / Off.
2
Voice Control Switch: Tap to turn the voice control function on or off.
3
Indicator Light Switch: Tap to turn indicator lights On / Off.
4
Image Stabilization (IS): Tap the icon to enter the IS mode selection page.
5
Audio Noise Reduction: Tap to enable audio noise reduction.
8
Playback: Tap to view recorded videos/photos.
7
Screen Switch: Tap to switch to the secondary screen display.(* To switch
back to the main screen, press and hold the Recording button.)
9
Brightness Adjustment: Tap to open the brightness adjustment module,
slide to adjust screen brightness.
6
Screen Saver: Tap to lock the screen.(*Tap the screen to wake it up after
locking.*Screen lock only turns off the display; the camera can still record
video or take photos normally.)

-11-
Shooting Modes
2
3
4
5
7
8
9
6
Video
Time Lapse
Photo
Regular photography
Driving Mode
Time Lapse
Video
The camera will continuously take photos after a
countdown when the record button is pressed. Press
the button again to stop.
Connect the camera to a live streaming APP for RTMP
push streaming.
Takes photos at fixed intervals and combines them into
a single video file, condensing slow processes (e.g.,
cloud movement, flower blooming) into a short video.
Slow
Motion
Records video at 2X/4X/8X high frame rates, generating
video that plays back at normal speed.
During the video recording process, the camera will
automatically save one photo every "1" second.
In Car Mode, the camera powers on and starts
recording automatically when power is connected; it
powers off and saves the video when power is
disconnected.
*After power disconnection, the camera continues
recording for about 7-8 seconds before automatically
shutting down.
Photo
After pressing the shutter button, the camera will
capture multiple photos in succession based on your
custom settings.
Burst Photo
Live
Broadcast
Grabs
from Video
Regular Recording
ModesNO.
Function Description
1

-12-
Video Menu Settings
1
2
3
4
5
6
8
9
7
Resolution
Video
Encoding
Off, On
Off, On
Off, On
Off , Anti-shake,
Horizon Steady
Image
Stabilization
Exposure
compensation
Wide / Medium / Narrow
+3EV--3EV
Adjusts the field of view (FOV)
as needed.
Adjusts exposure based on the
shooting environment.
Corrects fisheye (distortion)
effect when enabled.
When enabled, the camera
enters vertical shooting mode.
Enables smoother video.
Anti-shake and Horizon
Stabilization cannot be enabled
simultaneously.
When enabled, automatically
records content from a period
before the recording button is
pressed.
H.264
/
H.265
3 minutes / 5 minutes
10 minutes/ Off
Loop
Recording
Lossless
Portrait Mode
Video Pre-
Recording
View Angle
Distortion
Calibration
When the resolution / frame rate
is higher, the recorded file will be
larger.Video recordingat 120fps
has no anti-shake function.
H.265 is a newer encoding
protocol (an upgrade to H.264);
it can provide slightly clearer
results and smaller file sizes
compared to H.264.
It will automatically segment
the video according to the set
time. When the memory is
insufficient, it will automatically
clear the first video to achieve
a loop recording.
NO.
Menu
Parameter Options Parameter Descriptions
4K (16:9) 3840×2160 30fps
2K (16:9)2560×1440 60/30fps
1080P (16:9)1920X1080 120/60/30fp
720P (16:9)1280×720 120/60/30fps