00195348-0402 - MM WPC4-5-6_en.pdf - 第18页
Maintenance Manual WPC4, WPC5 and WPC6 Annual Maintenance Cleaning, Greasing and Checking the Feeder Ax is Toothed Belt 18 Maintenance Manual SIPLACE WPC4, WPC5 and WPC6 ► Refit the front, rig ht-hand side cov er onto th…
Maintenance Manual WPC4, WPC5 and WPC6
Greasing the Lifting Axis Spindle and Guidance Annual Maintenance
Maintenance Manual SIPLACE WPC4, WPC5 and WPC6 17
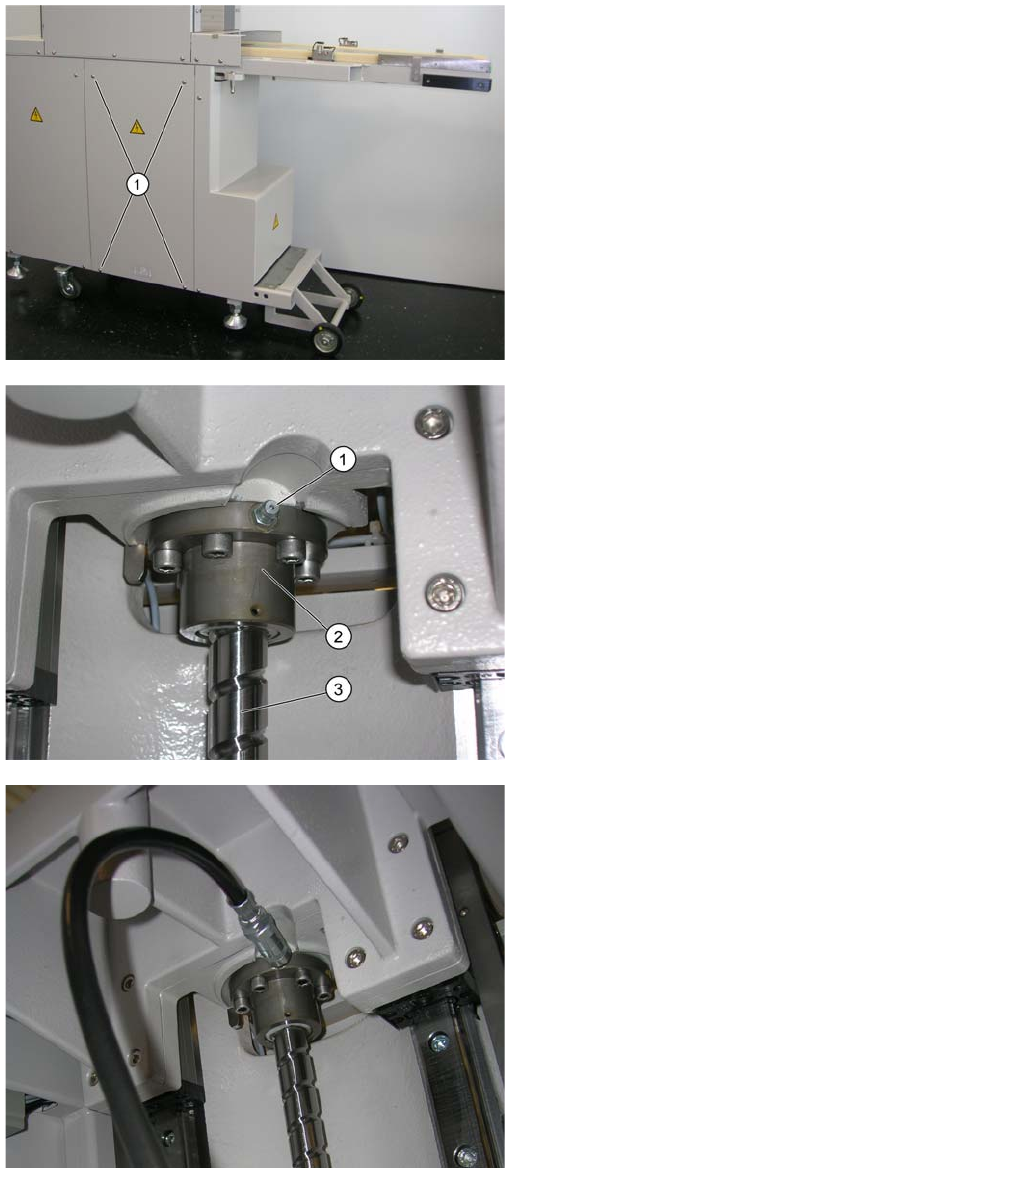
The tower has two linear guidances. Each of these has a lubrication nipple at the top (1). These
lubrication nipples can be reached via the open plexiglass door and the tower (refill position).
► Unscrew the 4 screws to remove the front, right-hand
side cover from the WPC.
You can now access the spindle nut.
1. Lubrication nipple
2. Spindle nut
3. Spindle
► Fit the universal grease gun mouthpiece onto the
lubrication nipple of the spindle nut.
► Pump the grease gun twice.
► Remove the grease gun.
► Use a dry cloth to remove any residual grease from
on and around the lubrication nipple.

Maintenance Manual WPC4, WPC5 and WPC6
Annual Maintenance Cleaning, Greasing and Checking the Feeder Axis Toothed Belt
18 Maintenance Manual SIPLACE WPC4, WPC5 and WPC6
► Refit the front, right-hand side cover onto the WPC.
Cleaning , Greasin g and Che cking the Feeder Axis Too thed Belt
2.4.3 Cleaning, Greasing and Checking the Feeder Axis Toothed Belt
► Activate the placement machine and the WPC.
► Remove all waffle pack trays from the magazine.
► Use the station software to move the empty magazine into the transport position.
The tower is now in the lowermost position.
► Switch the WPC off at the main switch and unplug the WPC from the power supply. This disconnects
the WPC reliably from the electricity.
► Disconnect the WPC data cable from the placement machine.
The toothed belt should now be accessible for cleaning and greasing.
► From behind, lift the grease gun into the WPC tower.
► From above, fit the universal grease gun mouthpiece
onto the lubrication nipple of the right-hand sliding
guidance.
► Pump the grease gun twice.
► From above, fit the universal grease gun mouthpiece
onto the lubrication nipple of the left-hand sliding
guidance.
► Pump the grease gun twice.
► Remove the grease gun.
► Use a dry cloth to remove any residual grease from
on and around the lubrication nipples.
CAUTION
SIPLACE cloth
The spindle and the spindle nut, plus the sliding bearings and the sliding guidances must not
be cleaned with the SIPLACE cloth or with ethanol. This would remove any grease present.
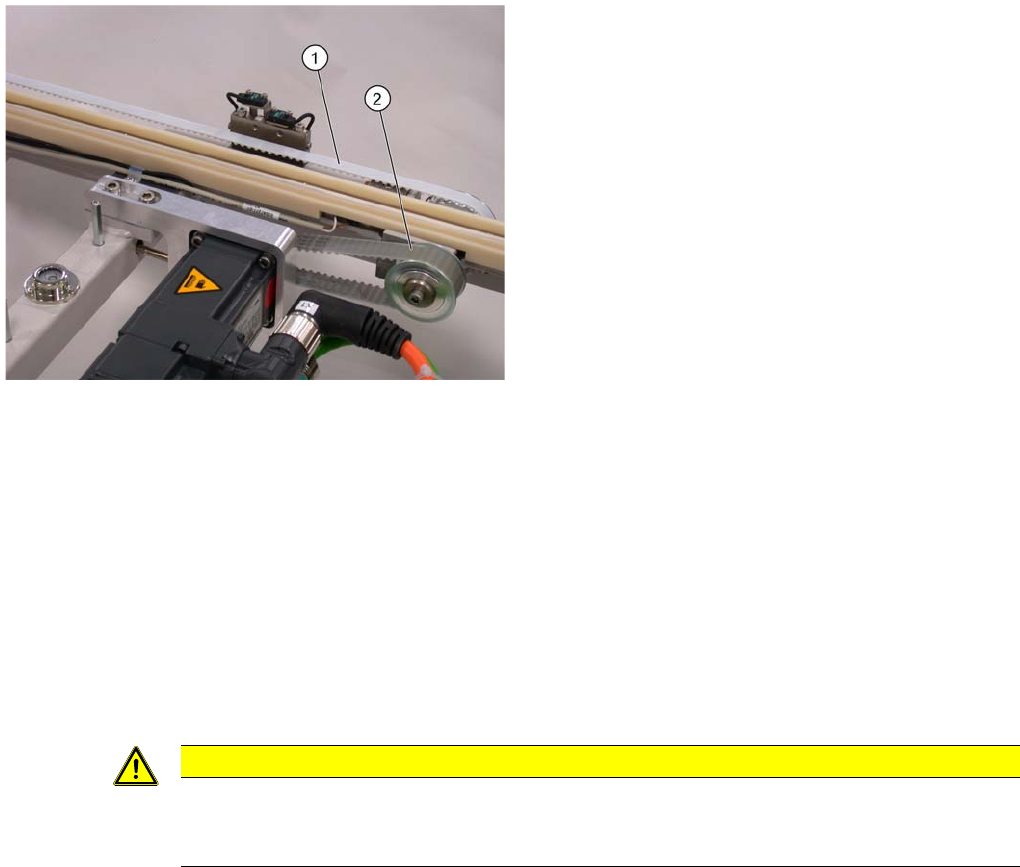
Fig.: Feeder axis from above
► Loosen the 2 screws on the left and right (1) to
remove the bridge cover on the feeder axis.
► Loosen the 6 screws (2) to remove the cover plate on
the feeder axis.
Maintenance Manual WPC4, WPC5 and WPC6
Cleaning, Greasing and Checking the Feeder Axis Toothed Belt Annual Maintenance
Maintenance Manual SIPLACE WPC4, WPC5 and WPC6 19
► Wipe the two toothed belts dry with a lint-free cloth. Move the feeder axis by hand so that you can
reach all parts of the toothed belt.
► Check the toothed belt for damage (cracks, worn teeth, protruding steel wires). If necessary, replace
the damaged toothed belt or contact SIPLACE Service.
► With a short-bristled brush, apply a small amount of grease (ISOFLEX TOPAS NCA 52) to the inside
of the toothed belt (as far as accessible).
► Move the feeder axis back and forth several times by hand. Wipe any residual grease away with a
dry cloth. Grease is usually pressed out at the deflection pulleys and toothed wheels. Remove this.
► Fit the cover plate and bridge cover for the feeder axis again.
Follow the removal instructions in reverse order.
►
1. Toothed belt
2. Drive belt
CAUTION
The feeder axis linear guidances do not need maintenance work.
Do not clean the linear guidances with the SIPLACE cloth or with ethanol. This would remove
the permanent lubrication grease present.