KE2010.Instruction Manual.Ver.2.01,Rev.08.pdf - 第510页
6 − 134 6.7.2 Laser height check 6.7.2.1 Checki ng the laser height Two mode: "Continuous check " and "Sing le check" ar e provided to check t he laser height. See Table below for the f unction provid…
6 − 133
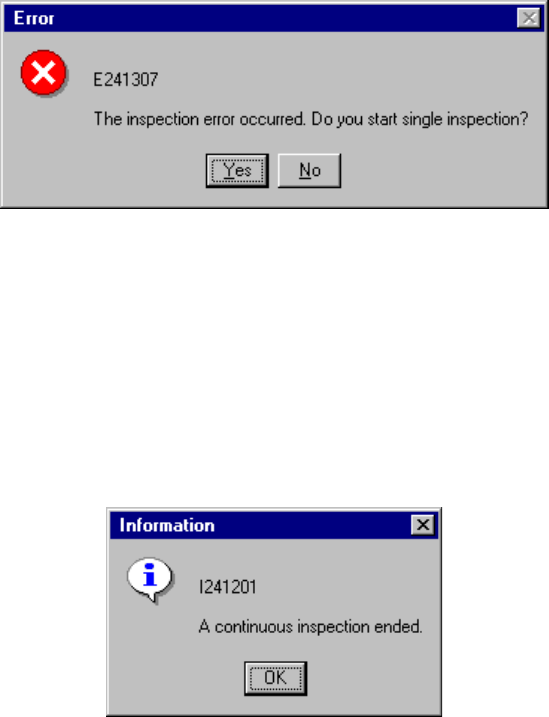
6.7.1.4.4 Continuous inspection error dialog box
If the inspection result indicates “NG”, the following dialog box appears and it
allows you to enter the system to Single Inspection mode.
Figure 6.7.1.4.6 Continuous inspection error dialog box
6.7.1.4.5 End of continuous inspection
When the system finishes checking all components you specified, the following
dialog box appears that notifies you of end of continuous inspection.
Figure 6.7.1.4.7 End of inspection dialog box
6 − 134
6.7.2 Laser height check
6.7.2.1 Checking the laser height
Two mode: "Continuous check" and "Single check" are provided to check the laser
height. See Table below for the function provided in each mode:
Table 6.7.2.1
[Tool] menu Operation mode Description
Single check Checks a component which caused an error in Continuous check
mode individually.
Laser check Continuous check Checks all components or components which satisfy the specified
conditions in a production program. In Single check mode, you can
individually check a component which the system failed to check for
some reason.
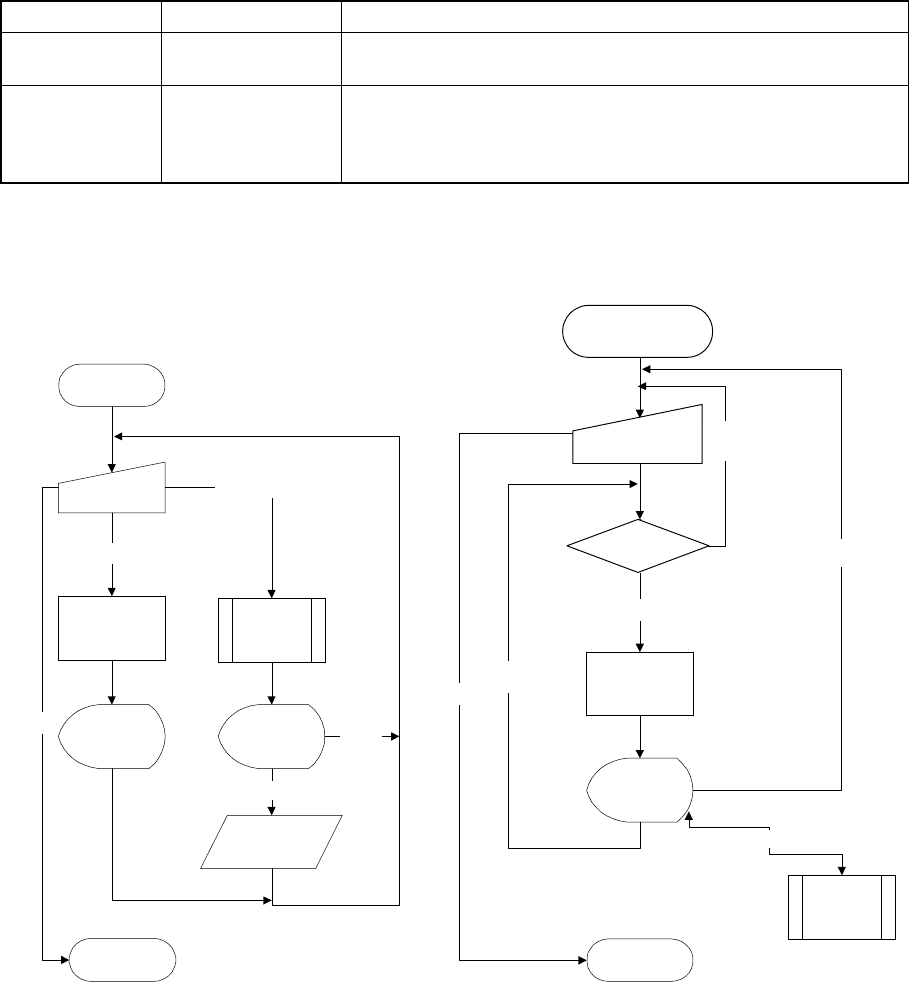
The operation flow for checking laser height is shown below.
レーザー高さ
単独検査開始
検査実行
(ダイアログ)
レーザー高さ
検査
結果表示
(ダイアログ)
レーザー高さ
単独測定終了
検査実行
終了
生産プログ
ラムへ結果
格納
確認
レーザー高さ
測定
レーザー高さ測定実行
結果表示
(ダイアログ)
キャンセル
レーザー高さ
連続測定開始
条件設定
(ダイアログ)
レーザー高さ検査
結果表示
(ダイアログ)
レーザ高さー
連続検査終了
対象部品あり
終了
次部品検査
対象
部品なし
検査対象
部品がある
か?
中止
レーザー高さ
単独検査
検査エラー
Start of laser
height single
check
Check (on the
dialog box)
Measurement of laser height
Execution of check
Check of laser
height
Measurement
of laser
height
Display of the
result (on the
dialog box)
Display of the
result (on the
dialog box)
Cancel
Check
Saving of the
result into a pro-
duction program
End
End of single
laser height
measurement
Figure 6.7.2.1.1 Operation flow for checking
the laser height in Single check mode
Figure 6.7.2.1.2 Operation flow for checking
the laser height in Continuous check mode
Any component
to be checked ?
Start of the continuous
laser height
measurement operation
Setting of the
conditions (on the
dialog box)
No component
satisfying the
conditions
Yes
Check of the
laser height
Display of the
result (on the
dialog box)
Check error
Single check
of the laser
height
Cancel
End
Check of the
next component
End of the
continuous laser
height check

6 − 135
6.7.2.2 Laser height checking method
The system performs the laser centering control operation based on the laser height
set in Component data to check to see if no error occurs. In Single check mode,
you can specify the desired laser height or the laser height obtained after measuring
it to check the laser height.
6.7.2.3 Measuring the laser height
If the system detects an error by checking the laser height, it enters Single check
mode. In Single check mode, you can measure the laser height.
To measure the laser height, the system repeats a check of the laser height under
the conditions described below, and assumes that the laser height which allows it to
center a component with laser is optimum.
Table 6.7.2.3 Conditions for repeating measurement of the laser height
Item Move direction Direction of movement Description
Alternation Start checking the laser height from the current
position to the upper direction, then down direction
alternately.
Up Starts checking the laser height from the current
position to the upper direction only.
1 Present position
Down Starts checking the laser height from the current
position to the down direction only.
2 Pick face of compo.
-> face under compo.
Checks a component from its picked-up side to the
top side continuously based on the component
height.
3 face under compo. ->
Pick face of compo.
Checks a component from its bottom side to the
picked-up side continuously based on the
component height.