JM-10维修调整要领书.pdf - 第110页
维修调整要领书 12-14 4) “ PnP Configuration ”的设置 出现如下所示的画面。在此进行 PCI IRQ 的设置。 按 [shift] + <+><-> 键或 <ENTER> 键可改变设置。 。“ PCI IRQ A :”的变更 请将光标对准“ PCI IRQ A :”设置为“ 5 ”。 。“ PCI IRQ B :”的变更 请将光标对准“ PCI IRQ B : ”设置为“ …
维修调整要领书
12-13
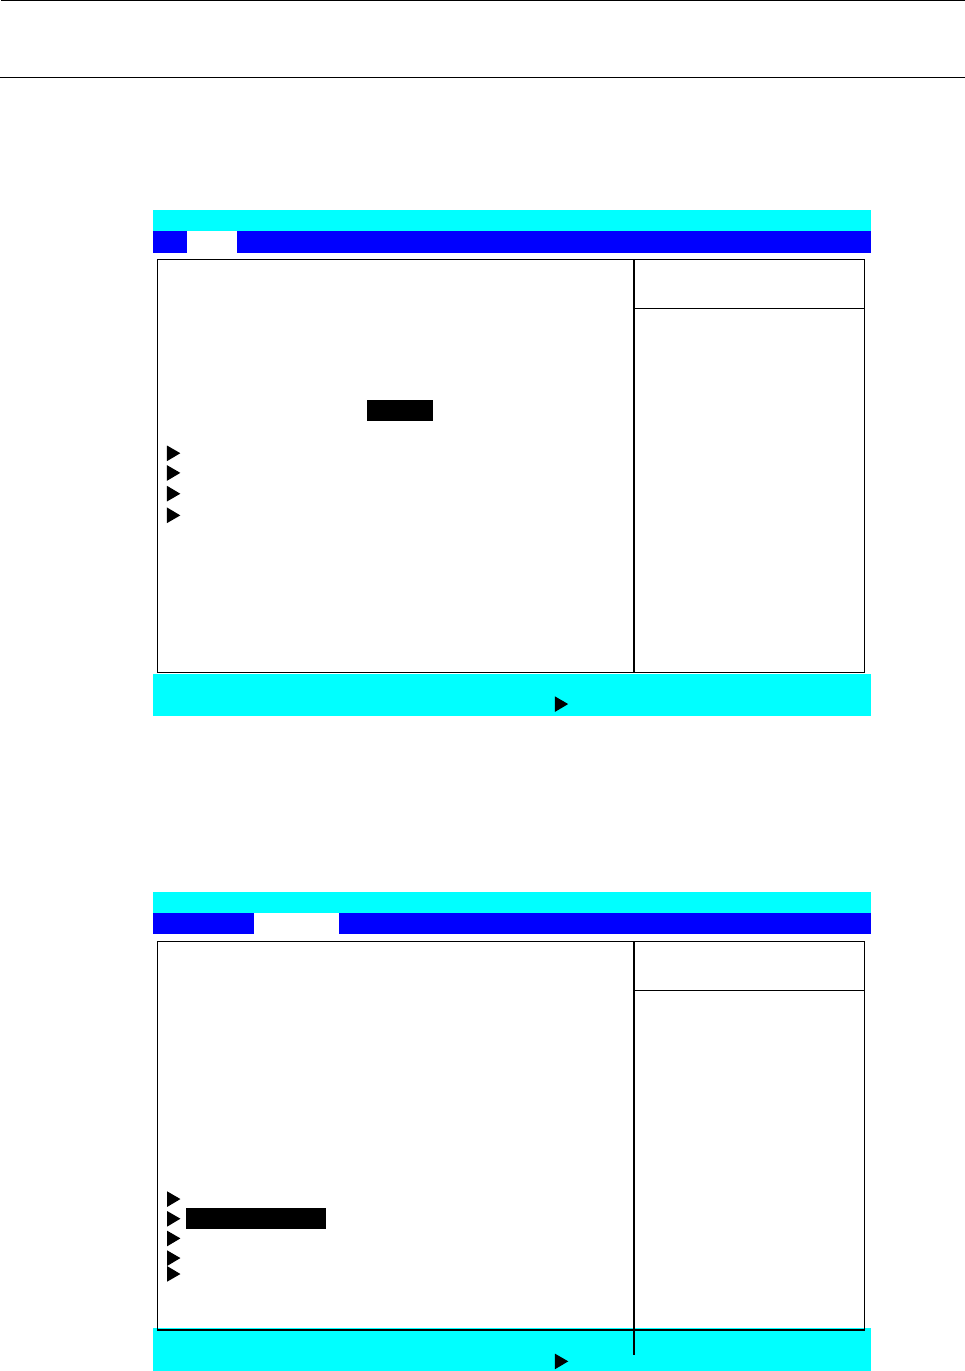
2) 软盘驱动器的设置
请用←→键选择“Main”菜单画面,用↑↓键移动光标(文字颜色反转的部分)对准“Legacy Diskette
A:”按<ENTER>键,选择“Disabled”按<ENTER>键。
3) “PnP Configuration”画面的选择
请用←→键选择“Advanced”菜单画面,用↑↓键移动光标(文字颜色反转的部分)对准“PnP
Configuration”按<ENTER>键。
Phoenix TrustedCore (tm) Setup Utility
Main Advanced Security
Boot
Exit
Item Specific Help
BIOS Version: r1.08
System Time: [11:17:51] <Tab>,<Shift-Tab>, or
System Date: [02/01/2011] <Enter> Selects field.
Legacy Diskette A: [Disabled]
IDE Channel 0 Master [4094MB]
IDE Channel 0 Slave [None]
SATA Port 0 [None]
SATA Port 1 [None]
System Memory 640 KB
Extended Memory 514048 KB
F1 Help ↑↓Select Item -/+ Change Values F9 Setup Defaults
Esc Exit Select Menu Enter
Select Sub
-Menu F10 Save and Exit
Phoenix
TrustedCore (tm)
Setup Utility
Main Advanced Security Boot Exit
Item Specific Help
Reset Configuration Data: [No]
Large Disk Access Mode: [DOS]
Local Bus IDE adapter: [Primary] Select ‘Yes’ if you
Legacy USB Support: [Enabled]
Want to clear the
Summary Screen: [Disabled] Extended System
Boot-time Diagnostic Screen: [Disabled] Configuration
QuickBoot Mode: [Enabled] Data (ESCD) area.
Extended Memory Testing: [Just Zero it]
PXE OPROM: [Disabled]
Keyboard Features
PnP Configuration
CPU Control Sub-Menu
ICH Control Sub-Menu
SIO Control Sub-Menu
F1 Help ↑↓Select Item -/+ Change Values F9 Setup Defaults
Esc Exit Select Menu Enter Select Sub-Menu
F10
Save and Exit

维修调整要领书
12-14
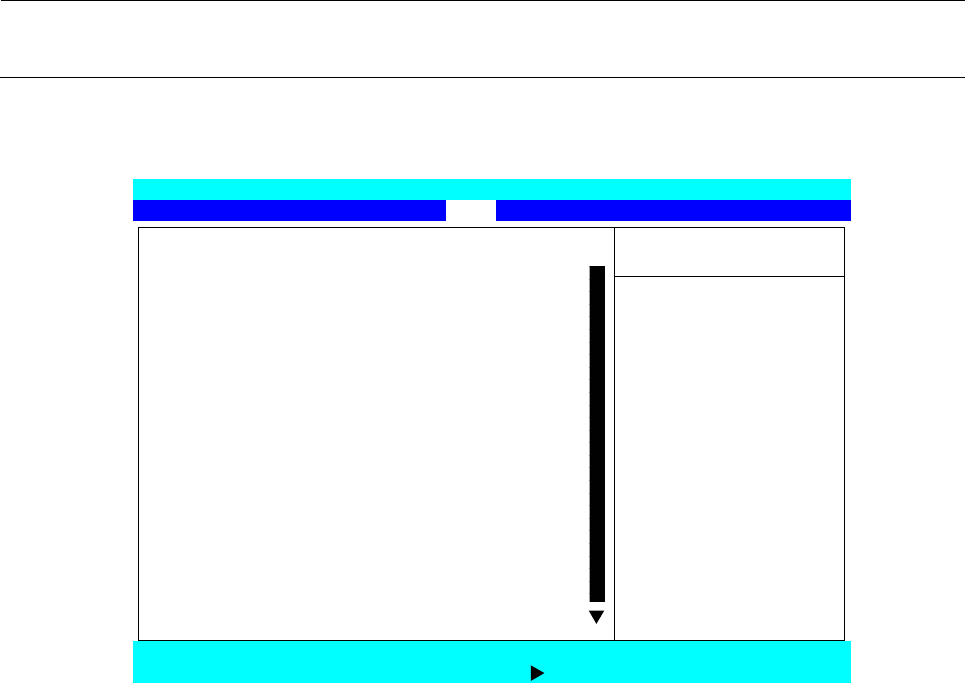
4) “PnP Configuration”的设置
出现如下所示的画面。在此进行 PCI IRQ 的设置。
按[shift] + <+><->键或<ENTER>键可改变设置。
。“PCI IRQ A:”的变更
请将光标对准“
PCI IRQ A
:”设置为“
5
”。
。“PCI IRQ B:”的变更
请将光标对准“
PCI IRQ B:
”设置为“
5
”。
。“PCI IRQ C:”的变更
请将光标对准“
PCI IRQ C:
”设置为“
5
”。
。“PCI IRQ D:”的变更
请将光标对准“
PCI IRQ D:
”设置为“
5
”。
。“PCI IRQ E:”的变更
请将光标对准“
PCI IRQ E:
”设置为“
11
”。
。“PCI IRQ F:”的变更
请将光标对准“
PCI IRQ F:
”设置为“
10
”。
。“PCI IRQ G:”的变更
请将光标对准“
PCI IRQ G:
”设置为“
9
”。
。“PCI IRQ H:”的变更
请将光标对准“
PCI IRQ H:
”设置为“
5
”。
设置结束后,请按<ESC>键,返回到可以选择 Main 画面。
Phoenix TrustedCore (tm) Setup Utility
Advanced
PnP Configuration Item Specific Help
Option ROM Scan: [Enabled] Initialize device
Latency Timer: [Default] expansion ROM
(PMC only)
PCI IRQ A: [5]
PCI IRQ B: [5]
PCI IRQ C: [5]
PCI IRQ D: [5]
PCI IRQ E: [11]
PCI IRQ F: [10]
PCI IRQ G: [9]
PCI IRQ H: [5]
F1 Help ↑↓Select Item -/+ Change Values F9 Setup Defaults
Esc Exit Select Menu Enter Select Sub-Menu F10 Save and Exit
维修调整要领书
12-15
5) BOOT 识别順序的设置
请用←→键选择“Boot”菜单画面,参照操作方法将“Boot priority”设置为下图所示的顺序。
。“Boot”菜单画面的操作方法
(1) 怎样变更“Boot priority”内的順序
① 用↑↓键将光标对准要移动的项目。
② 可用[shift] + <+><->键使之上下移动。
(2) 怎样从“Excluded from boot order:”移动到“Boot priority”
① 用↑↓键将光标对准要移动的项目。
② 可用<X>键移动到“Boot priority”。
※ 从“Boot priority”移动到“Excluded from boot order:”的操作方法也相同。
Phoenix TrustedCore (tm) Setup Utility
Main Advanced Security Boot Exit
Item Specific Help
Boot priority
1: USB FDC:
2: USB CDROM: Keys used to view or
3: IDE CD: configure devices:
4: UDE HDD: MS9732FMD040AY-(PM) Un and Down arrows
5: PCI SCSI: select a device.
6: USB KEY: <+> and <-> moves
7: the device up or down.
8: <f> and <r> specifies
Excluded from boot order: the device fixed or
: Legacy Floppy Drives removable.
: USB HDD: <x> exclude or include
: USB ZIP: the device to boot.
: USB LS120: <Shift + 1> enables or
: PCI BEV: disables a device.
: Other USB: <1-4> Loads default
: PCI boot sequence.
F1 Help ↑↓Select Item -/+ Change Values F9 Setup Defaults
Esc Exit
Select Menu Enter Select Sub-Menu F10
Save and Exit